Overview
My team and I were tasked to morph an existing Desktop application called AddressBook3 for our Software Engineering Team Project (Module Code: CS2103T). Our team has chosen to morph the application into an Expiry Date Tracker named Xpire that targets students living in residences and halls. Our application allows users to track expiry dates of items and be reminded when they are about to expire. Examples of items that can be tracked include perishable items such as Milk, Bread, Fruits or even non-perishable items such as Medicine and Passwords. Additionally, there is also a ReplenishList where users can track what items they need to replenish after it expires or has been used up.
Xpire Interface
Currently, this is what our project, Xpire, looks like in v1.4:

Formatting and Terms used in this Project Portfolio
undo - This grey highlight represents a class, a variable or method that exists in the codebase. It can also represent a command that has to be entered into the application.
Xpire - This refers to the main list in the application and not the entire application. The Xpire application will be simply referred to as 'the application'.
ReplenishList - This refers to the replenish list in the application.
current view - This refers to the current list that the user is viewing (either the main list (Xpire) or the replenish list (ReplenishList)).
Lightbulb icon - Refers to a tip that developers/users can follow.
Info icon - Refers to an important note that developers/users need to know.
Summary of contributions
This section details the contributions I have made to the team as well as any documentation or code I have written. |
-
My code on RepoSense: [RepoSense]
-
Major enhancement: added the ability to undo/redo previous commands
-
What it does: allows the user to undo previous commands or redo commands that have been entered earlier.
-
Justification: This feature enhances the application by introducing Error Prevention as the user may accidentally key in a command wrongly and may want a convenient way of undoing that particular command. The redo command also provides convenience as it allows users to go back and forth in history to see the changes.
-
Highlights: This feature must work with existing commands as well as future commands and also not slow down the application. A proper brainstorming of design choices must be made as the undo/redo mechanism will affect most commands and the current status of the application. The implementation was challenging as there are two lists that the application contains which is
XpireandReplenishListand there is a need to find a way to archive the data in order to support undoing of commands.
Also, efficiency and memory usage is a concern as we do not want to store too many archival data which may slow down the application, thus only items or views that have been changed should be noted by the mechanism and not create duplicates. -
Code contributed for this enhancement: (Pull requests #138, #181)
-
-
Major enhancement: added a tagging command that allows users to tag items in the application
-
What it does: allows the user to tag items so that they are able to search it up or group items together easily.
-
Justification: This feature improves the application by allowing users the freedom to categorise their items and organise them properly. This is important as the application may contain many items at any time and there should be a convenient way of organising them into separate groups.
-
Highlights: This enhancement works well with the two existing lists,
XpireandReplenishList. Some thought must be given to parsing and storing tags in items as our team has decided on a limit of the amount of tags each item can have as well as a limit on how long the tag should be. The implementation was difficult when trying to apply defensive programmming as we do not want tags to be accidentally deleted away or have been duplicated.
Furthermore, tag must support deletion and stackable commands as our application so that the user can add or delete tags easily in the current view. -
Code contributed for this enhancement: (Pull request #17)
-
-
Minor enhancement: created a history manager which stores commands and user input for feedback as well as for use in retrieving previous user inputs.
-
Code contributed for this enhancement: (Pull request #197)
-
-
Minor enhancement: implemented a show all tags function that allows users to see all the tags that are present in the current view.
-
Code contributed for this enhancement: (Pull request #83)
-
-
Other contributions:
-
Testing:
-
Project management:
-
Assign issues related to bugs and tests to other team members.
-
Managed releases
v1.2-v1.4(3 releases) on GitHub
-
-
Documentation/User Study:
-
Update DG for user stories, value proposition and target user profile. Helped to do up user persona.
-
Code contributed: (Pull request #31)
-
-
-
Debugging:
-
Fixed issues from dry-run PE as well as other bugs such as unchecked type casting of objects.
-
Code contributed: (Pull request #180)
-
-
-
Enhancements to existing work/features:
-
Helped to refactor and integrate the new Model API so that it is easier for developers in the future to use.
-
Code contributed: (Pull request #194)
-
-
-
Contributions to the User Guide
Given below are sections I contributed to the User Guide. They showcase my ability to write documentation targeting end-users. |
Deleting certain tags from an item
If you would like to delete tag(s) from a particular item, use the delete command in the format:
Format: delete|<index>|<tag>[<other tags>]…
Examples:
-
view|main
delete|3|#Fruit #Food
Deletes the tags#Fruitand#Foodfrom the 3rd item in the main list.
Deleting certain tags from an item
Deletes tag(s) from the specified item.
Format: delete|<index>|<tag>[<other tags>]…
Examples:
-
view|main
delete|3|#Fruit #Food
Deletes the tags#Fruitand#Foodfrom the 3rd item in the main list.
Tagging an item : tag
Display all tags created
Shows all the tags in the current list view.
Format: tag
Like help and export, this command is not undoable.This command does not show tags of items that are not on the current list on the screen. If you would like to view all the tags in the main list or the replenish list, simply key in view, followed by tag!
|
Add new tag(s) to an item

Tags an item from the list according to your own input
Format: tag|<index>|<tag>[<other tags>]…
| You can tag a particular item with more than 2 tags or more at a time. Just be mindful of the 5 tags per item limit! |
Examples:
-
view|main
tag|2|#Nestle #Caffeine
Tags the 2nd item in the main list with#Nestleand#Caffeine. ==== Tagging an item :tag
Display all tags created
Shows all the tags in the current list view.
Format: tag
Like help and export, this command is not undoable.This command does not show tags of items that are not on the current list on the screen. If you would like to view all the tags in the main list or the replenish list, simply key in view, followed by tag!
|
Add new tag(s) to an item

Tags an item from the list according to your own input
Format: tag|<index>|<tag>[<other tags>]…
| You can tag a particular item with more than 2 tags or more at a time. Just be mindful of the 5 tags per item limit! |
Examples:
-
view|main
tag|2|#Nestle #Caffeine
Tags the 2nd item in the main list with#Nestleand#Caffeine. ==== Tagging an item :tag
Display all tags created
Shows all the tags in the current list view.
Format: tag
Like help and export, this command is not undoable.This command does not show tags of items that are not on the list you are viewing. If you want to view all the tags in the main list or replenish list, simply key in view, followed by tag.
|
Add new tag(s) to an item

| An item can have up to 5 tags. |
Tags an item from the list according to user input
Format: tag|<index>|<tag>[<other tags>]…
Examples:
-
view|main
tag|2|#Nestle #Caffeine
Tags the 2nd item in the main list with#Nestleand#Caffeine.
Undo previous command : undo
Undo the previous command that you have entered in.
Format: undo
undo only works on commands that alter your items or the current view!Thus, commands such as help and export are not undoable as they do not alter items or the current view.Also, undo only works for the last 10 commands. Therefore, make sure you are certain before you type in a command!
|
The undo command also tells you the exact user input you have keyed in as well as what command was entered so that you know what you have undone.
Redo an earlier command : redo
Redo an earlier command that you have entered in.
Format: redo
This command works in the opposite way as undo, it will redo any command that you have undone in the past.
Keying in a new command other than redo will erase the earlier command that you have undid. Thus, doing so will not allow you to redo that command again.
|
Contributions to the Developer Guide
Given below are sections I contributed to the Developer Guide. They showcase my ability to write technical documentation and the technical depth of my contributions to the project. |
Undo/Redo feature
Implementation
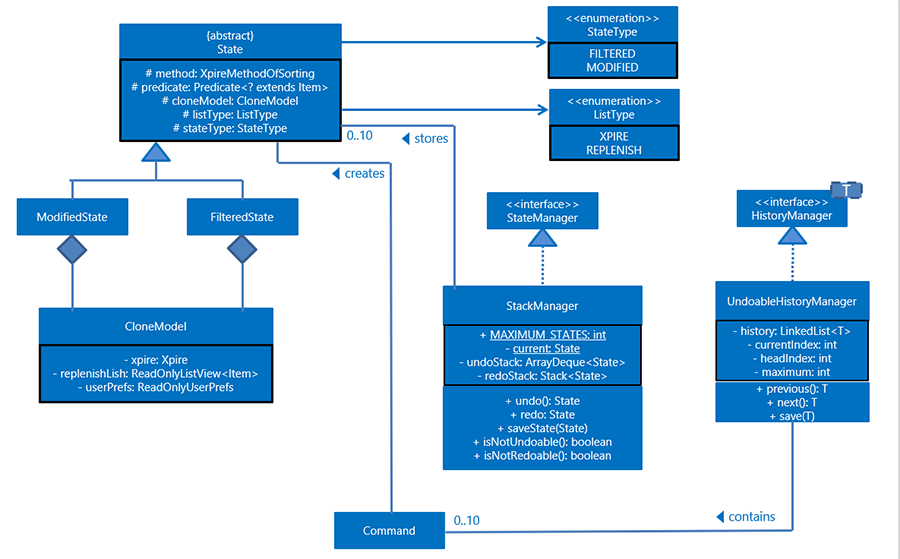
The undo/redo mechanism is facilitated by 4 different components: CloneModel, State, StackManager, and UndoableHistoryManager.
A CloneModel is a cloned version of the Model class and contains UserPrefs and the items in Xpire and ReplenishList.
A State represents the status of the application at that point in history and contains the corresponding CloneModel, an enum ListType which is the current view of the application, a XpireMethodOfSorting which determines how the items in Xpire are sorted, as well as a predicate that filters items in the current view.
The undo/redo mechanism is also supported by a StackManager which stores internally all the states and
decides when to pop or clear, depending on the command.
There are two stacks that are stored in StackManager internally, the UndoStack and the RedoStack.
The UndoStack is a ArrayDeque class, a double-ended queue which can simulate as a stack whilst the RedoStack is of the Stack class. Both classes are imported from java.util.
These stacks are initialised and cleared upon the beginning and ending of every session of the application.
| Currently, the undo/redo mechanism only supports up to 10 previous commands. This is enforced in order to save memory by not storing too many states in one session which may slow down the application. |
As the UndoStack can only contain a maximum of 10 states, the UndoStack has to drop the first state from the front if there are already 10 states stored, thus influencing the design of the two stacks.
Therefore, an double-ended queue was used to replicate a Stack as it supports O(1) deleting operations from the front.
The UndoableHistoryManager is a generic class that stores inputs as well as Commands so that Undo/Redo commands are able to feedback to the user what commands have been undone or redid.
At every command (besides undo/redo/help/exit/export/tag (show), the state is stored internally.
When an undo command is executed, it will pop the previous state and update the model via update.
The state that was undid will then be pushed into the RedoStack, should the user types in a redo command.
Given below is an example usage scenario and how the undo/redo mechanism behaves at each step.
Step 1. The user launches the application for the first time. The two internal stacks in StackManager will be initialised. Both stacks should be empty as there are no previous commands by the user. The current state is s0, the initial state of the application.
Step 2. The user executes delete|5 command to delete the 5th item in Xpire. The delete will then save the previous state, s0, by pushing it into the Undo Stack. The current state will be the new state s1 that has the 5th item in Xpire deleted.

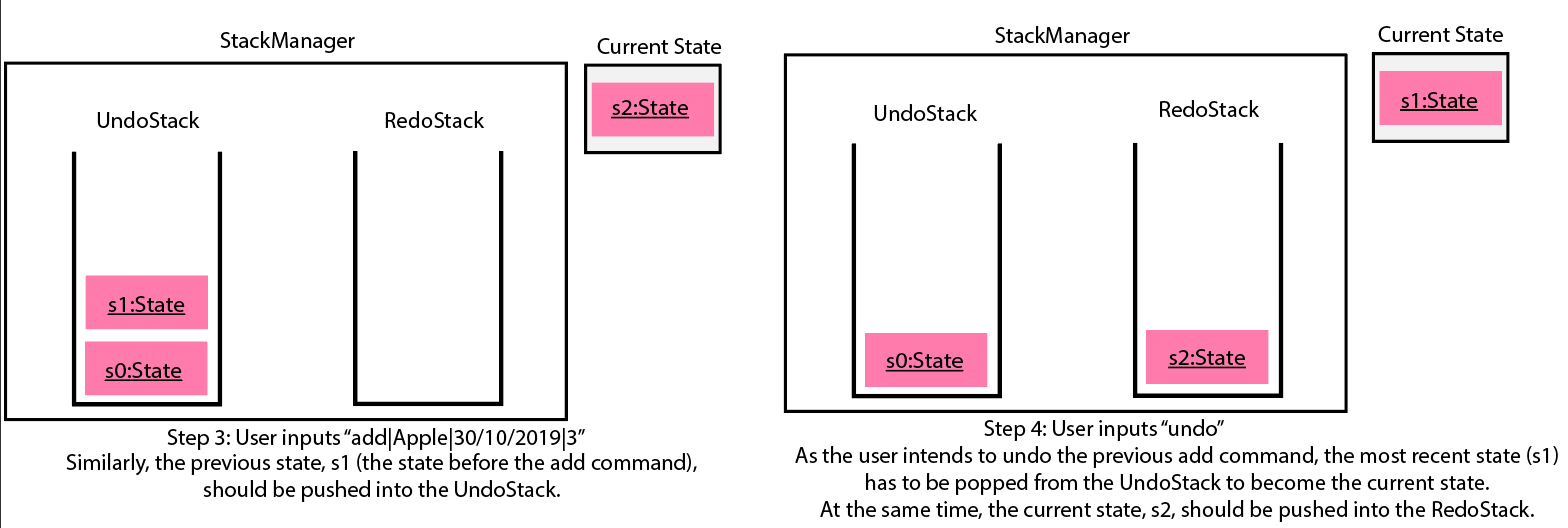
Step 3. The user executes add|Apple|30/10/2019|3 to add a new item. Similar to Step 2, The AddCommand will then save the previous state, s1, by pushing it into the UndoStack. The current state will be the new state s2 with the item Apple added.
| If a command fails its execution, it will not save the previous state, thus the state will not be pushed into the UndoStack. |
Step 4. The user now decides that adding the Apple item earlier on was a mistake, and decides to undo that action by executing the undo command. The undo command will then update the current model with the model in the previous state.
Internally within StackManager, the most recent state, s1, will be popped from the UndoStack to become the current state. At the same time, s2, the new state with the added item, will be pushed into the RedoStack.
| If there are no commands to undo (e.g. at the start of a new Xpire session), undo will return an Error to the user instead. This is done by checking whether the UndoStack is empty. |
The following sequence diagram shows how the undo operation works:

The redo command does the opposite — It will pop the latest state from the Redo Stack and set it as the current state whilst pushing the current state into the UndoStack.
Similarly, if there are no commands to redo, redo will return an Error to the user. This is done by checking if the RedoStack is empty.
|
From Step 4, there are 3 scenarios which showcases the behaviour of StackManager after an Undo command has been executed.
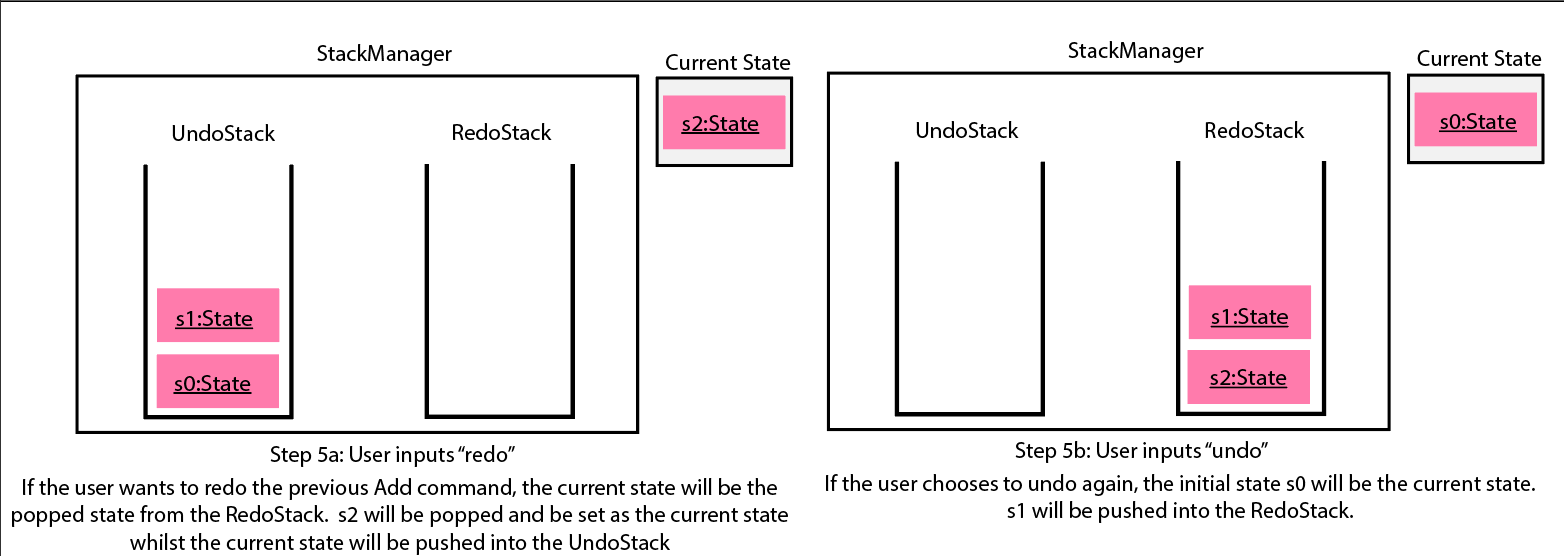
Step 5a. The user suddenly decides that he should not have undid the previous Add command, thus he wants to redo the action. This is done by inputting 'redo' in Xpire.
Within StackManager, the current state will be the popped state, s2, from the RedoStack. The current state, s1, will then be pushed back into the UndoStack. The current states and their locations should be the same as after the execution of the AddCommand in Step 3.
Step 5b. The user decides to further undo his actions, which now includes the first DeleteCommand. The initial state, s0, will then be popped from the UndoStack and set as the current state. The current state, s1, will then be pushed into the RedoStack.
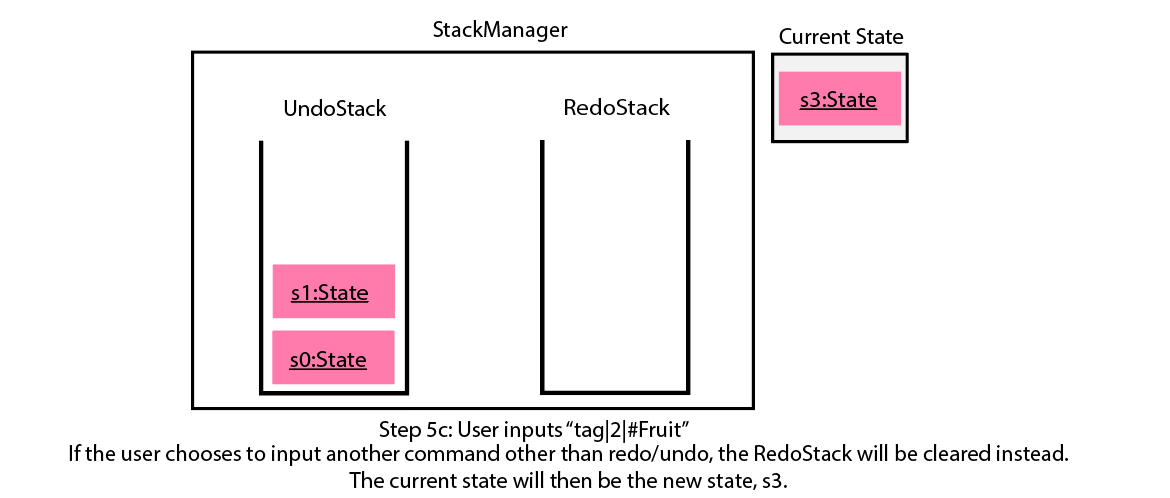
Step 5c. The user may also decide to execute some other command (which is the most likely scenario) other than Undo/Redo. For instance, the user inputs tag|2|#Fruit.
When this happens, the existing states in the RedoStack will be cleared. The state s1, will then be pushed into the UndoStack whilst the current state will be the new state s3 that includes the new TagCommand.
Not all commands will save states to StackManager. exit and help commands will not save states. UndoCommand and RedoCommand should only act on commands that update items or change the view of the list of items to the user.
|
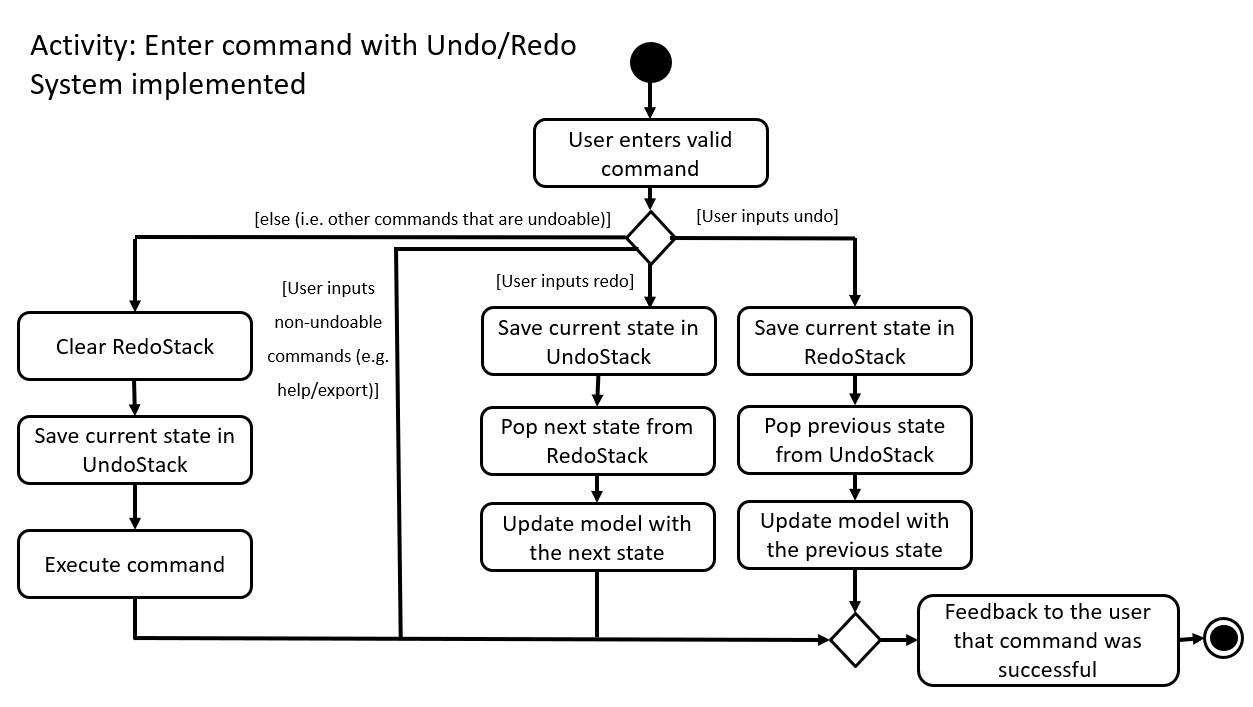
The following activity diagram summarises what happens when a user executes a new command:
Design Considerations
There are two classes that inherit from the abstract class State which are FilteredState and ModifiedState.
The states that are stored at each valid and undoable command depends on the type of command itself as FilteredState only copies over the predicate and method of sorting but not the backend Xpire or ReplenishList data. Thus, commands that do not alter items such as SortCommand and CheckCommand commands instantiate a FilteredState.
On the other hand, ModifiedState is created with commands that alters the item of the data, thus new Xpire and ReplenishList objects will be stored within the state. Commands that instantiate a ModifiedState include AddCommand, TagCommand and DeleteCommand.
The following class diagram shows the entirety of the undo/redo mechanism and its associations.
Aspect: How undo & redo executes
-
Option 1 (current choice): Saves and clones the entire model.
-
Pros: Easy to implement.
-
Cons: May have performance issues in terms of memory usage, need to have a limit for the amount of states that we can save.
-
-
Option 2: Individual command knows how to undo/redo by itself.
-
Pros: Will use less memory (e.g. for
DeleteCommand, just save the item being deleted and apply the corresponding reverse command which is andAddCommand). -
Cons: Ensure that the implementation of each individual command are correct.
Hard to do when applying stackableSearchCommandandSortCommandas thepredicateand XpireMethodOfSorting needs to be updated properly.
-
Aspect: Data structure to support the undo/redo commands
-
Optional 1 (current choice): Use a stack to store the different commands and states.
-
Pros: Easy for new Computer Science student undergraduates to understand, who are likely to be the new incoming developers of our project.
-
Cons: Logic is duplicated twice. For example, when a new command is executed, we must remember to update the filtered list shown to the user and the backend
Xpire/ReplenishListdata.
-
-
Optional 2: Use
HistoryManagerfor undo/redo that stores previous versions of Item/XpireItem-
Pros: We do not need to maintain a separate list, and just reuse what is already in the codebase.
-
Cons: Requires
Item/XpireItemto have a history of its edits. Violates Single Responsibility Principle and Separation of Concerns as eachItemnow needs to do two different things which is to store data and know its previous edited versions.
-
Tag Feature
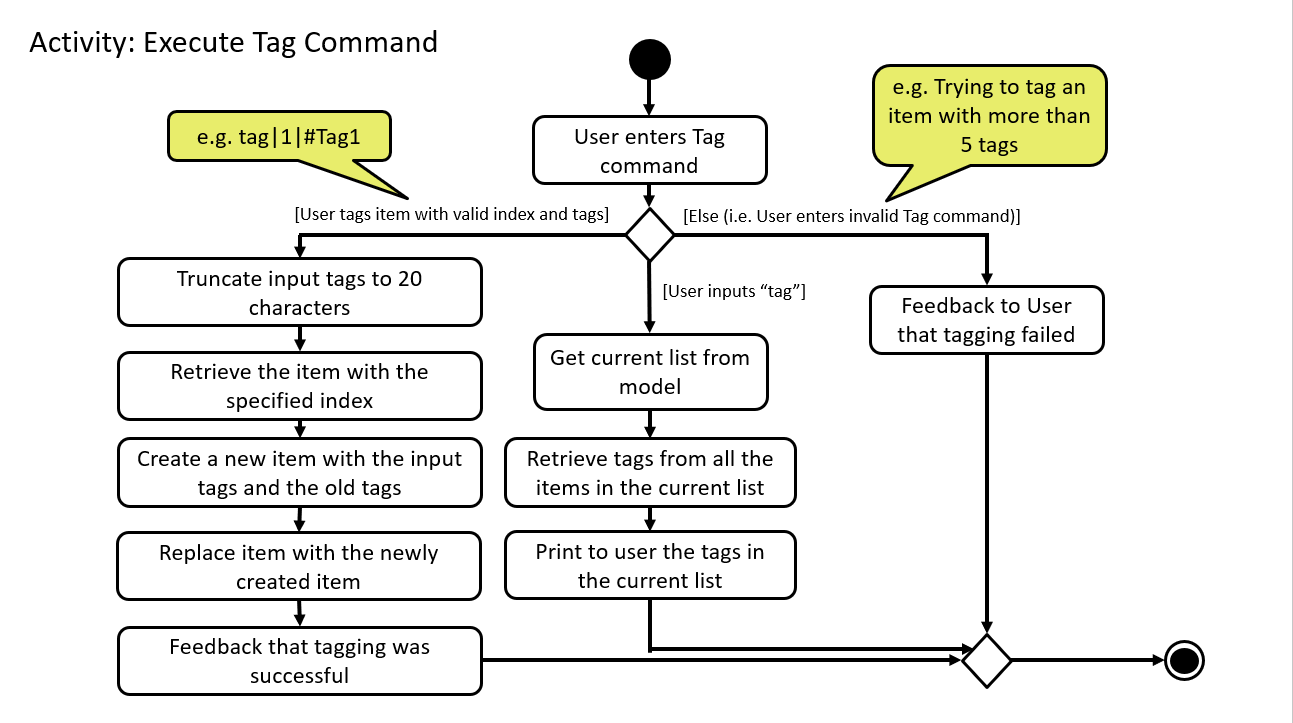
This feature allows users to tag specific items in the list. Items can only have a maximum of 5 tags and all tags are parsed in Sentence-Case and must not be more than 20 characters long each. If the user enters tag, all the tags in the current list view will be collected and displayed to the user.
Implementation
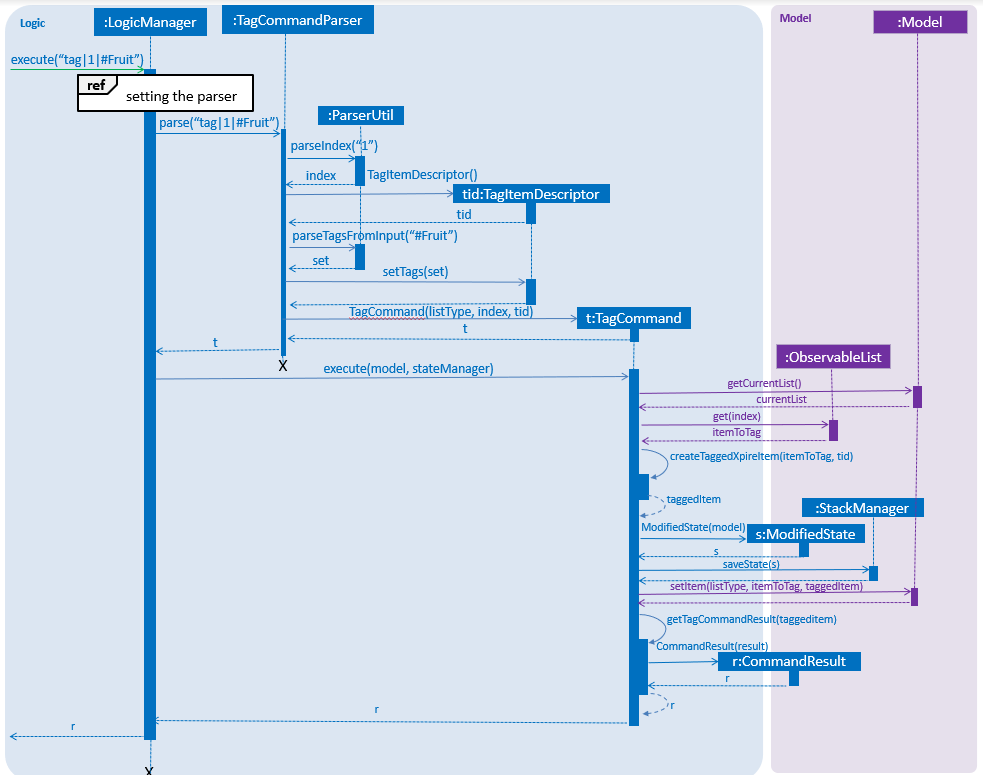
Below are diagrams of what happens when a user keys in a Tag Command in Xpire as current list.
