By: TeamXpire Since: Sep 2019 Licence: MIT
- 1. Introduction
- 2. Quick Start
- 3. Graphic User Interface
- 4. Features
- 4.1. Common features
- 4.1.1. Opening the help window:
help - 4.1.2. Viewing all items :
view - 4.1.3. Tagging an item :
tag - 4.1.4. Deleting an item or its tags:
delete - 4.1.5. Searching for item(s) by name and/or tag:
search - 4.1.6. Shifting an item from one list to another:
shift - 4.1.7. Tagging an item :
tag - 4.1.8. Deleting variable(s):
delete - 4.1.9. Clearing all entries :
clear - 4.1.10. Undo previous command :
undo - 4.1.11. Redo an earlier command :
redo - 4.1.12. Exporting data (multi-platform) :
export - 4.1.13. Exiting the application :
exit - 4.1.14. Saving the data
- 4.1.1. Opening the help window:
- 4.2. Main tracking list features only
- 4.3. Upcoming features (coming in v2.0)
- 4.1. Common features
- 5. FAQ
- 6. Command Summary
- 7. Command Shorthands
1. Introduction
Xpire is for those who prefer to use a desktop app for tracking expiry dates of items. More importantly, Xpire is optimised for those who prefer to work with a Command Line Interface (CLI) while still having the benefits of a Graphical User Interface (GUI). If you have trouble tracking your items' expiry dates, Xpire can help you manage and notify you of items that are soon-expiring. Interested? Jump to the Section 2, “Quick Start” to get started!
2. Quick Start
-
Ensure you have Java
11or above installed in your Computer. -
Download the latest
xpire.jarhere. -
Copy the file to the folder you want to use as the home folder for Xpire.
-
In the home folder for Xpire, launch the jar file using the
java -jar xpire.jarcommand on Terminal (for macOs) or Command Prompt (for Windows) to start the app. The GUI should appear in a few seconds.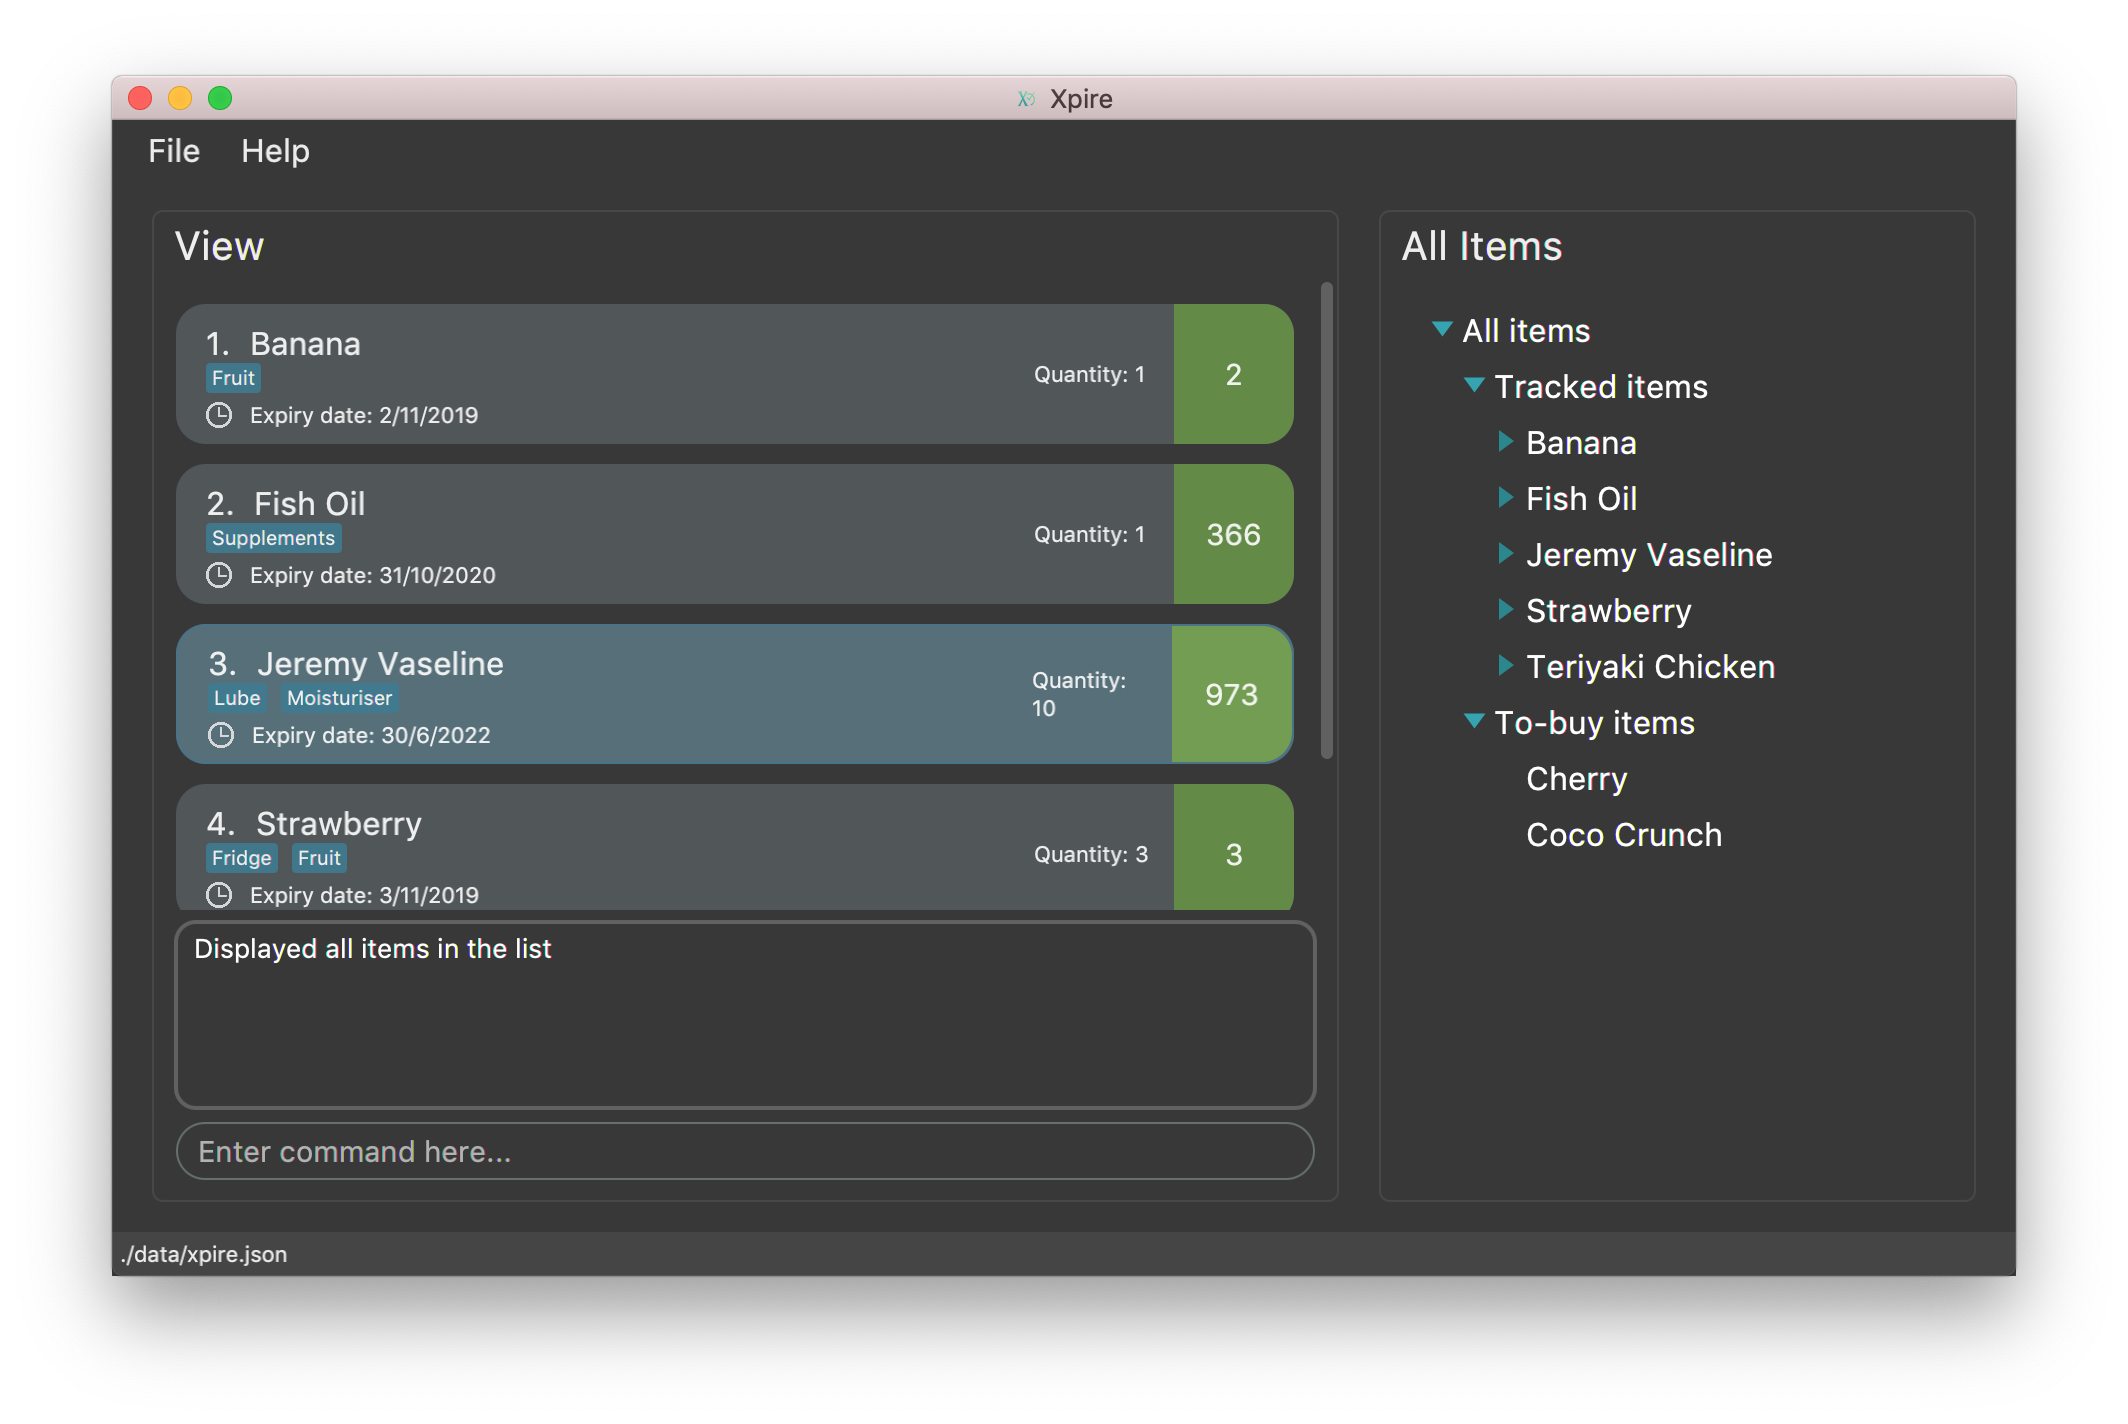
-
Type the command in the command box and press Enter to execute it.
e.g. typinghelpand pressing Enter will open the help window. -
Some example commands you can try:
-
view|main: views all items in the main list -
check|20: views items that are going to expire within 20 days -
add|Banana|25/9/2020: adds an item namedBananawith expiry date25/9/2020to list -
delete|3: deletes the 3rd item shown in the current list -
exit: exits the app
-
-
Xpire not only has a list to track you perishable items, but also a to-buy list (replenish list). The to-buy list is to help you keep track of the things you want to replenish. You can move your items from the tracking list to the replenish list once they are consumed or expired.
-
shift|1: moves the 1st item from the tracking list (main list) to the replenish list
-
-
Some commands are only applicable for items in the tracking list. Refer to Section 4, “Features” for details of each command.
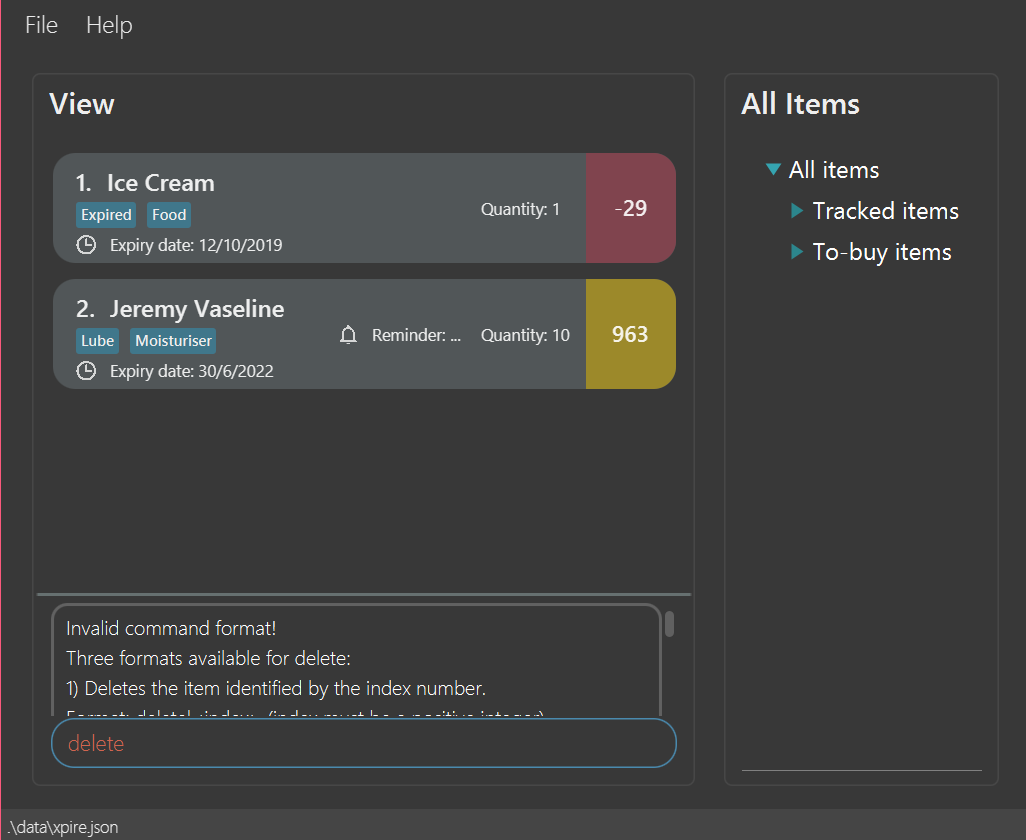
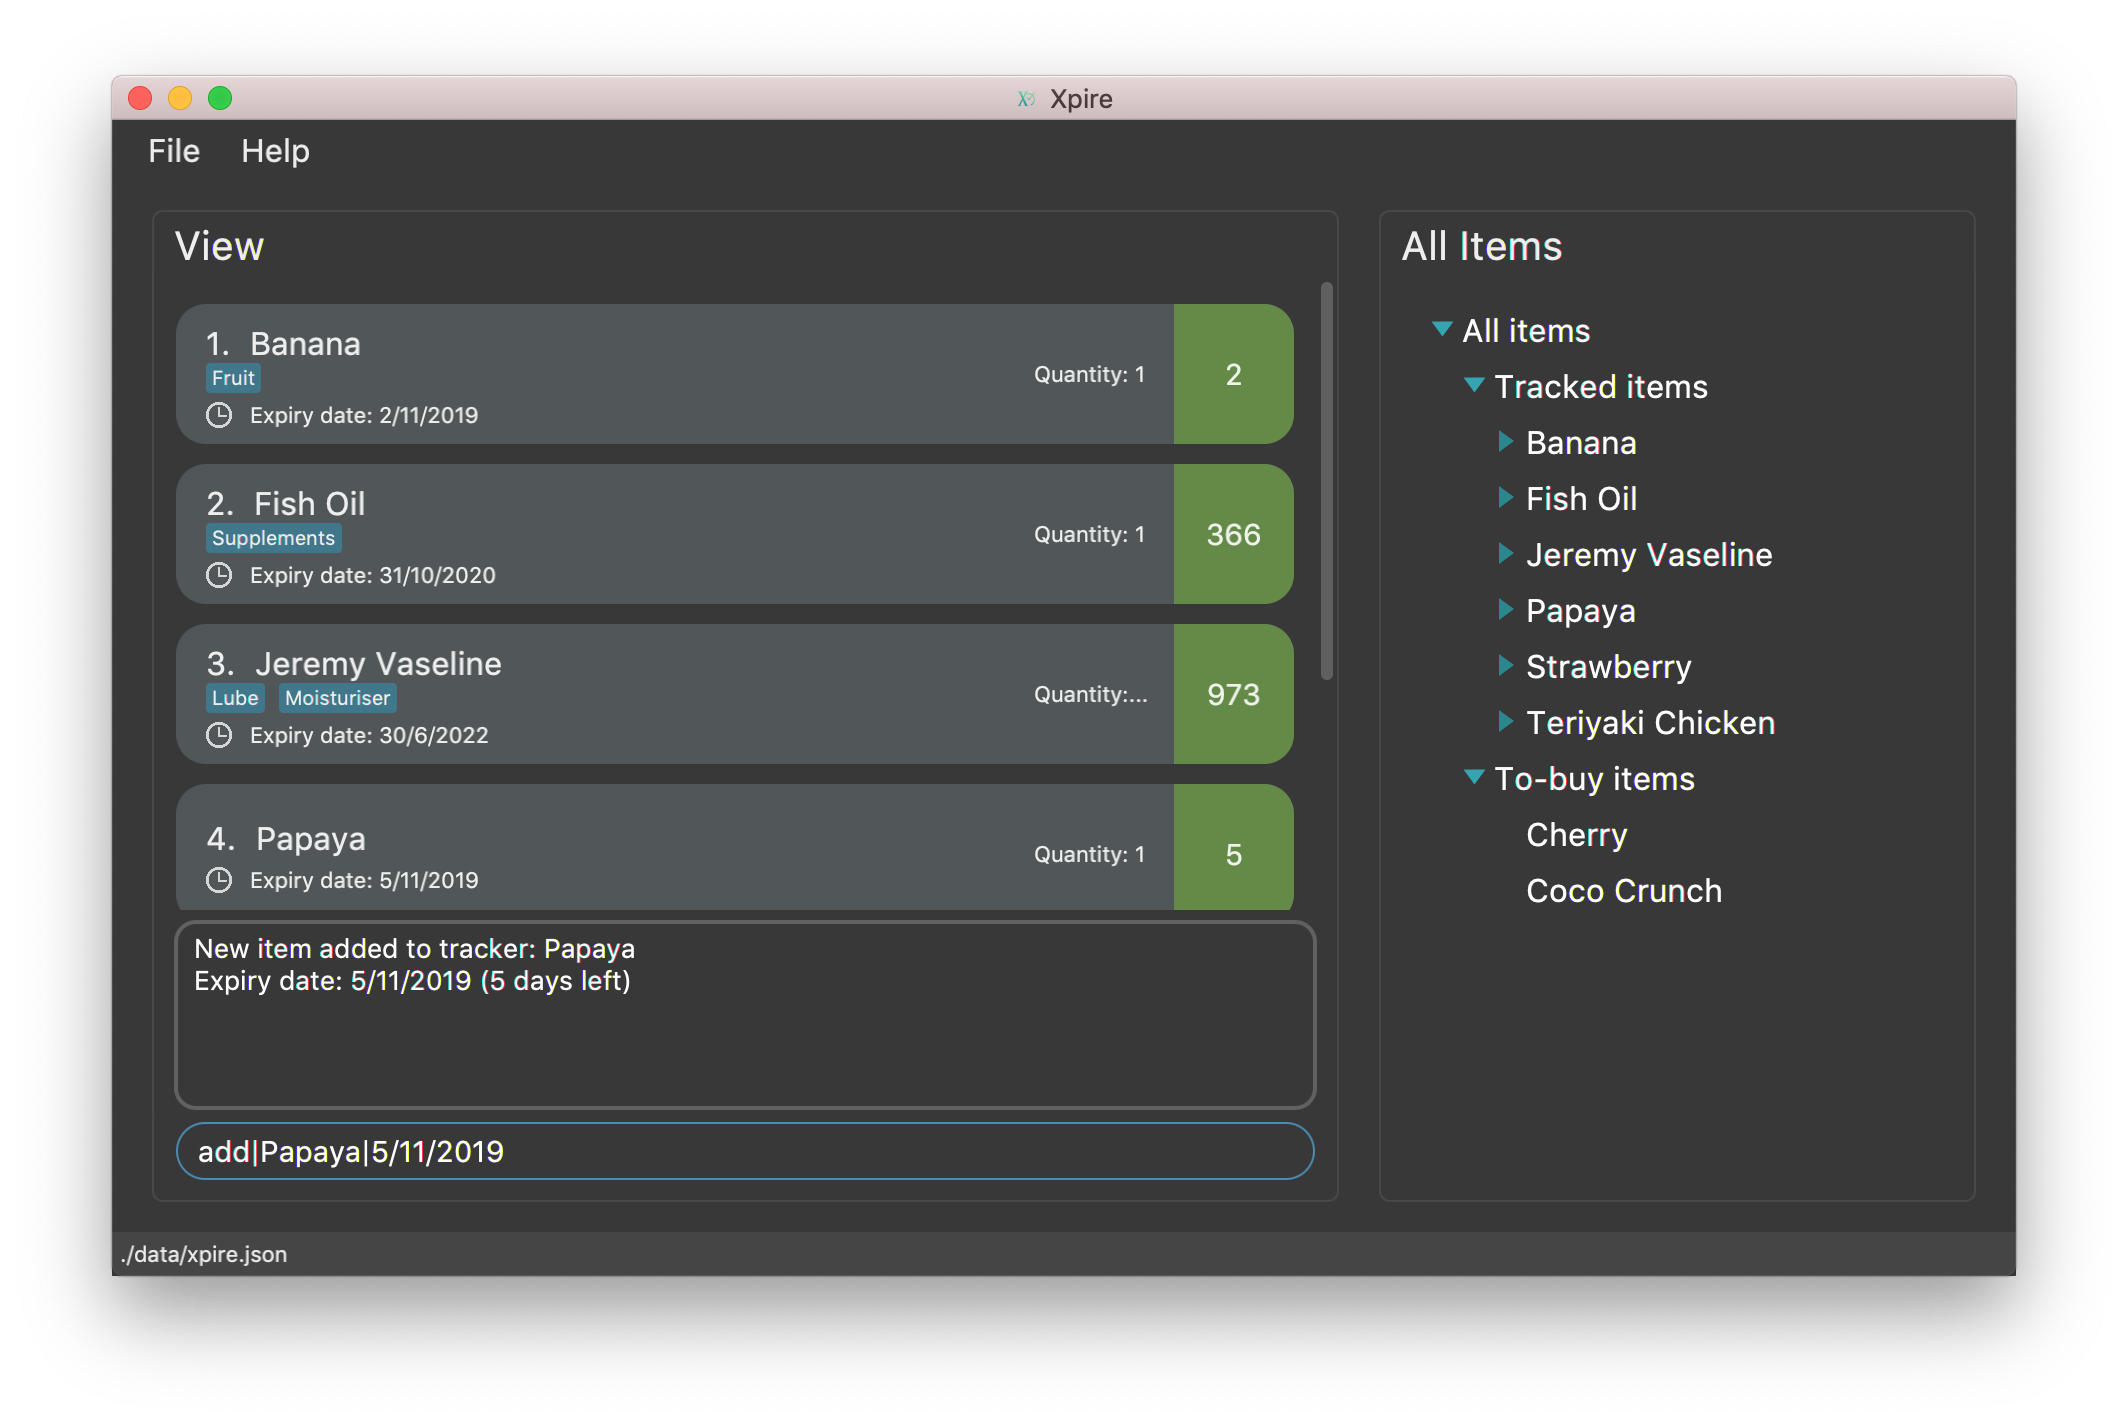
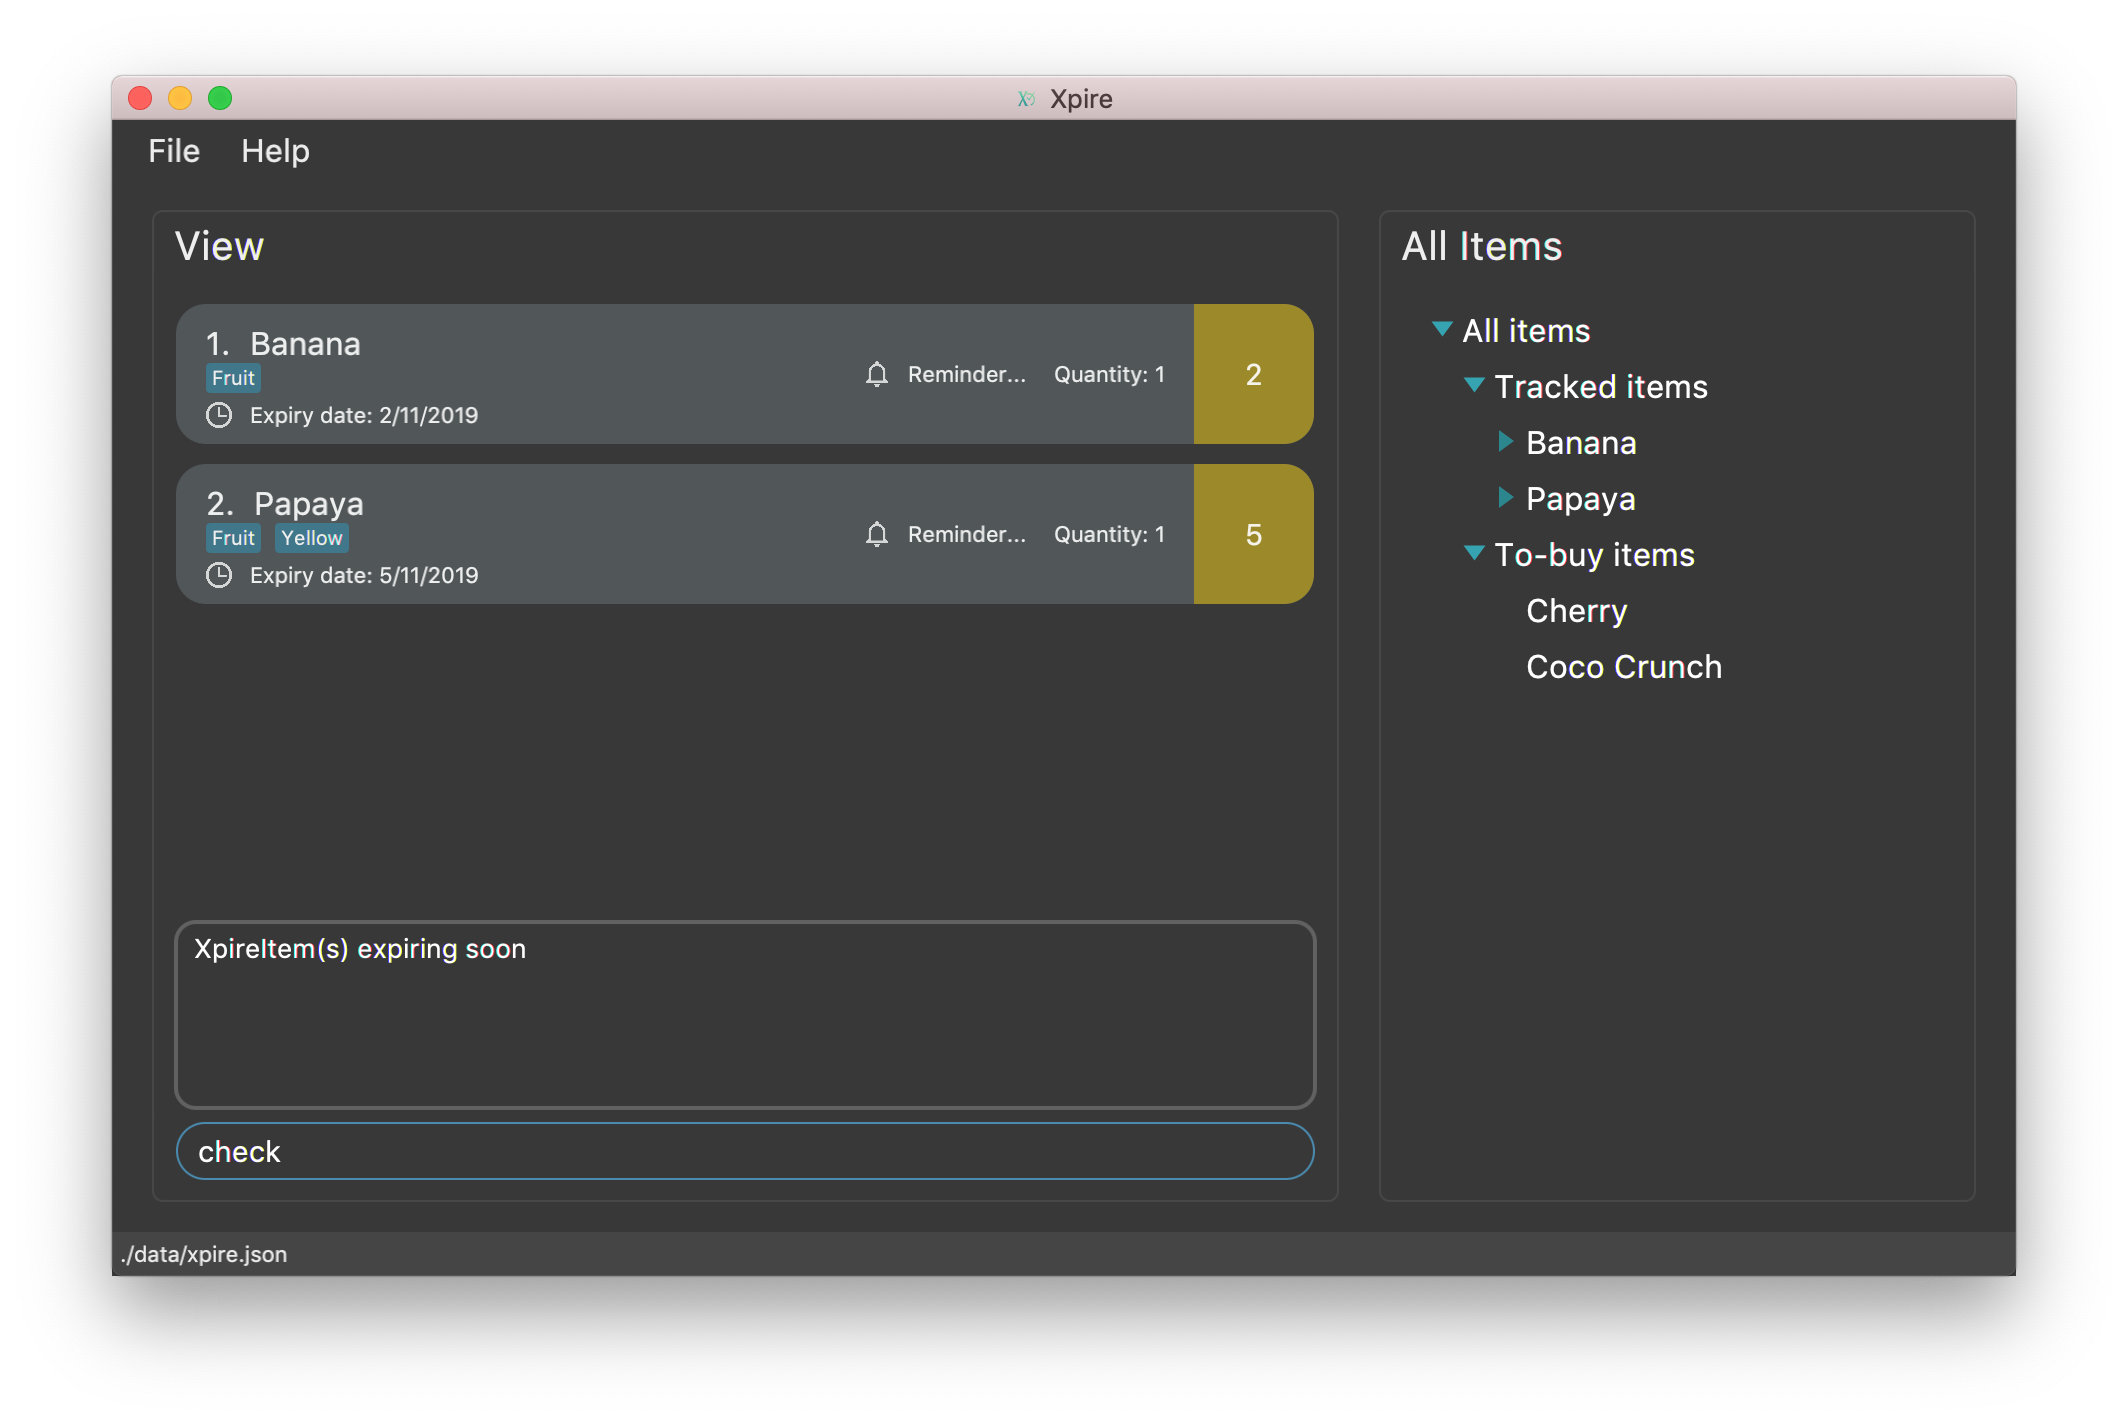
3. Graphic User Interface
3.1. GUI components
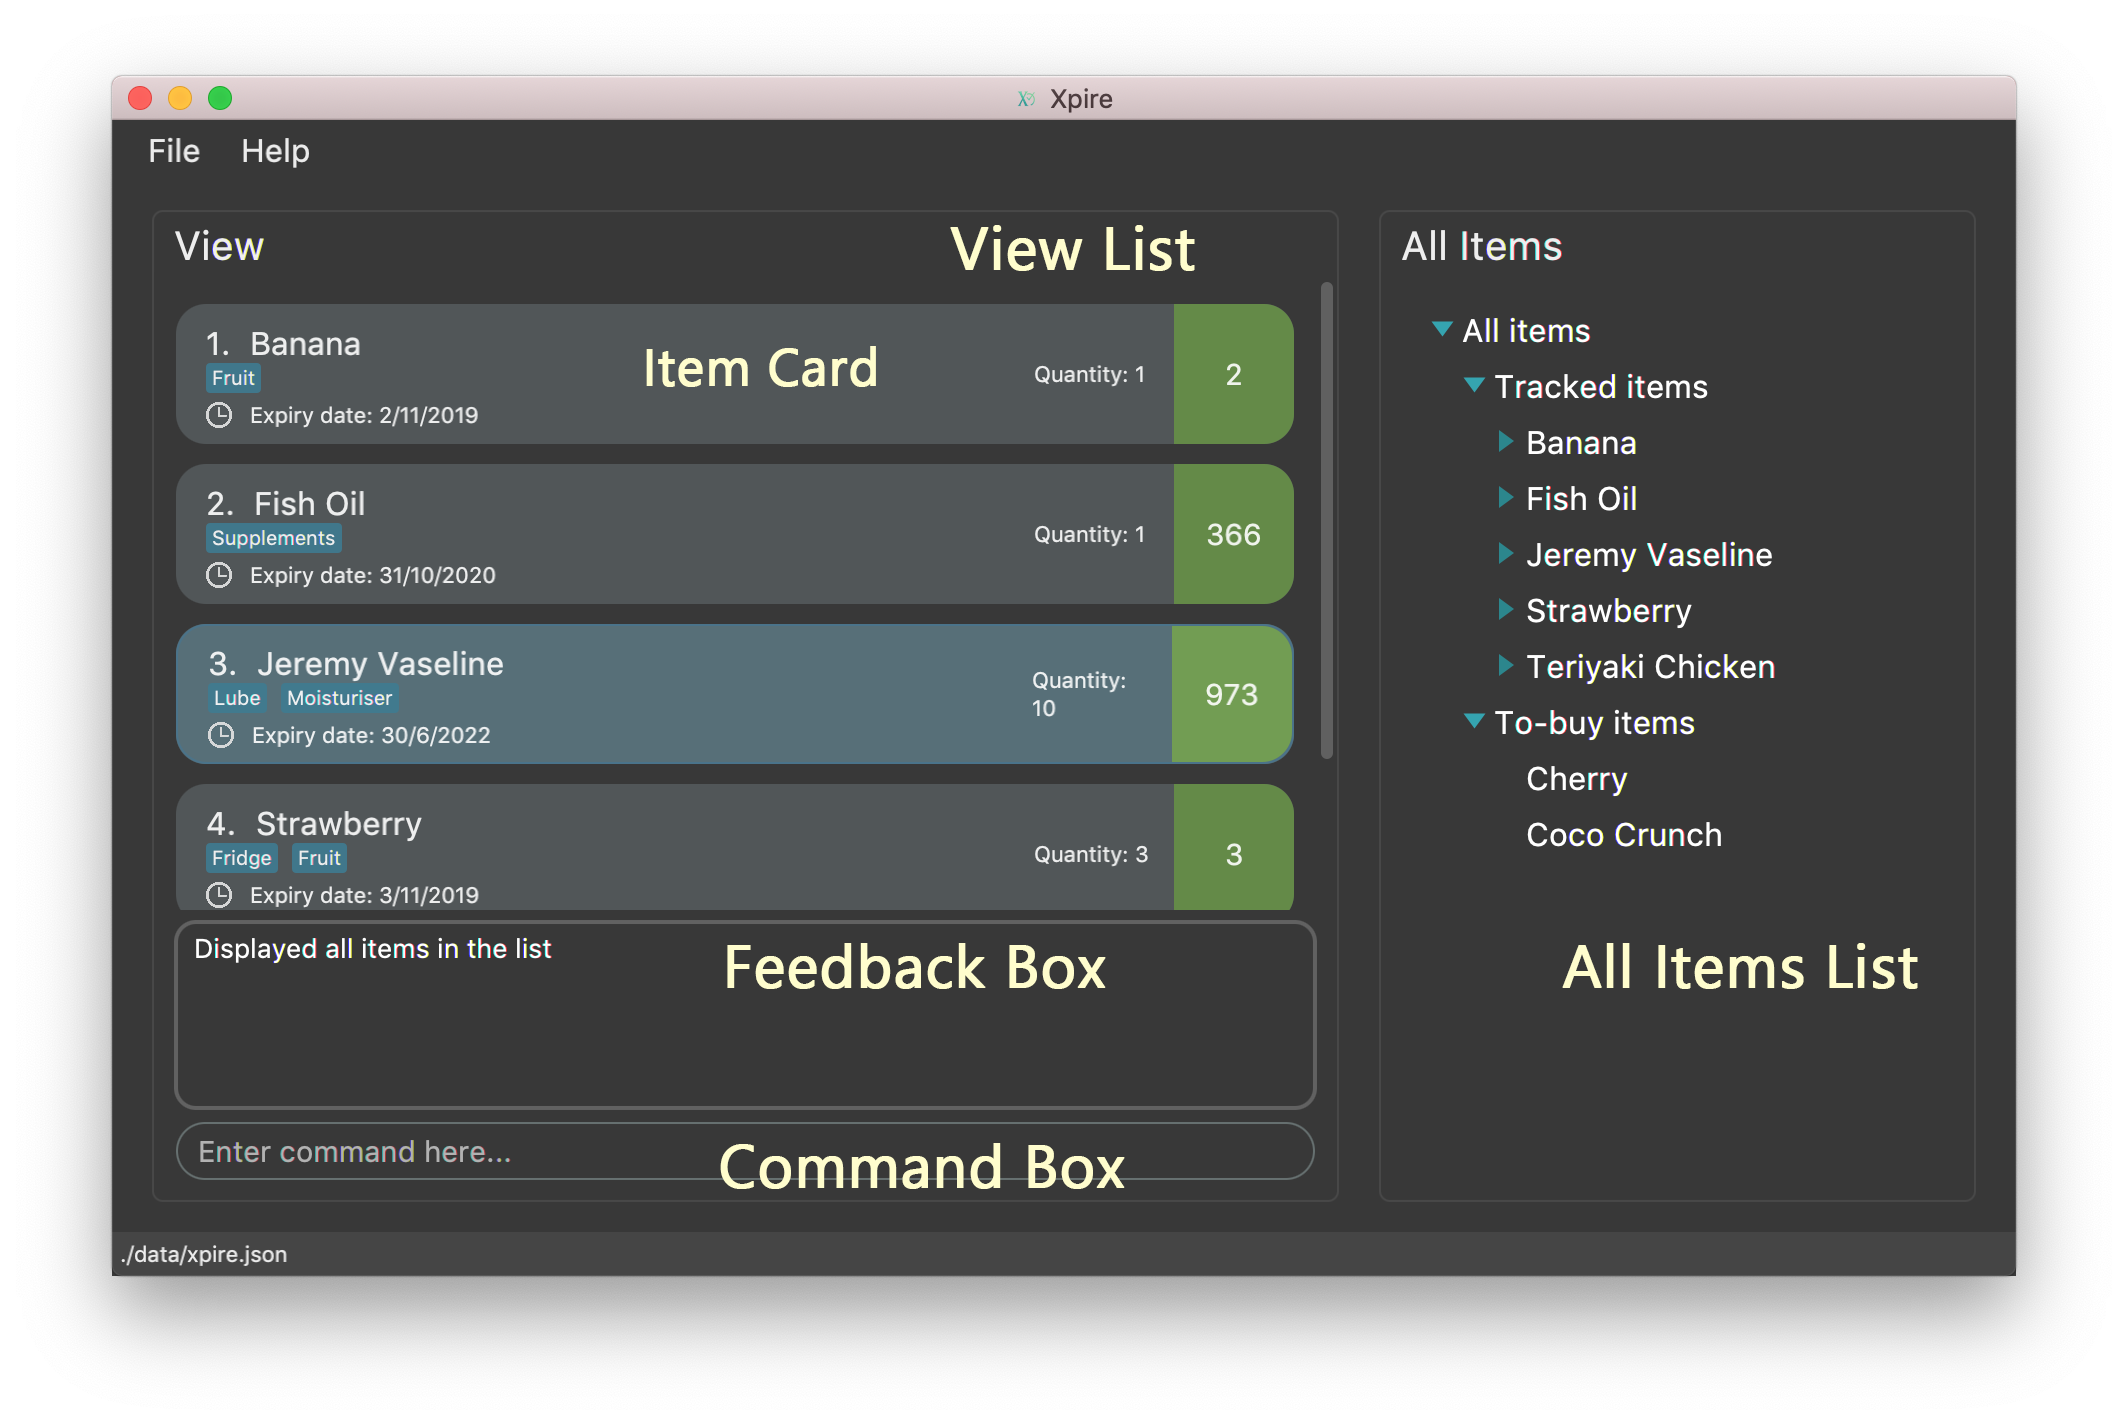
The above image shows you the Graphic User Interface(GUI) of Xpire with its major components annotated.
You can refer to the following sections for details on what each component does.
3.1.1. View List
There are two lists shown on the GUI, View and All Items. On the left is the View list.
This is an active list that shows you the current view of items. As you manipulate the items using
search, view or check, View list will change accordingly to show you only the items you want to see.
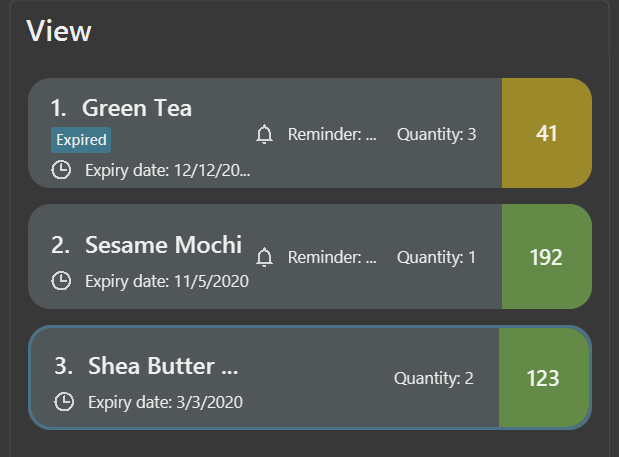
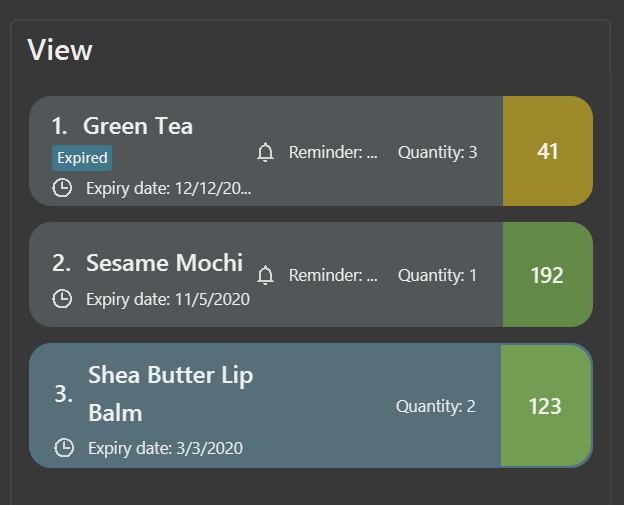
3.1.2. Item Card

This is how your item will look like in the View list. The number on the right is the number of days left before the item expires.
The colour of the item card changes according to
the status of your item.
-
An expired item will be red.

-
An item that is expiring soon will be yellow. You can set when to mark an item yellow based on individual cases. See more information here: Section 4.2.4, “Setting reminder for an item:
set reminder”.

-
An item that has not expired and is not going to expire soon will be green.
3.1.3. All Items List
You can find all your items on the right, in the All Items list.
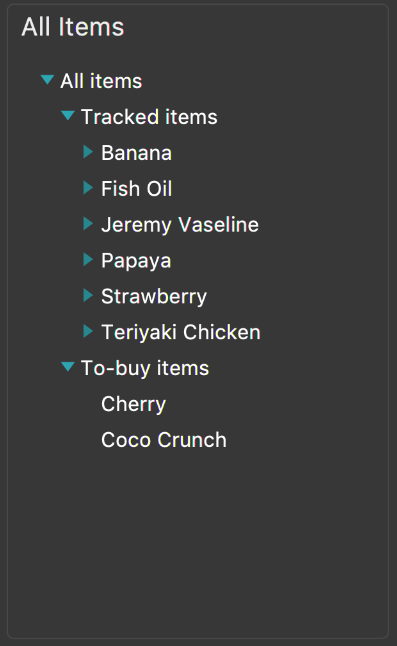
The All Items list provides you with a static view of all your items in the app in alphabetical order. Here items are categorized into tracked items and to-buy items. You can click on the list
name to view items in the list, or click again to collapse the list. Clicking on the item name will show you the
expiry date of the item if it has one.
3.1.4. FeedbackBox
Below the View list panel, you can find a rectangle box which acts like a "feedback window".

Feedback on the successful execution of the command will be displayed in this box. If an illegal command is entered, you will also be able to see a failure message and relevant suggestions in the box.
3.1.5. CommandBox
Finally, at the very bottom, you can find a small rounded rectangle box that says "Enter command here…".

This is where you can type your command. The maximum you can type is 60 characters. Try typing add|Banana|1/11/2020 and press enter, and you will see it appears in your lists!
3.2. Tips
3.2.1. Expand cards
When you reduce the window size, the name or other details of the item in the item card could be shortened with ….
You can click on the card to expand it and view more information.
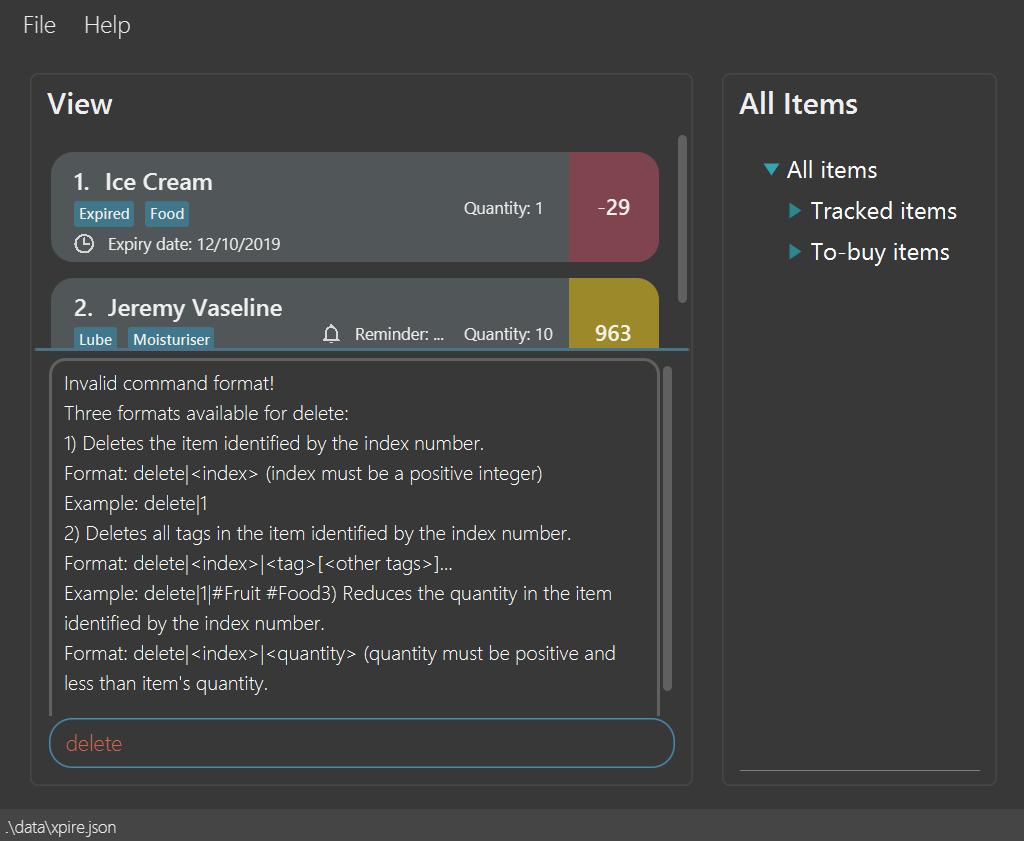
3.2.2. Resize Feedback Box
When the feedback message is too long, you can either scroll or adjust the height of the feedback box to display more information. To resize, simply drag the horizontal bar above the feedback box to your desired position as shown below.
3.2.3. Retrieve Previous Entry
Just like any other Command Line App, you can easily retrieve your previous commands or go back to later commands using the ↑ and ↓ keys on your keyboard. You can call back up to 20 commands you entered.
4. Features
Command Format
-
Words that are enclosed with
<and>are the parameters to be supplied by you e.g. inset reminder|<index>|<reminder threshold>,<index>and<reminder threshold>are parameters which can be used asset reminder|1|7. -
Tags are recognised with the prefix
#on the CLI. e.g. Xpire recognisesFruitas a name while#Fruitas a tag. -
Parameters in square brackets are optional e.g
check[|<days>]can be used ascheck|7orcheck. -
Optional parameters with
… after them can be used multiple times including zero times. e.g. for [<other tags>]…, the following format for Tag Command:tag|<index>|<tag>[<other tags>]…can be used astag|1|#Fruit #Frozen #Coldortag|1|#Fruit. -
Trailing
|(s) are allowed. e.g.add|banana|2/2/2020|||orsort|name|.
4.1. Common features
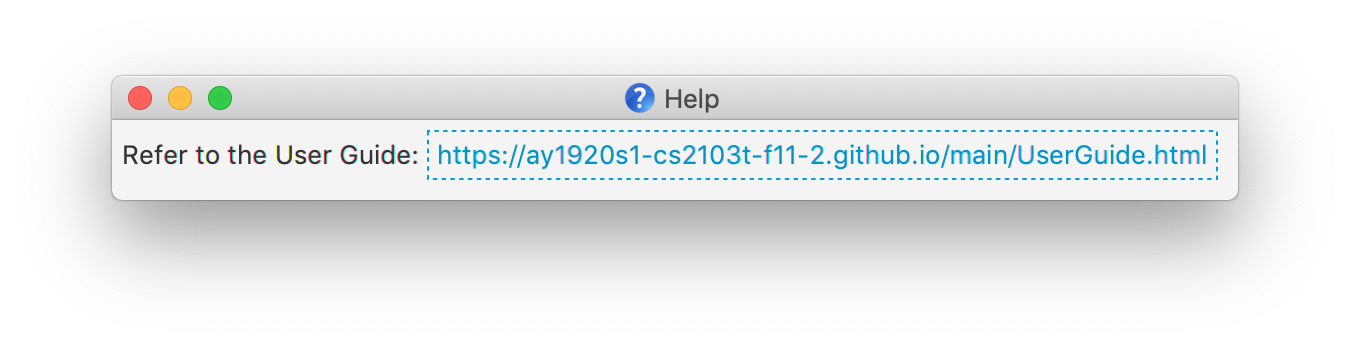
4.1.1. Opening the help window: help
Use the command help to access the help window.
Example:
Let’s say that you wanted to view all your items that are expiring soon, but have forgotten the command word for this purpose.
Instead of trying all possible inputs, you can simply type help into the command box, to find the command word check that you have looking for.
4.1.2. Viewing all items : view
4.1.2.1. Viewing all items in another list
To toggle between the main list and the list of items to be replenished, you
can use the command view|<list name>. This shows you all the items in the list automatically sorted by their name
(lexicographical order) then date (chronological order).
Examples:
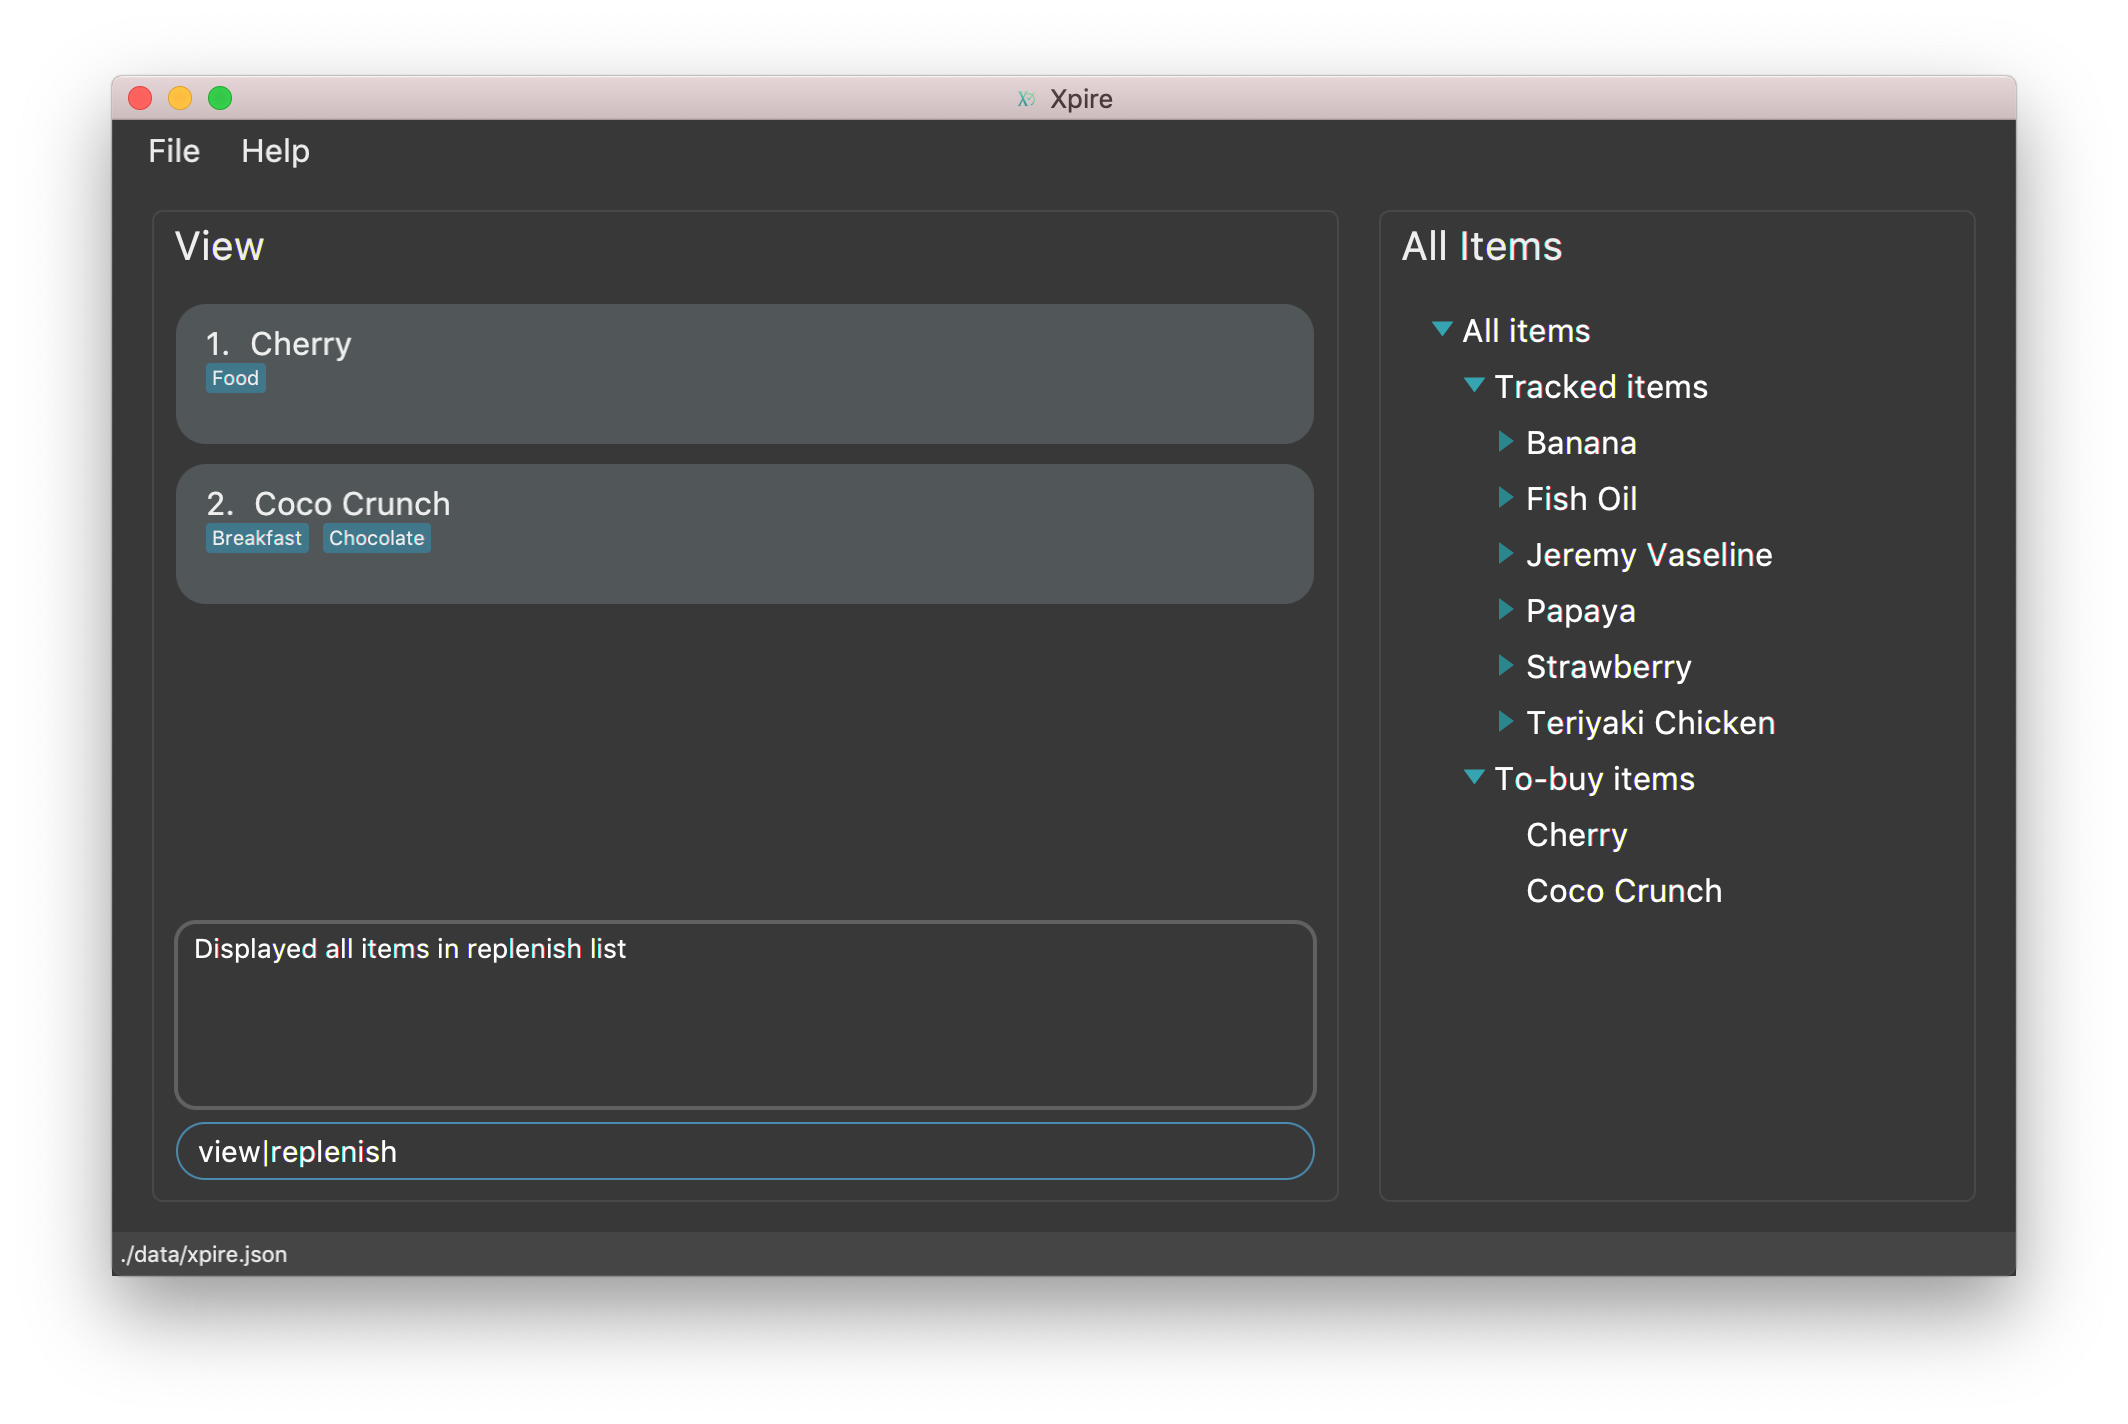
Let’s say that you have completely depleted some items, namely Cherry and Coco Crunch in the main tracking list, and you wish to view these items
that have been automatically shifted to the replenish list. You can do so by typing view|replenish in the command box
to change your current list view to that shown in the figure below.
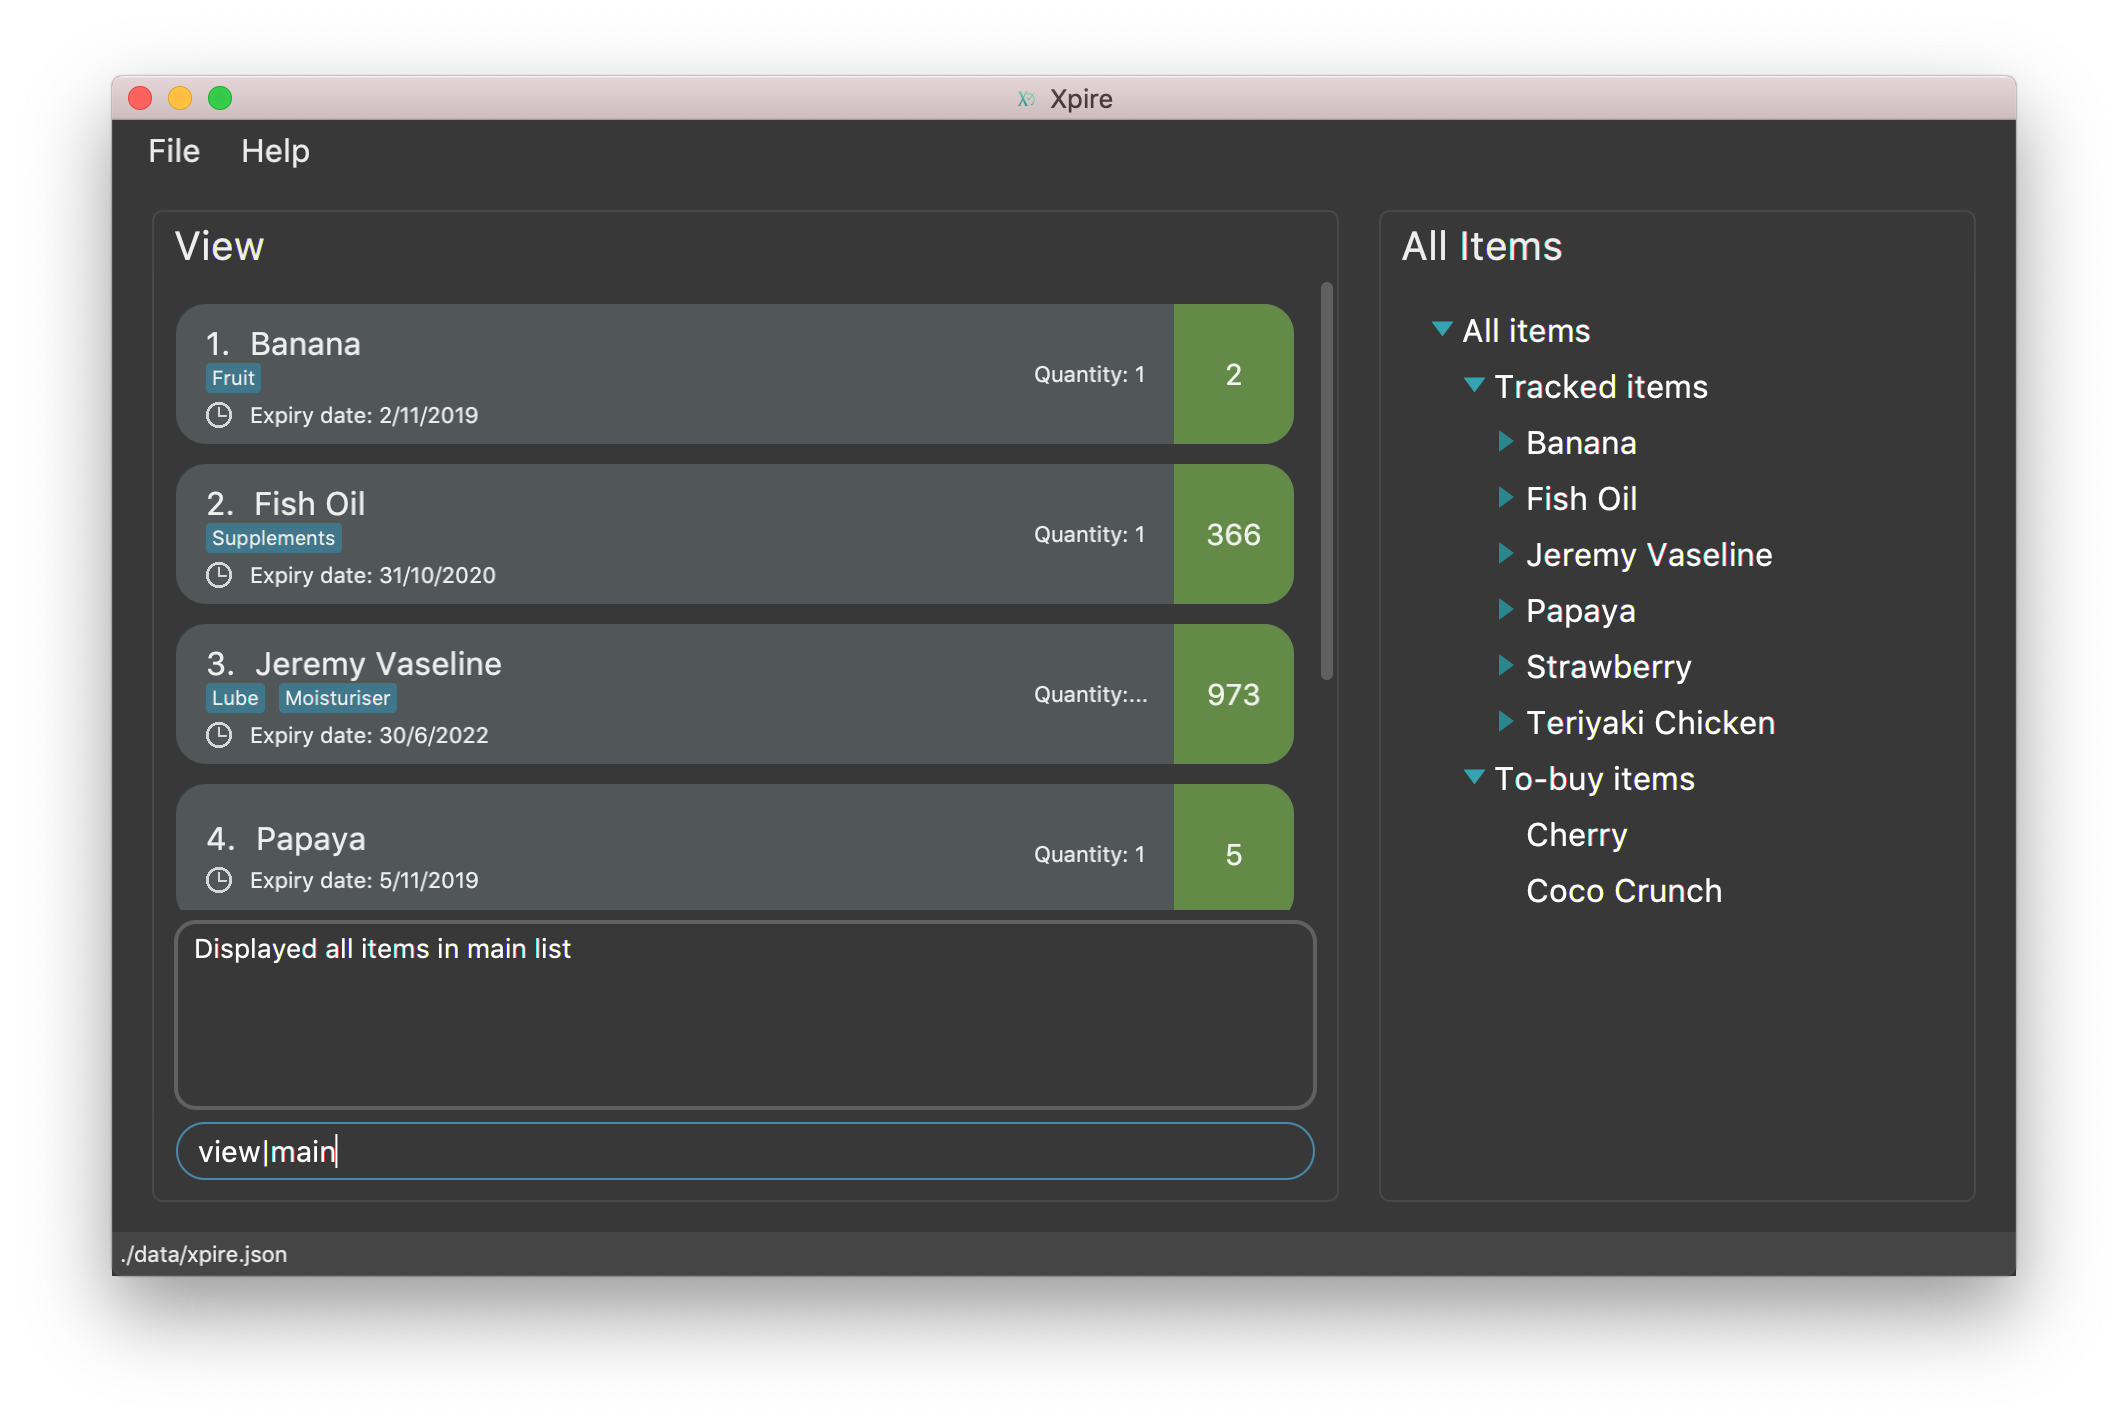
Perhaps after viewing all your items in the replenish list, you wish to return to the main tracking list to add some items
that you have recently purchased. You can easily return to the main list, by typing view|main in the command box.
This is also depicted in the figure below.
4.1.2.2. Viewing all items in the current list
To view all the items in the current list, you can simply enter the command view.
| If you have not previously toggled the list view, this command will display the main tracking list by default. |
Example:
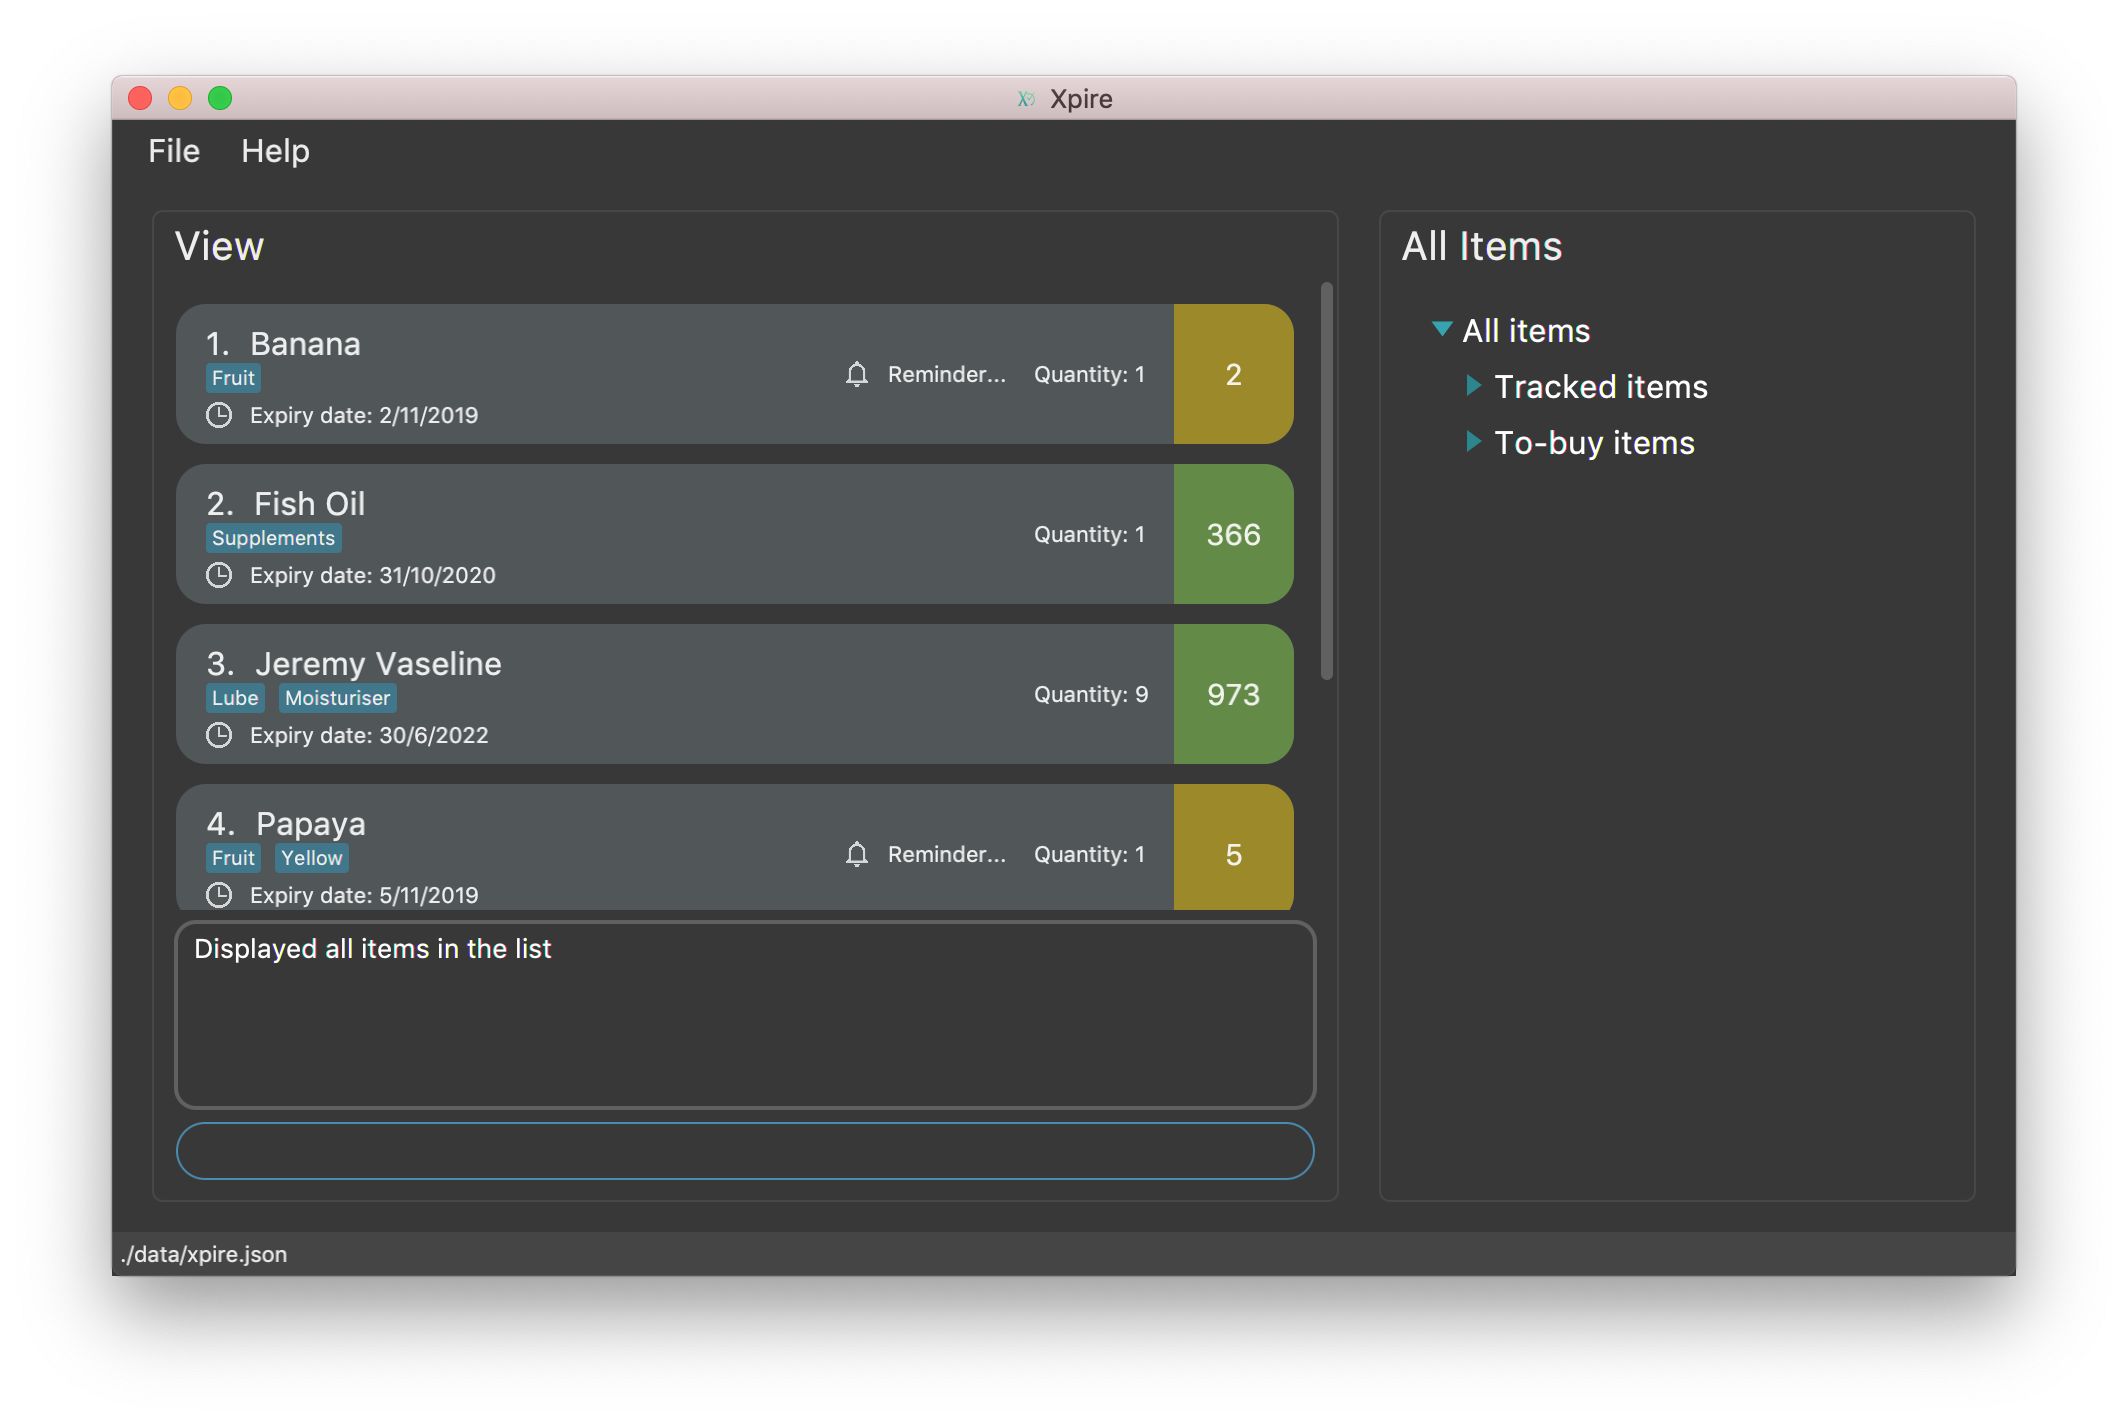
Let’s say that you have been searching for an item in the main tracking list, and you are shown the item found.
To return back to the main list that displays all the items tracked, you can simply enter the command view.
4.1.3. Tagging an item : tag
4.1.3.1. Display all tags created
Shows all the tags in the current list view.
Format: tag
Like help and export, this command is not undoable.This command does not show tags of items that are not on the current list on the screen. If you would like to view all the tags in the main list or the replenish list, simply key in view, followed by tag!
|
4.1.3.2. Add new tag(s) to an item
Tags an item from the list according to your own input
Format: tag|<index>|<tag>[<other tags>]…
| You can tag a particular item with more than 2 tags or more at a time. Just be mindful of the 5 tags per item limit! |
Examples:
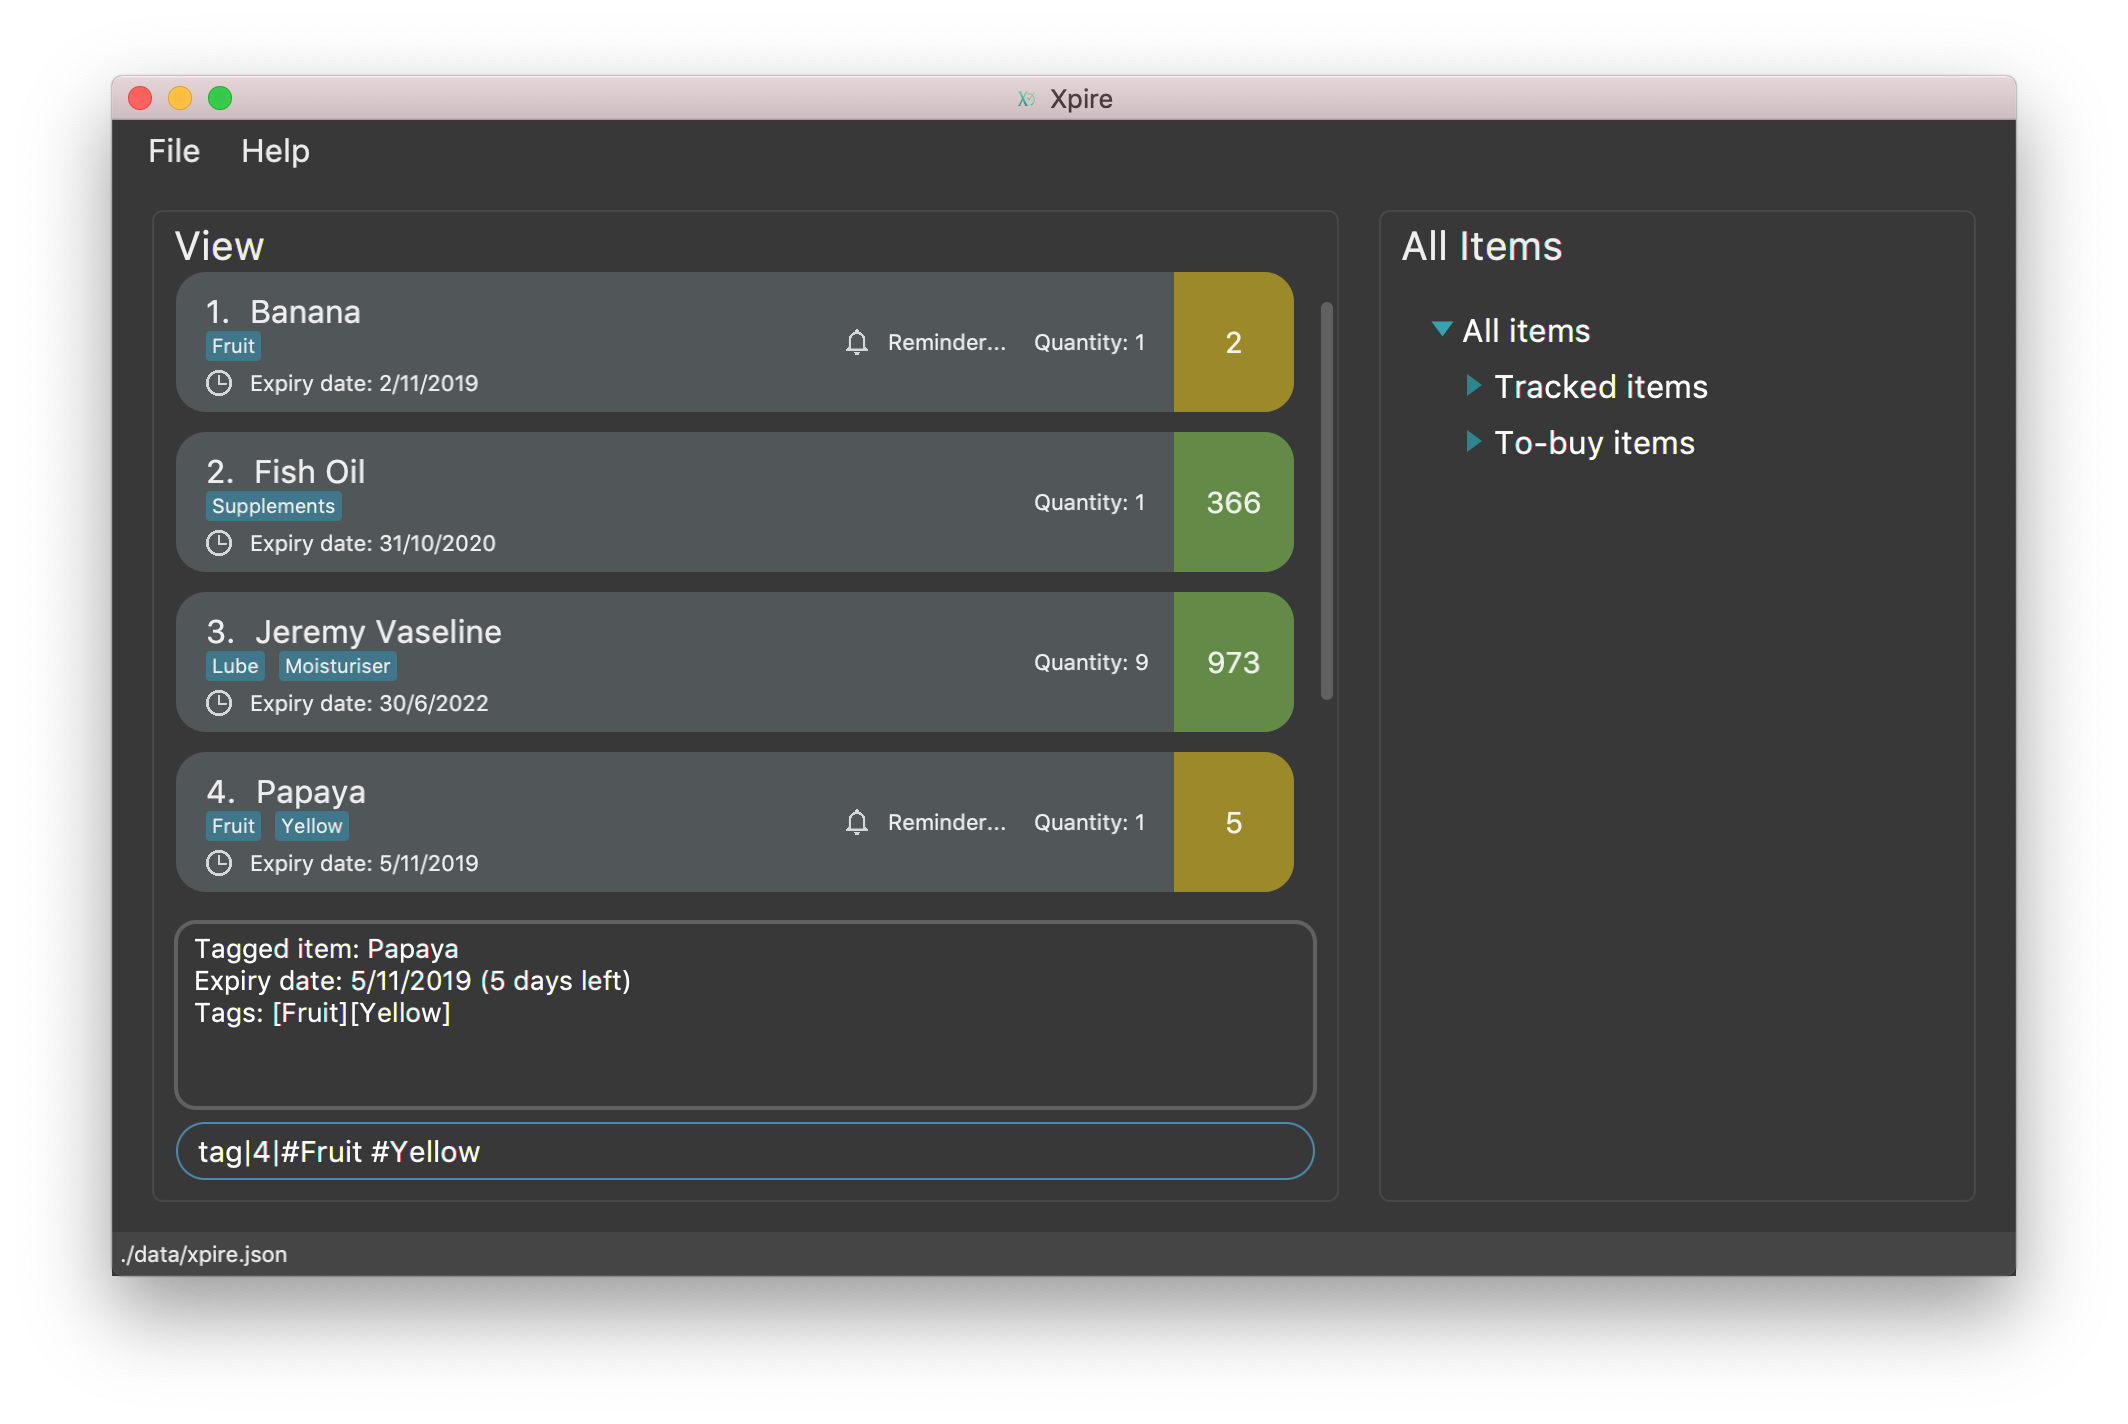
-
view|main
tag|2|#Nestle #Caffeine
Tags the 2nd item in the main list with#Nestleand#Caffeine.
4.1.4. Deleting an item or its tags: delete
If you would like to delete an item or its related fields from the list, the delete command can be used.
4.1.4.1. Deleting an item
If you would like to delete a particular item from your list, simply follow the format: delete|<index>.
Examples:
-
view|main
delete|2
Deletes the 2nd item in the main list. -
sort|name
delete|3
Deletes the 3rd item in the sorted main list. -
search|potato
delete|1
Deletes the 1st item in the results of thesearchcommand.
4.1.4.2. Deleting certain tags from an item
If you would like to delete tag(s) from a particular item, use the delete command in the format:
Format: delete|<index>|<tag>[<other tags>]…
Examples:
-
view|main
delete|3|#Fruit #Food
Deletes the tags#Fruitand#Foodfrom the 3rd item in the main list.
4.1.5. Searching for item(s) by name and/or tag: search
Having a hard time looking for an item in Xpire? Not to worry, Xpire provides a search functionality to aid you in finding your items with ease.
With search, you can simply input any words or phrases and Xpire will display all items whose names or tag(s) contain any of the given keywords.
Format: search|<keyword>[|<other keywords>]…
search is designed to work only on the current view list. In other words, search will only
display matching items which exists in the current view list.
|
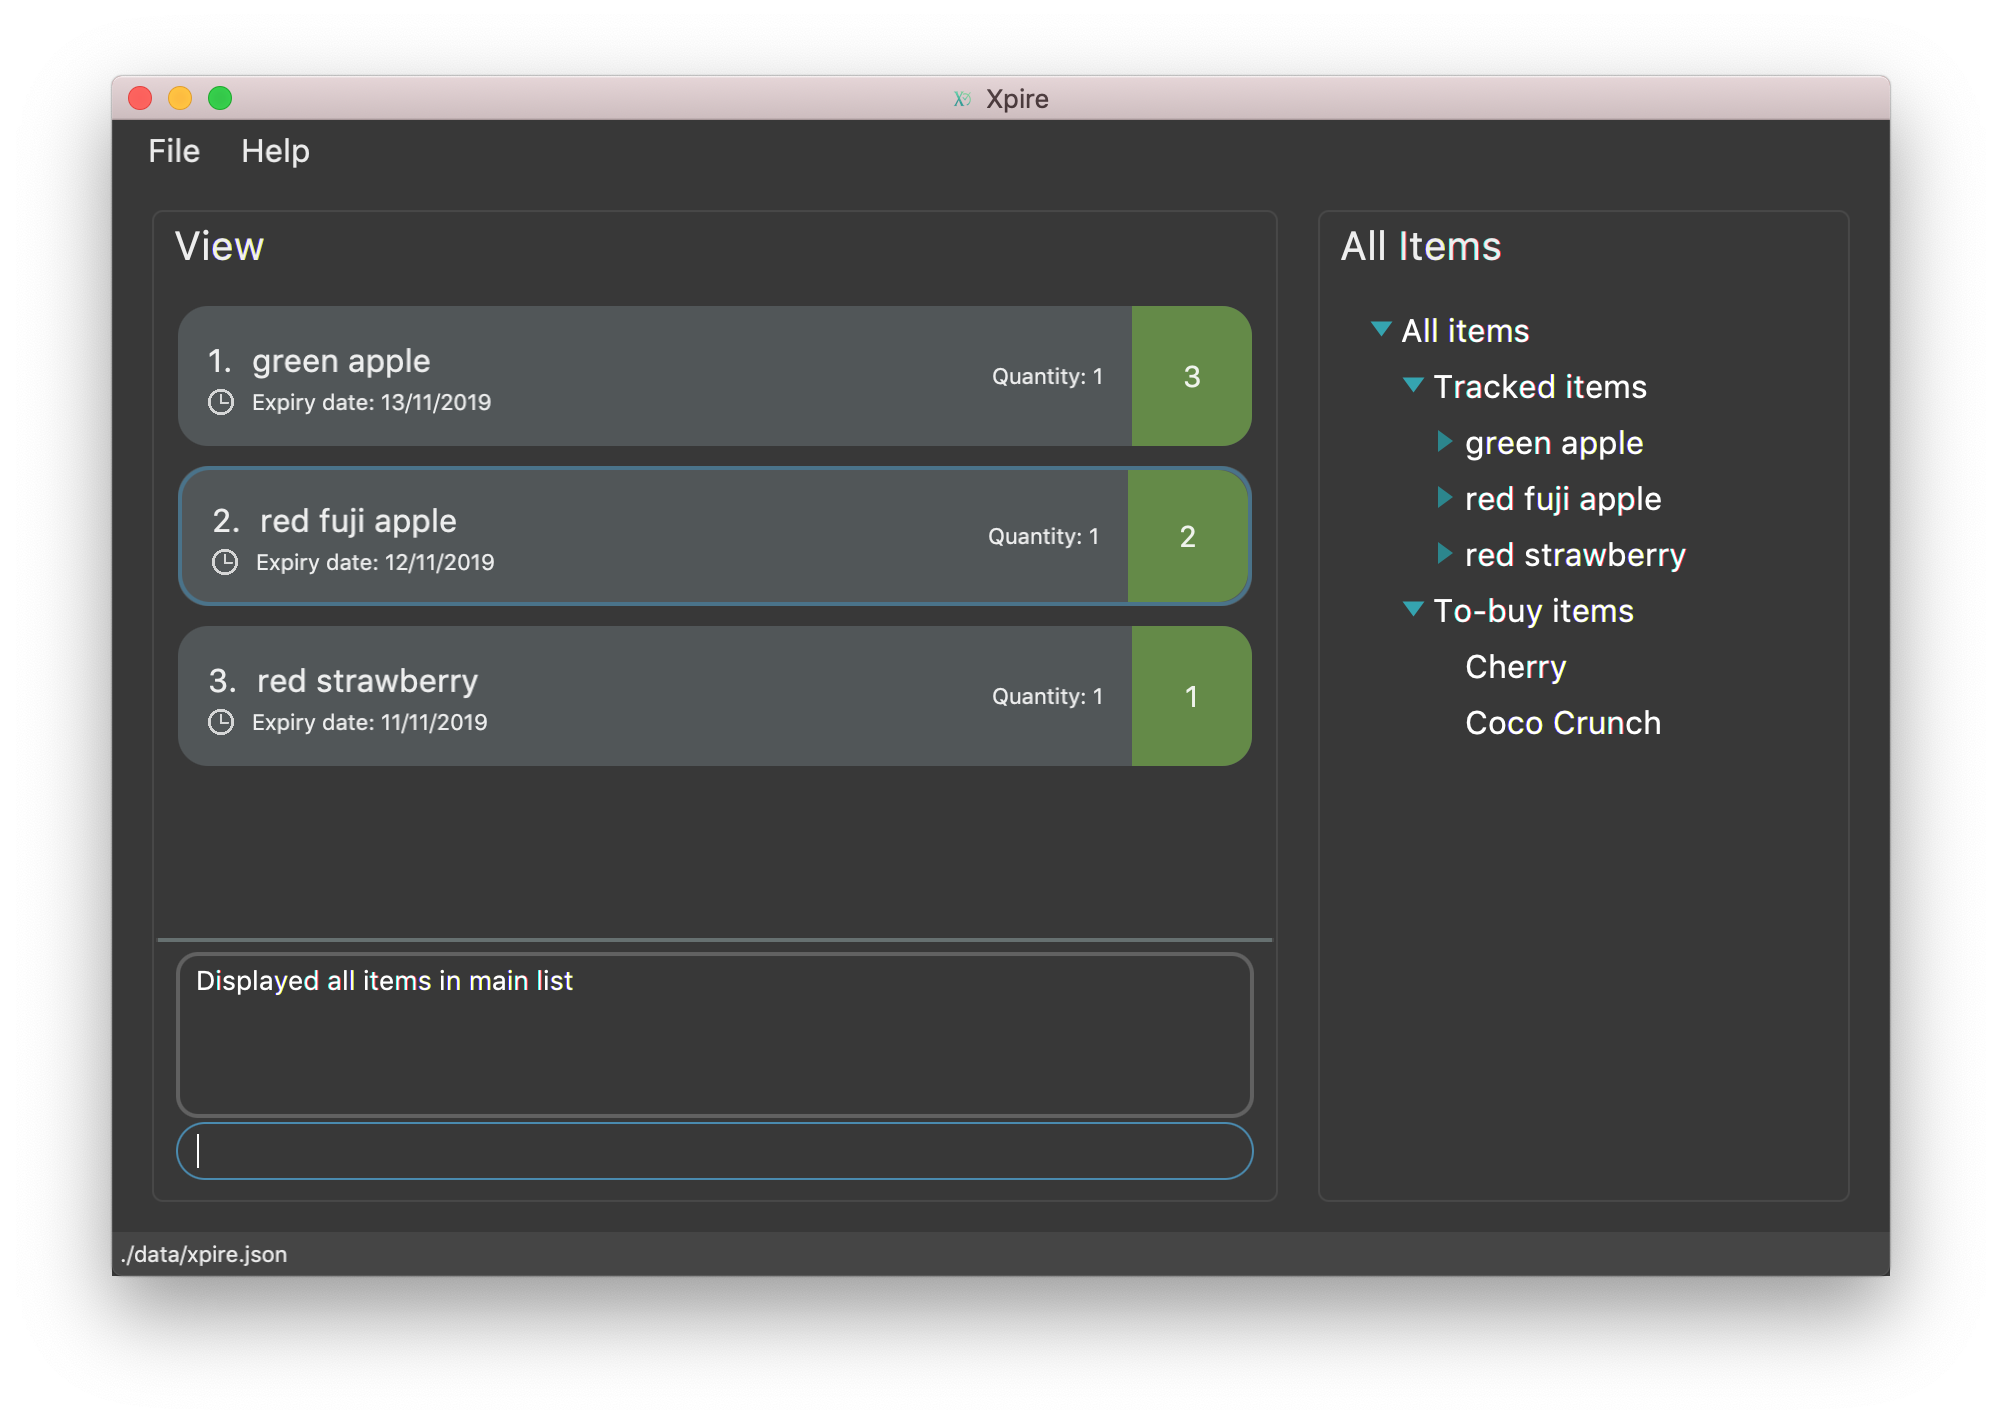
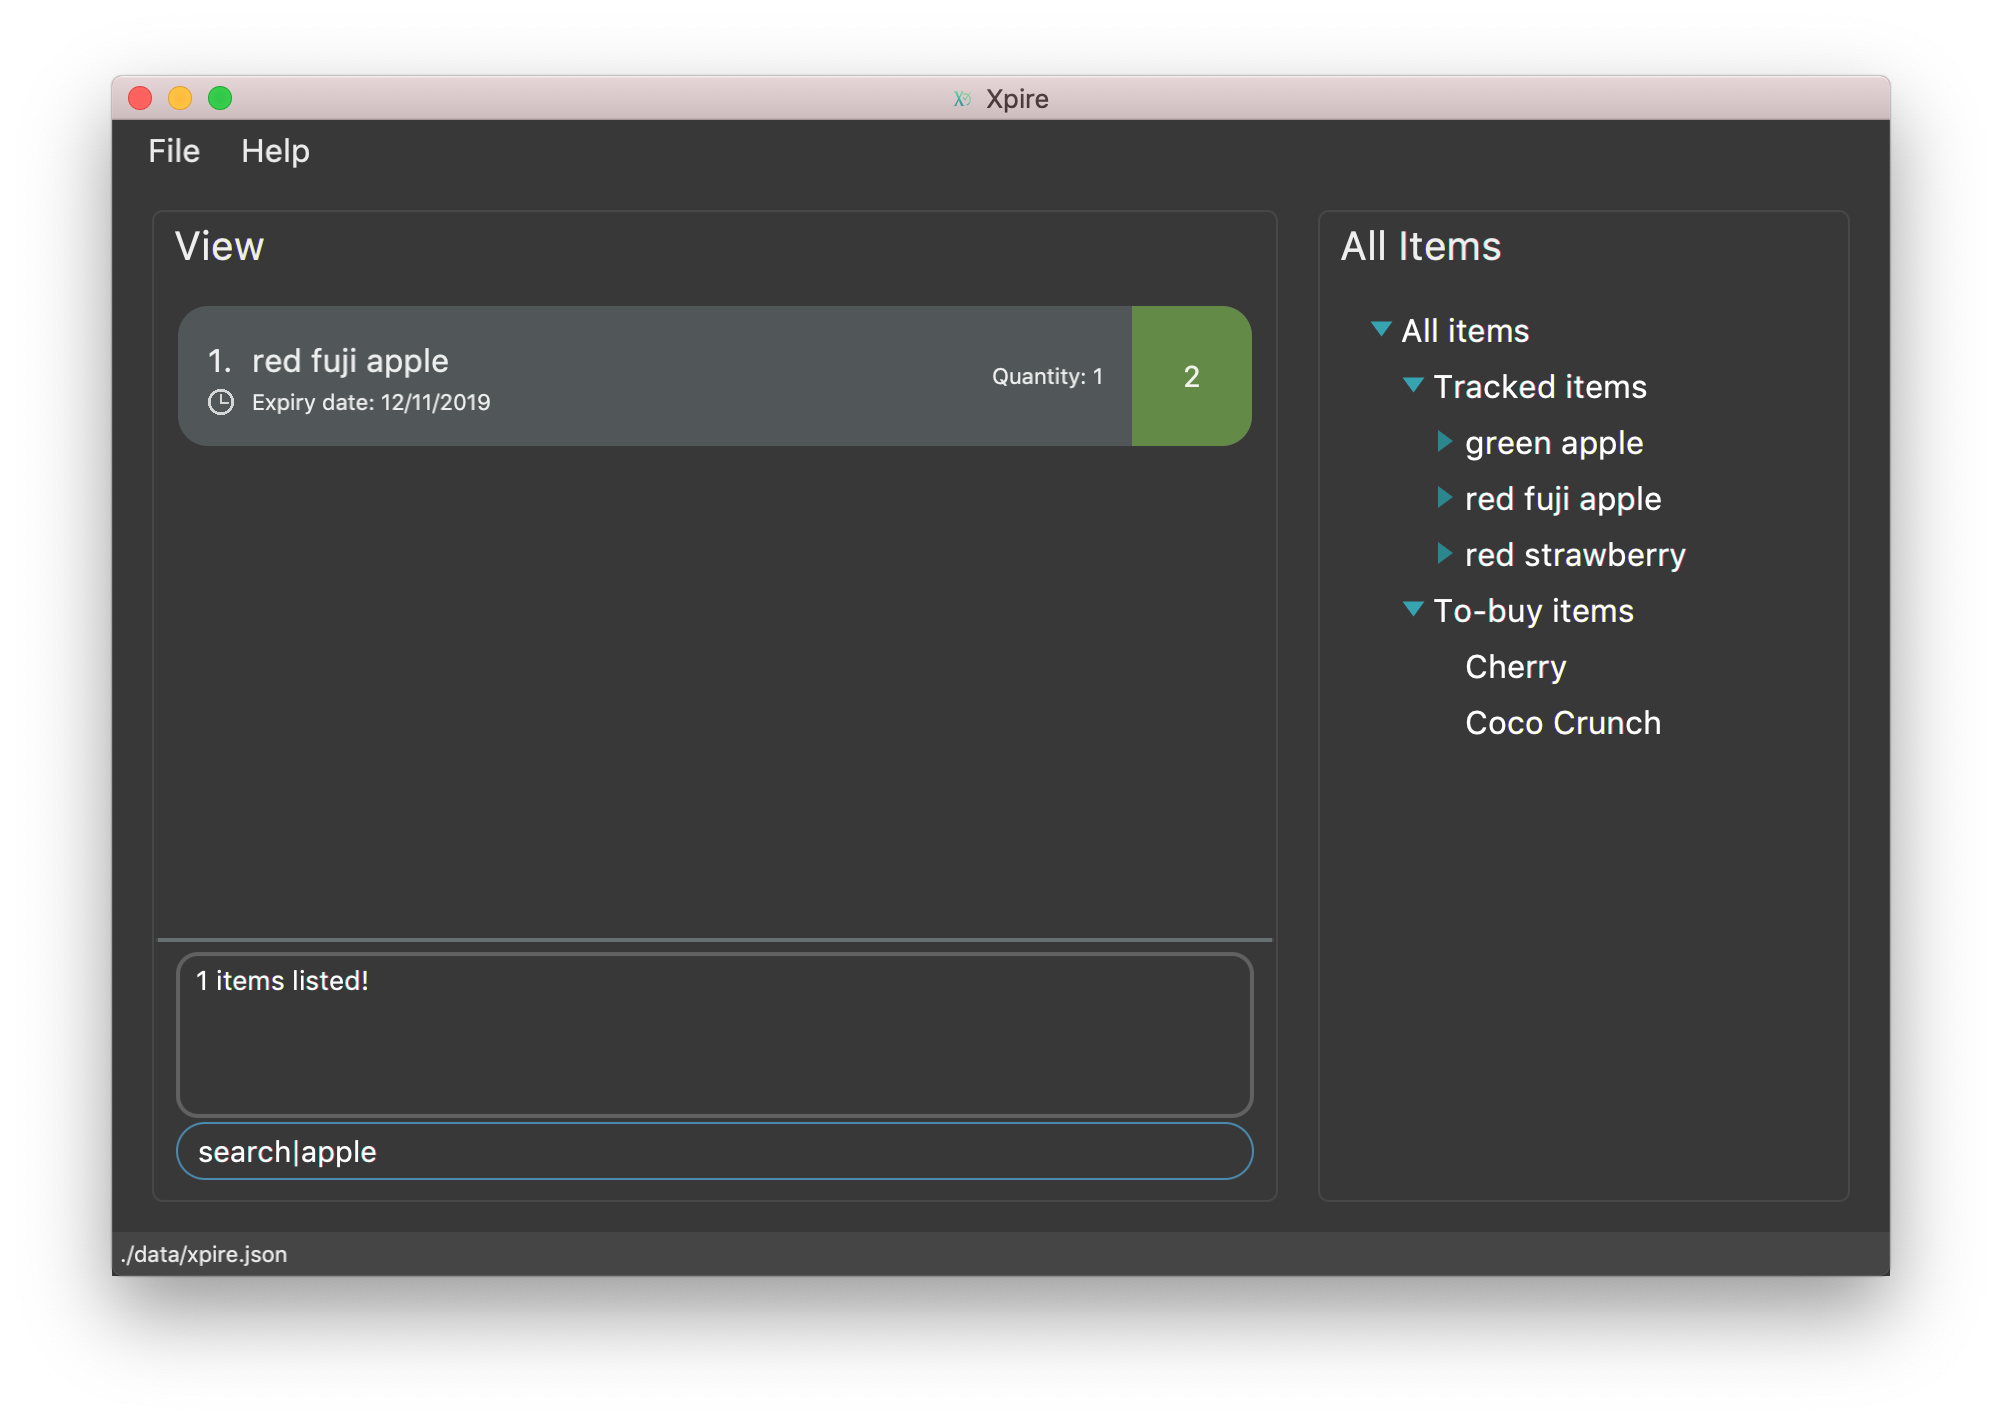
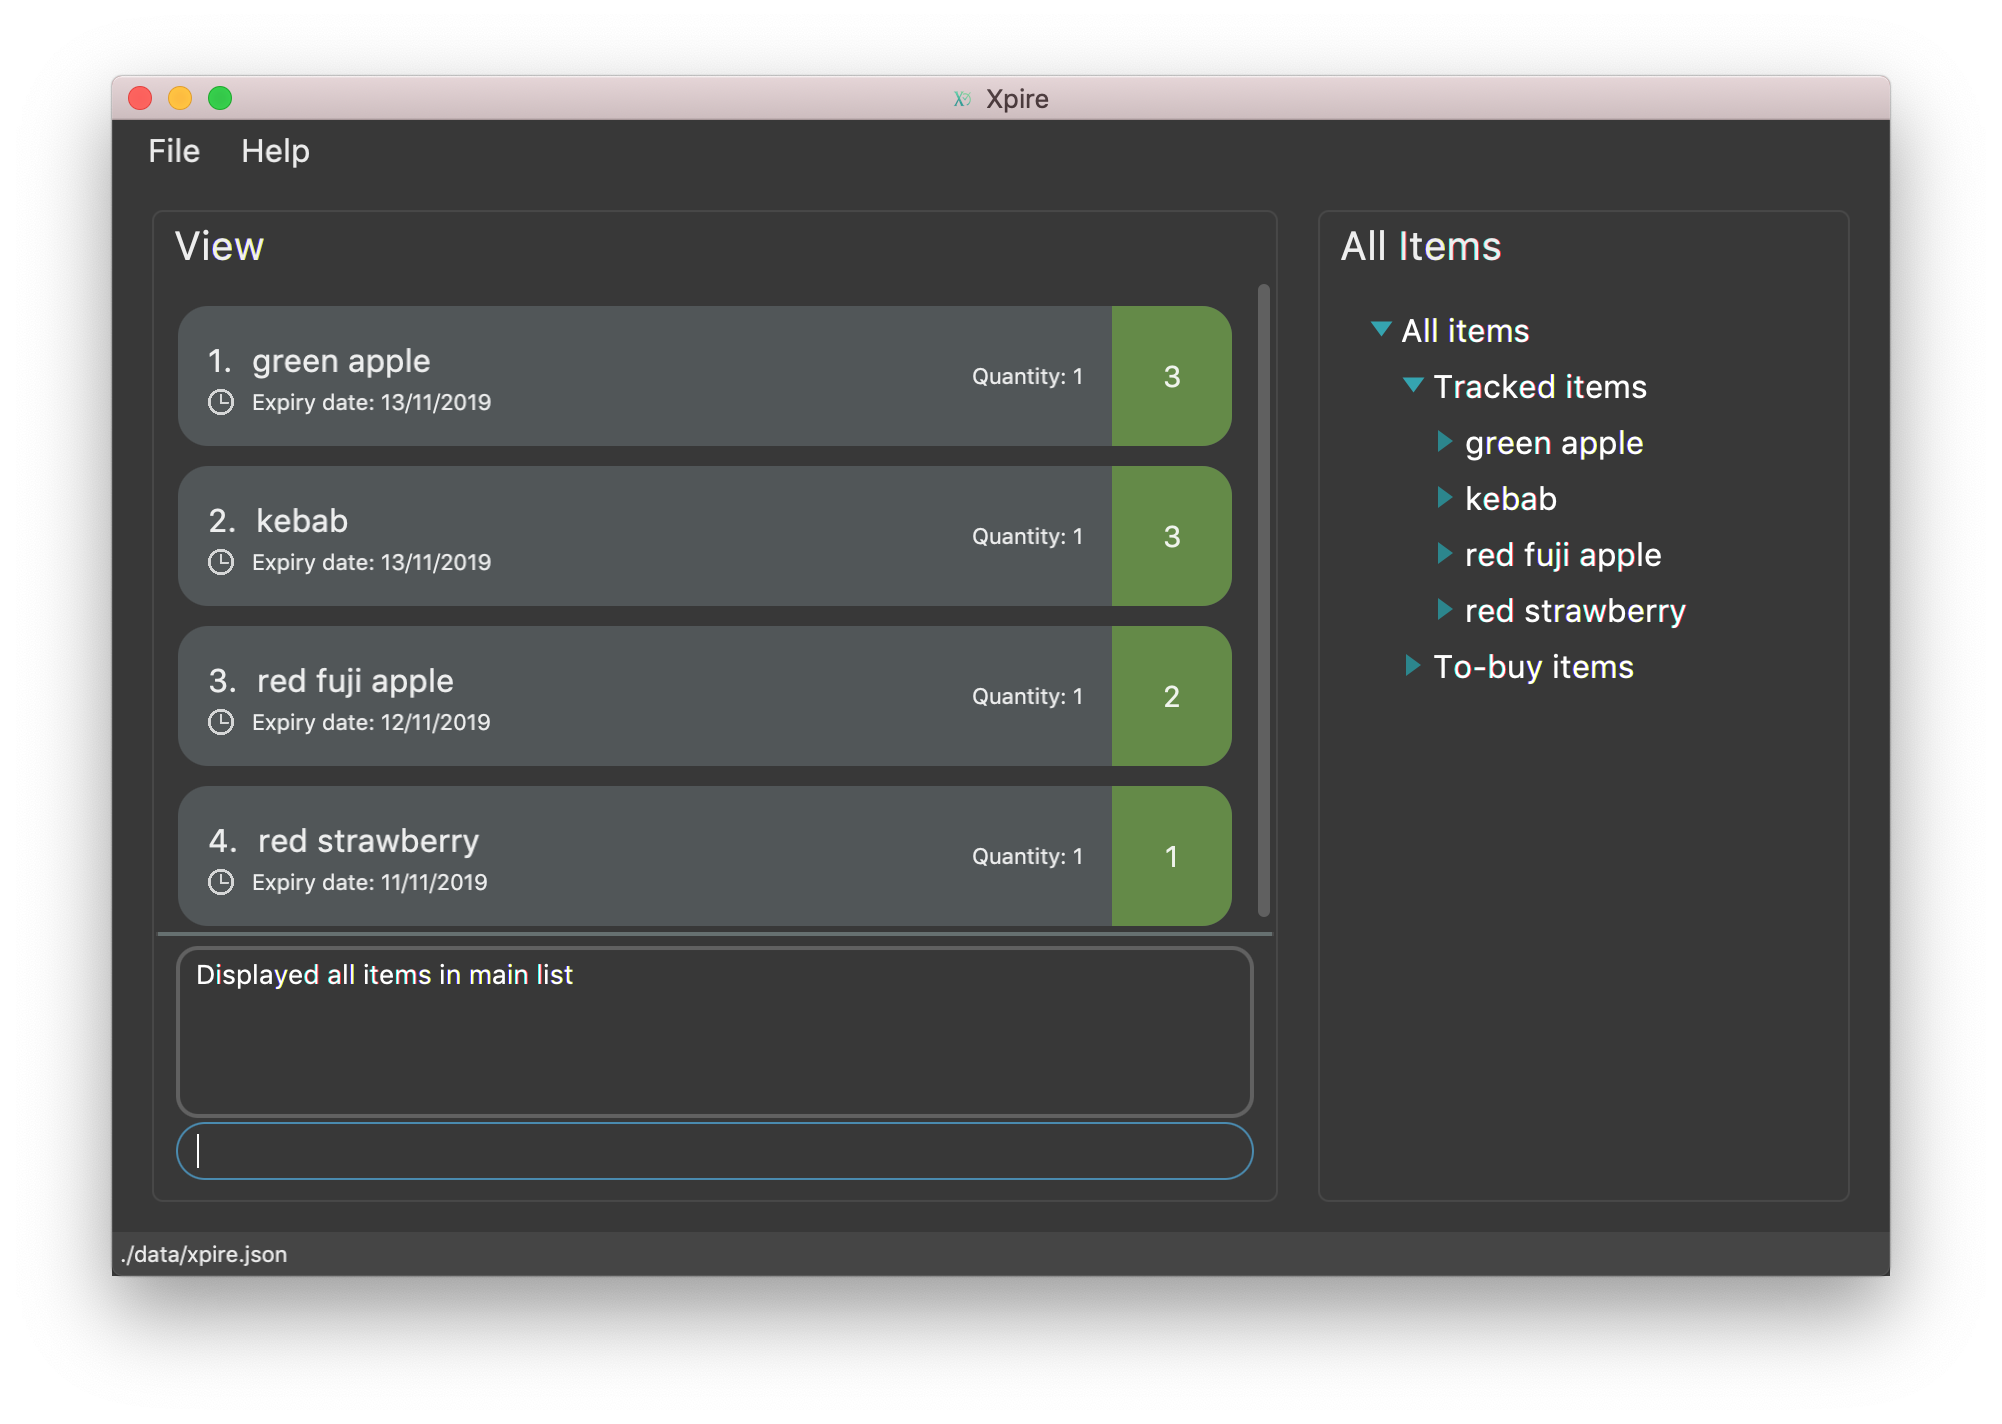
You can do an AND search, e.g. search for items that contains BOTH red and apple in its name,
by keying search|red and then search|apple. Suppose there are only 3 items in your list, e.g.
red fuji apple, red strawberry and green apple (see Figure 6), the above commands will display only red
fuji apple (see Figure 7).
|
search|red and then search|appleExamples:
-
search|kebabwill displayChicken Kebabandkebab(see Figure 8).
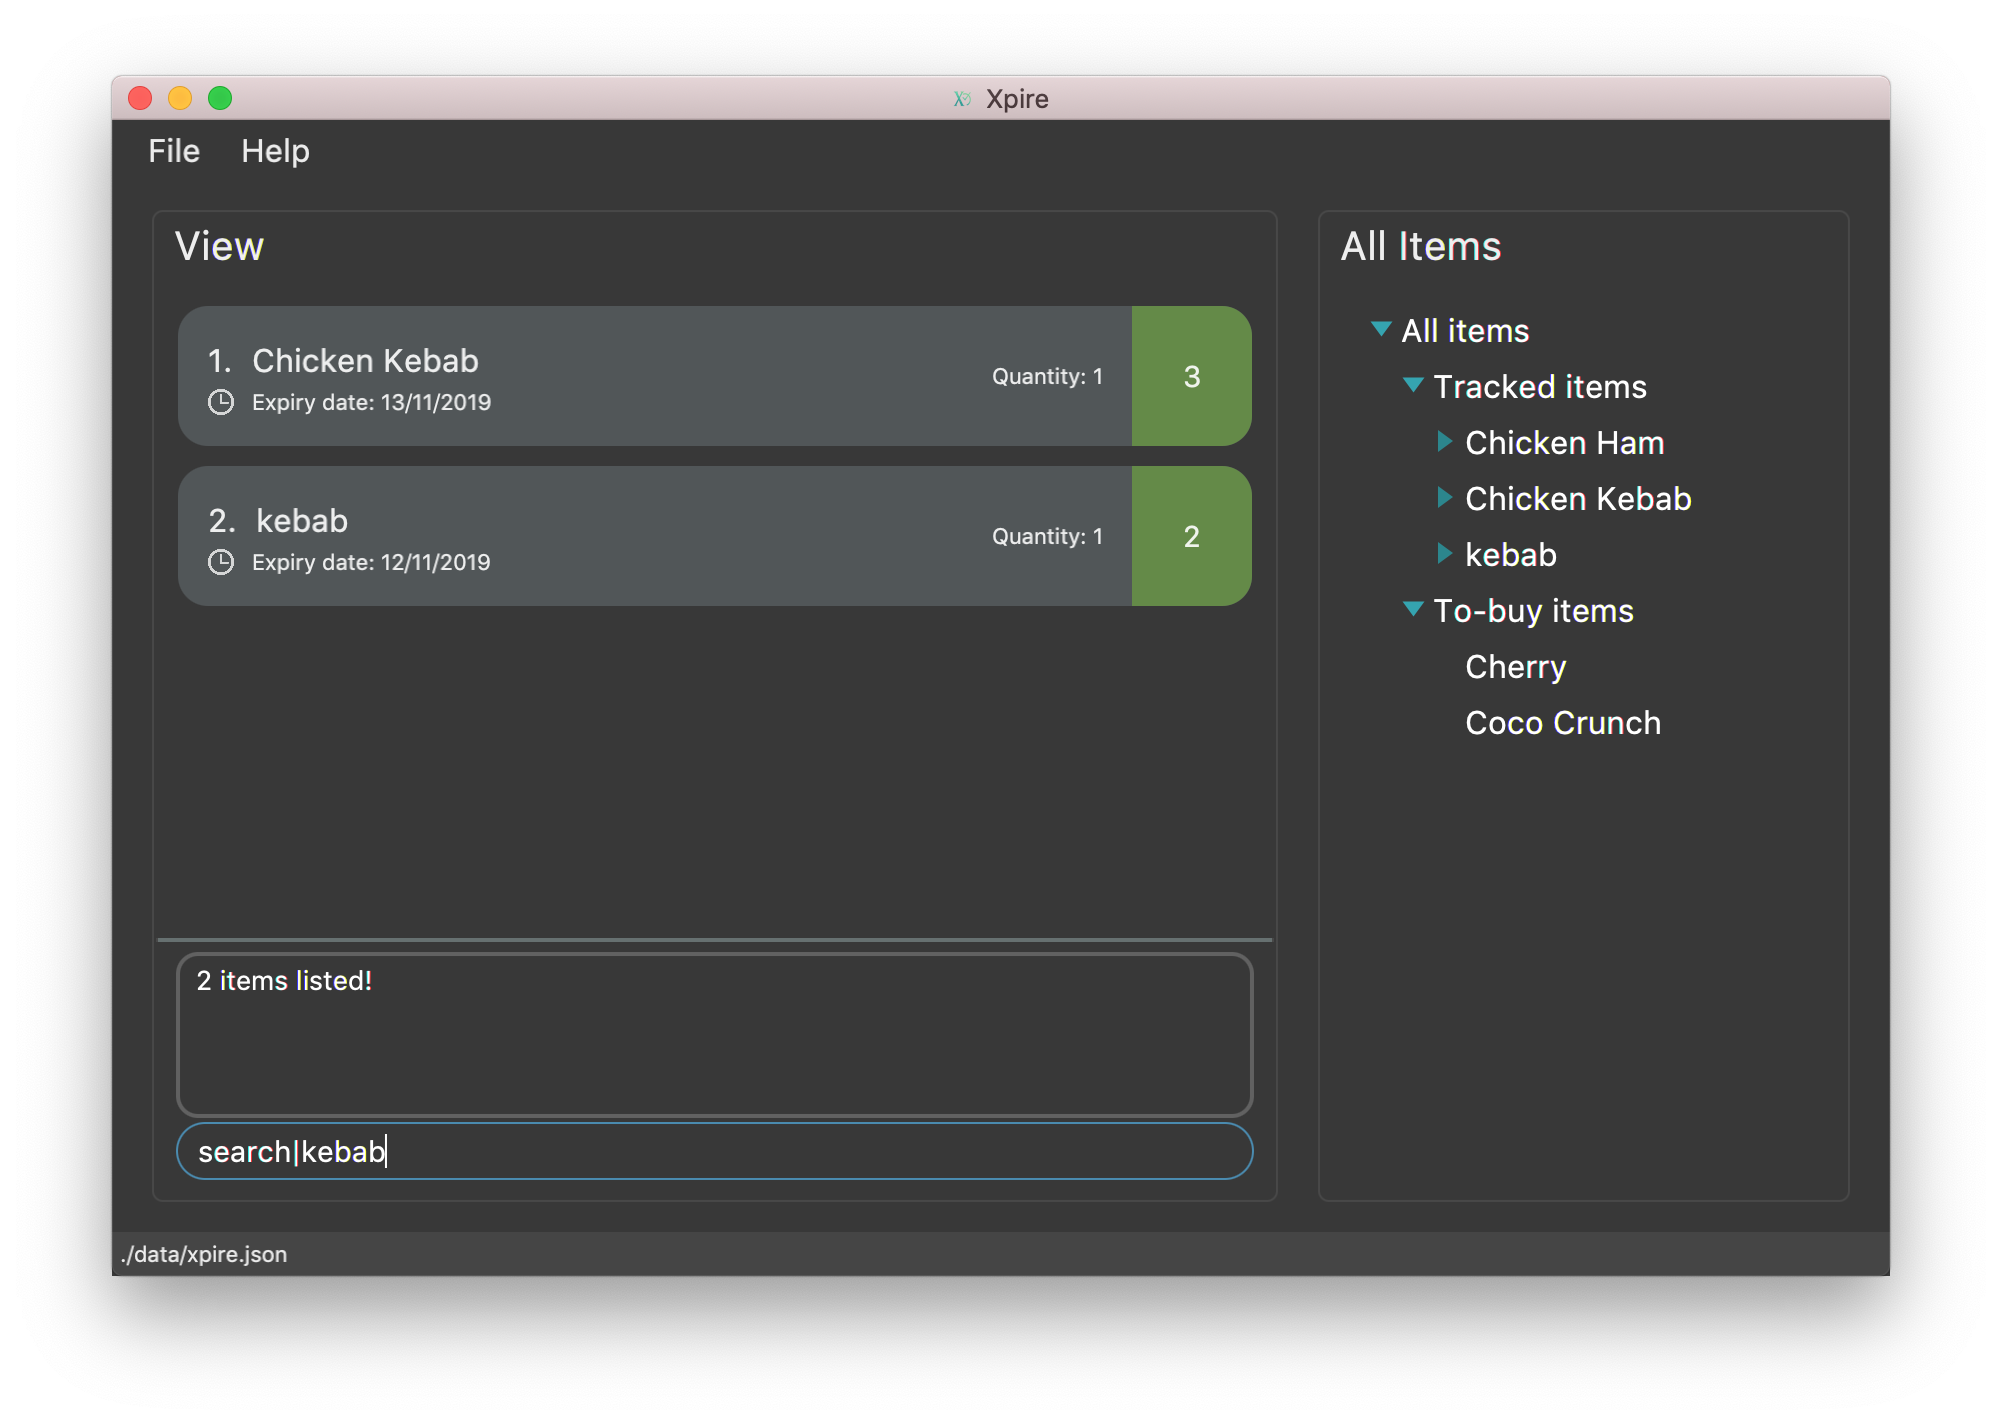
search|kebab-
search|Chicken Hamwill displayChicken Ham(see Figure 9).
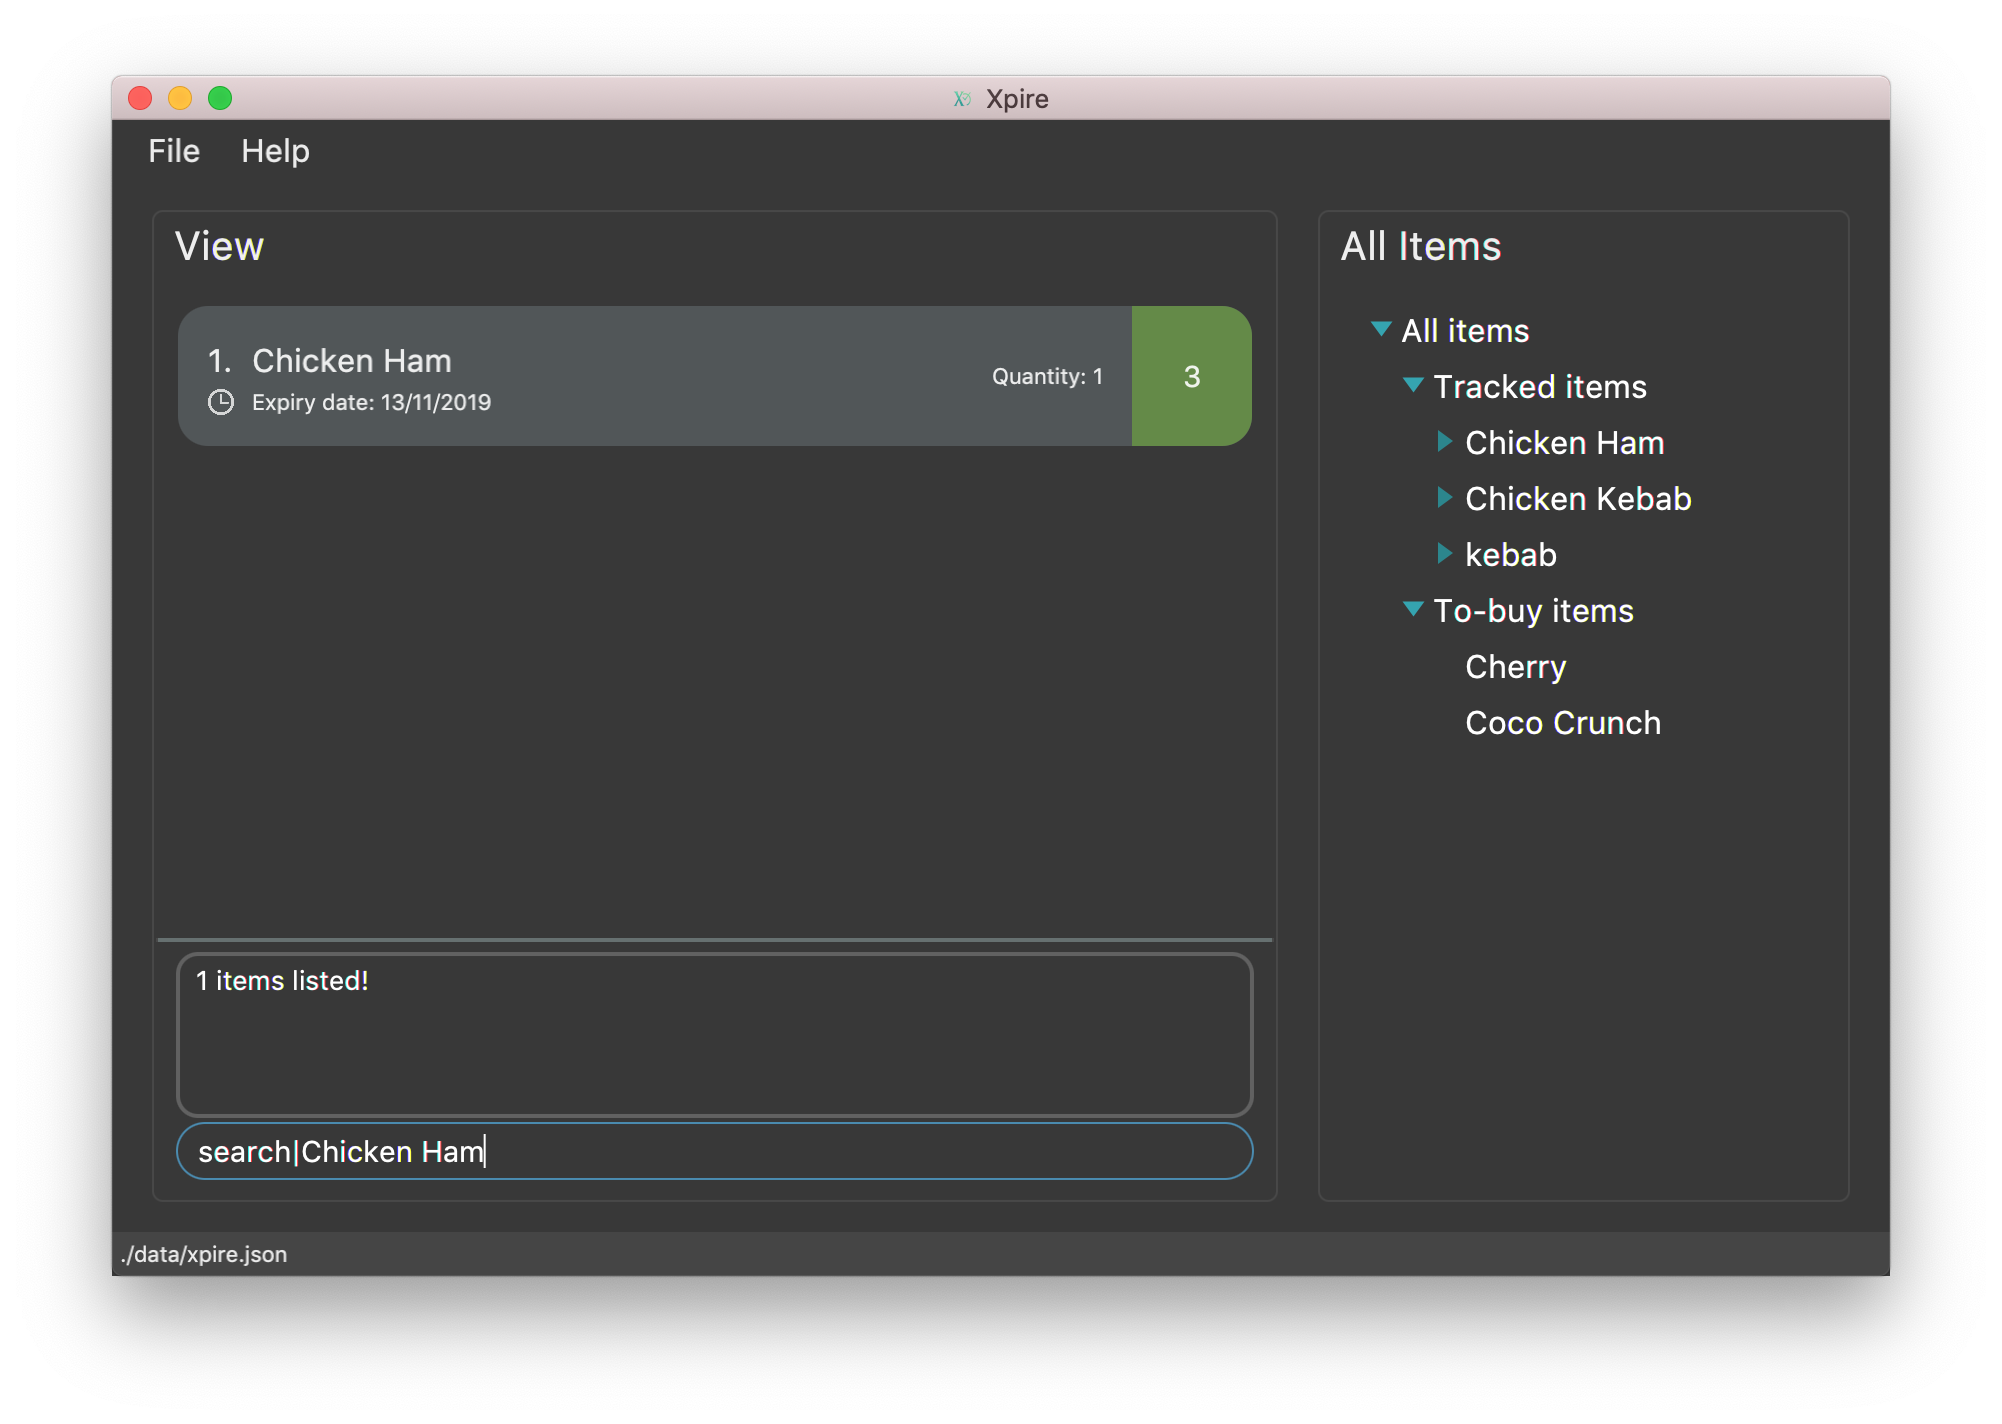
search|Chicken Ham-
search|milk|tea|#Drinkwill display any items with names containingmilkortea, or with the tag#Drink.
4.1.6. Shifting an item from one list to another: shift
Let’s say one of your items has expired and you want to stock up on this particular item.
Simply use the shift command to transfer this item to the replenish list so that you will know which items you need to replenish.
Once you have stocked up on your expired items, you can similarly use the shift command again
to keep track of the item’s new expiry date.
4.1.6.1. Shifting an item from the main list to the replenish list
If you would like to view the list of expired items, simply type check|0.
From this list of expired items, you can use the shift command to move any item into the replenish list.
|
Format: shift|<index>
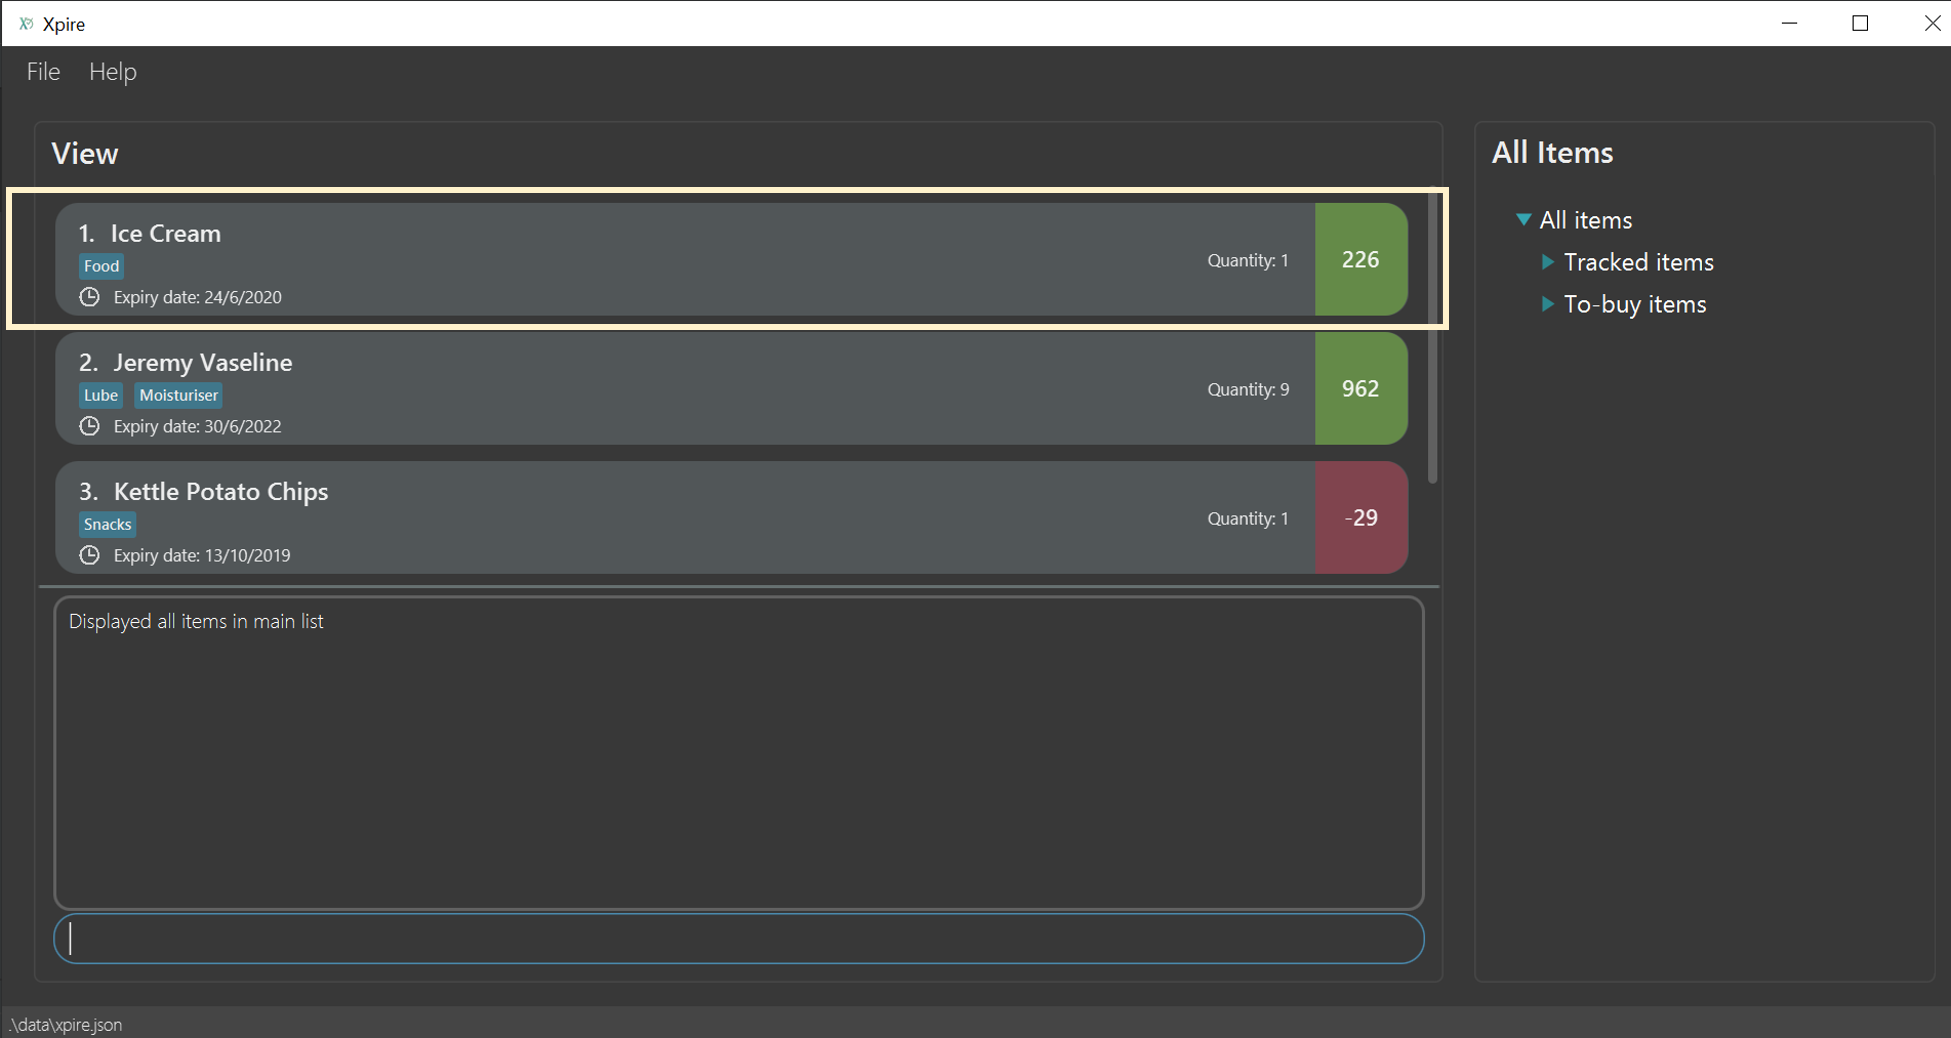
Let’s say you have this list of expired items and you want to remind yourself to replenish the first item in the list—the ice cream.
To do so, you can transfer the ice cream to the replenish list by typing shift|1, where 1 refers to item number displayed.
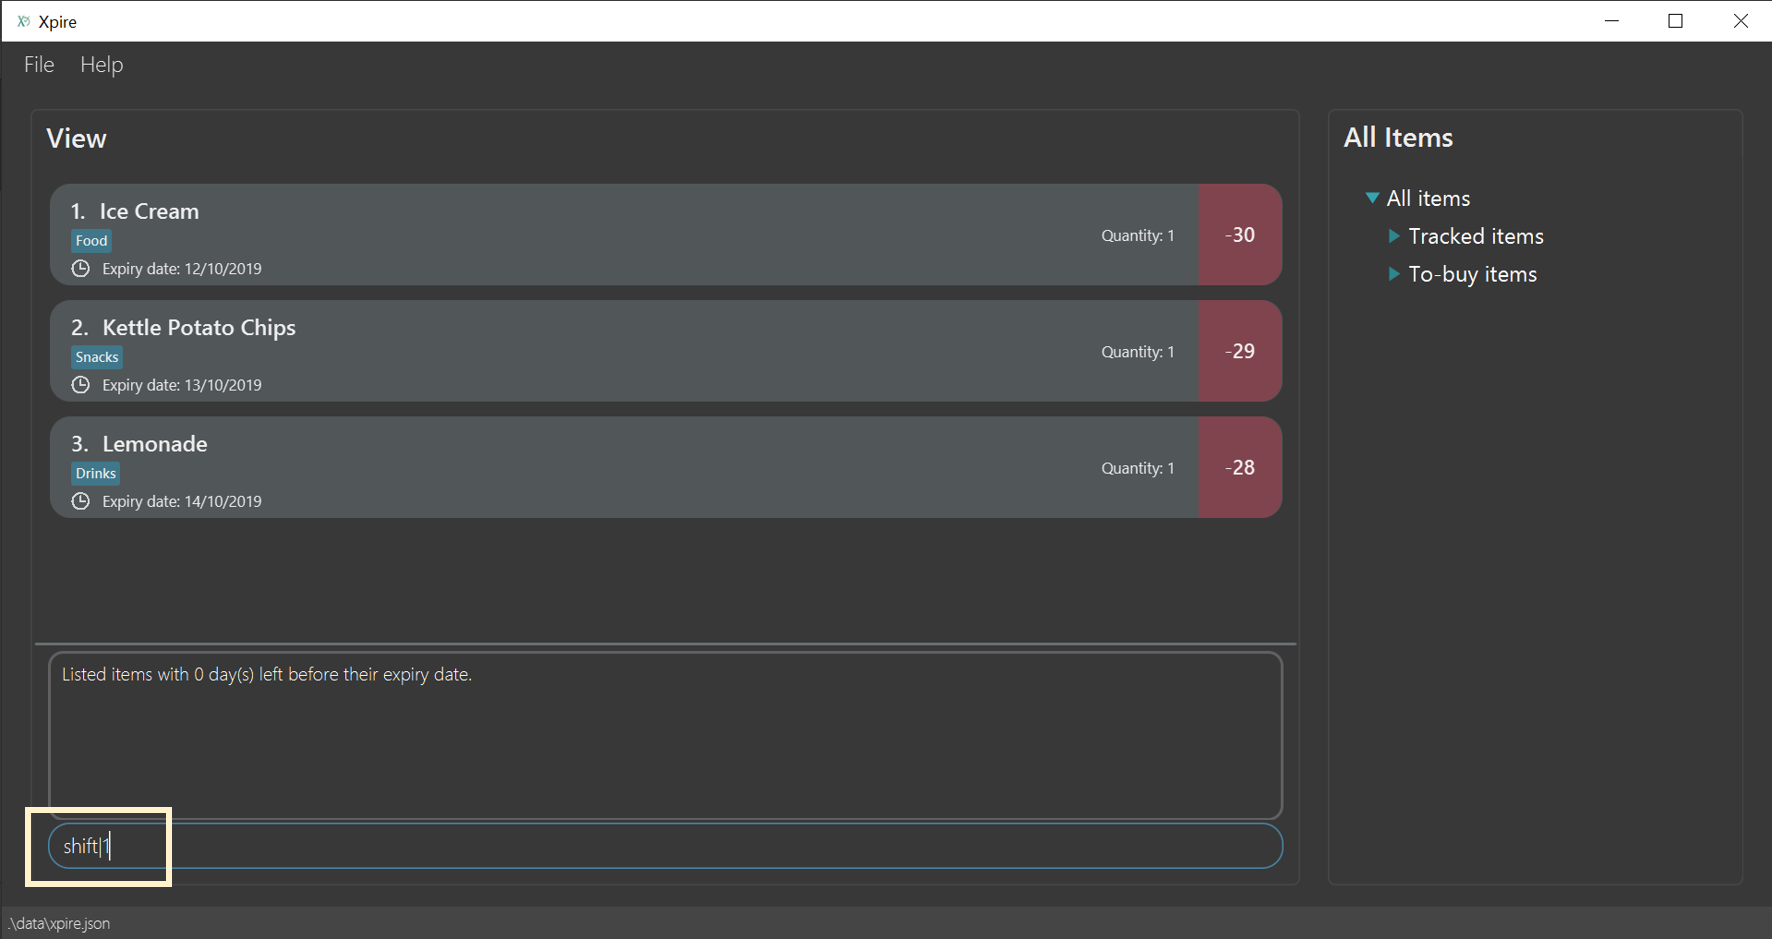
With this, your item will be shifted to the replenish list as seen from the figure below. When you go for grocery shopping in future, you can refer to this handy replenish list to stock up on your ice cream, or any items that have run out.
Shift command.4.1.6.2. Shifting an item from the replenish list to the main list
After some shopping, you may have stocked up on the items that were in the replenish list.
Now, you want to add these items back to your tracking list to keep track of their new expiry dates.
To do so, you can simply use the shift command again.
Format: shift|<index>|<expiry date>[|quantity]
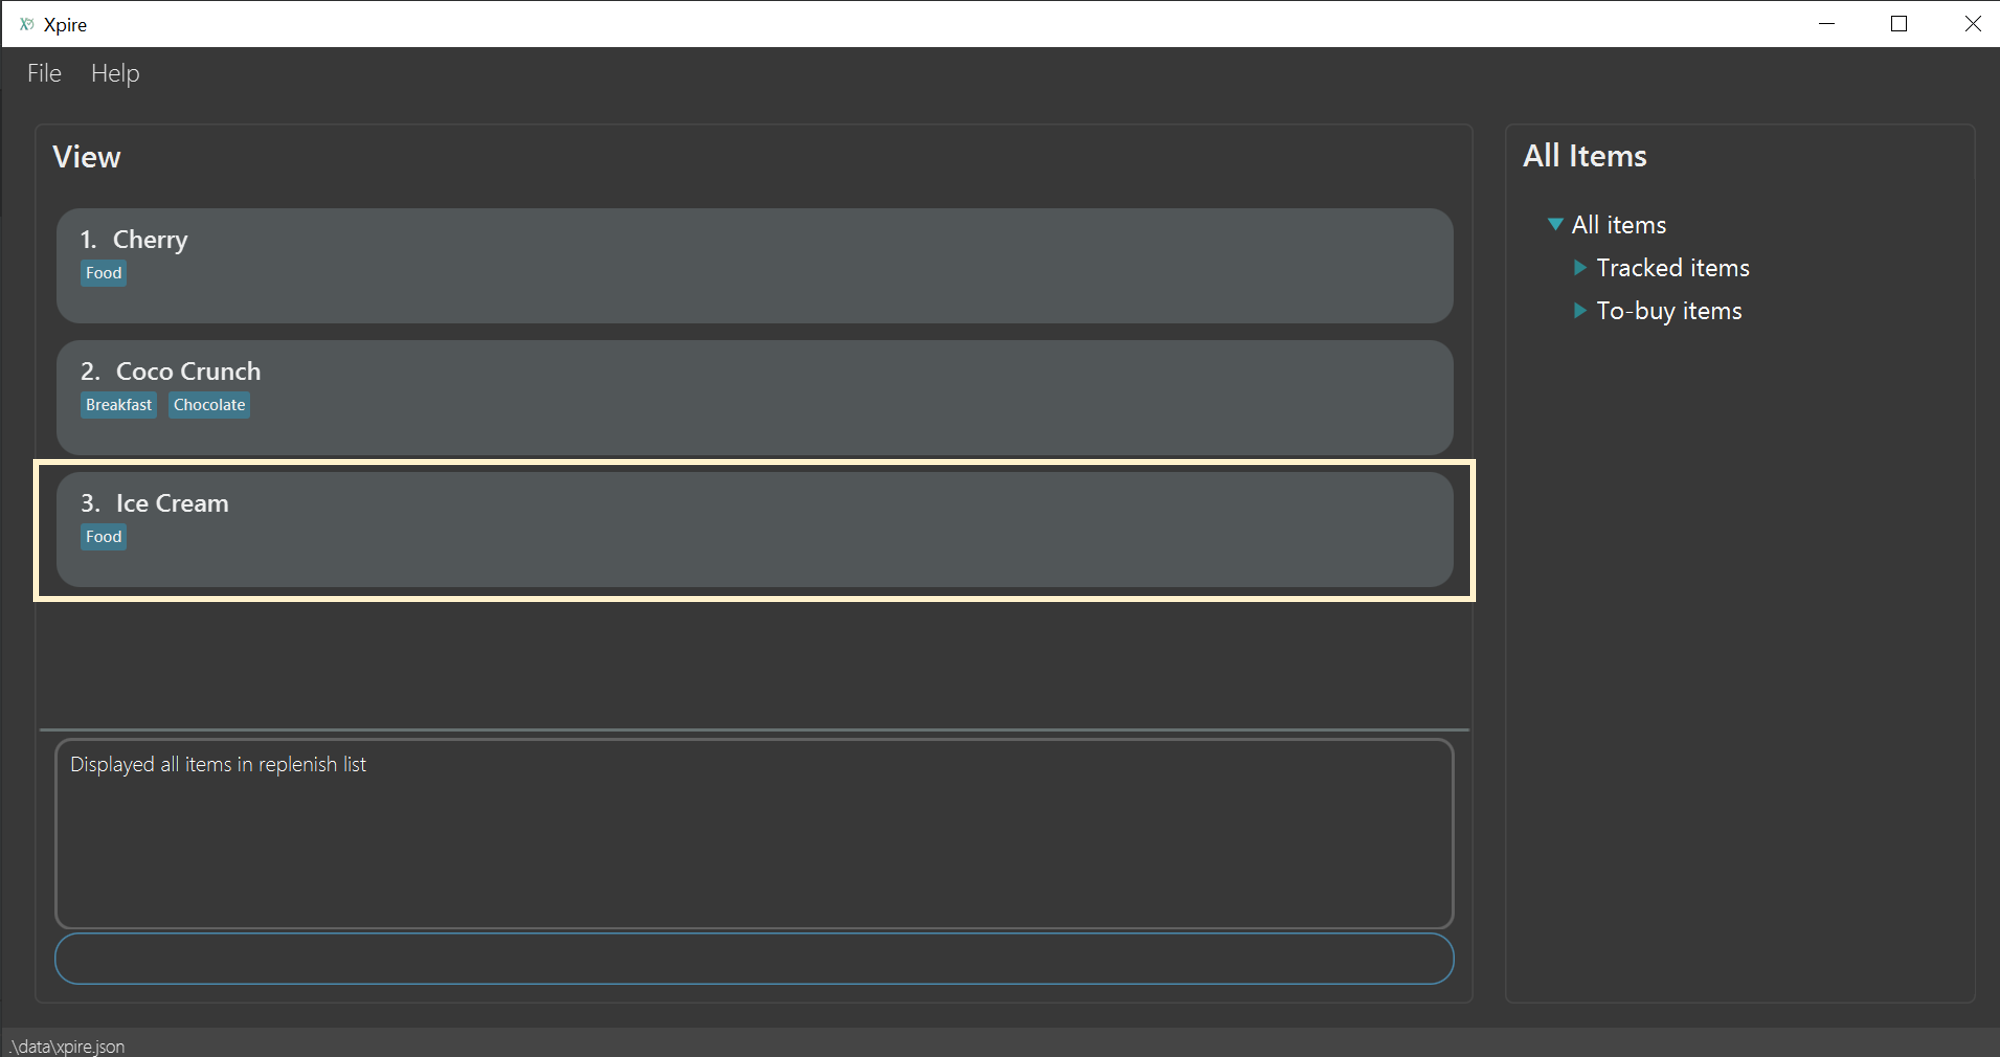
For example, you have just replenished the ice cream and you wish to keep track of its expiry date again.
To transfer the ice cream back to the tracking list, simply key in shift|3|<expiry date>[|<quantity>].
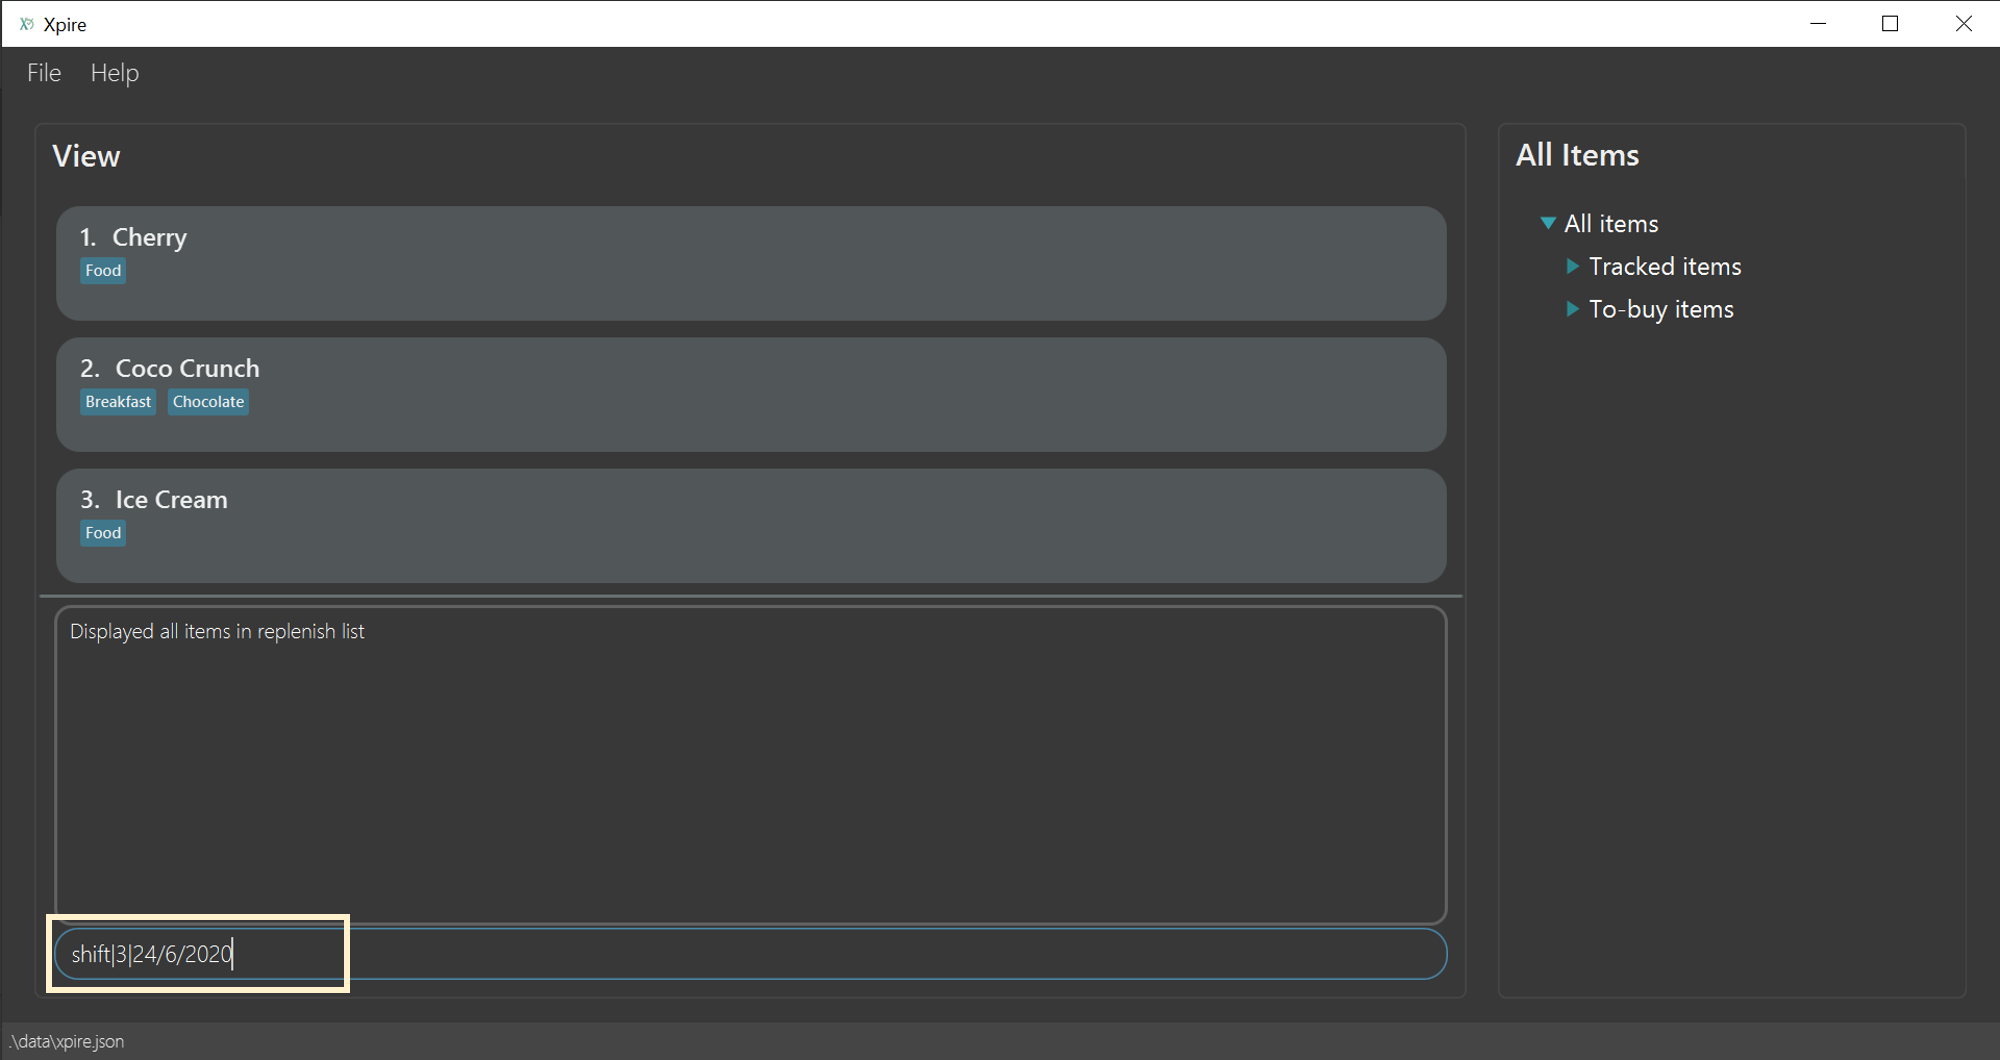
Now, the ice cream that you just bought is added back to the tracking list.
| If you only have one of a particular item, you only need to key in the item number and expiry date (without keying in the quantity)! We’ll do the rest for you. |
4.1.7. Tagging an item : tag
4.1.7.1. Display all tags created
Shows all the tags in the current list view.
Format: tag
Like help and export, this command is not undoable.This command does not show tags of items that are not on the current list on the screen. If you would like to view all the tags in the main list or the replenish list, simply key in view, followed by tag!
|
4.1.7.2. Add new tag(s) to an item
Tags an item from the list according to your own input
Format: tag|<index>|<tag>[<other tags>]…
| You can tag a particular item with more than 2 tags or more at a time. Just be mindful of the 5 tags per item limit! |
Examples:
-
view|main
tag|2|#Nestle #Caffeine
Tags the 2nd item in the main list with#Nestleand#Caffeine.
4.1.8. Deleting variable(s): delete
4.1.8.1. Deleting an item
Deletes the specified item from your list.
Format: delete|<index>
Examples:
-
view|main
delete|2
Deletes the 2nd item in the main list. -
sort|name
delete|3
Deletes the 3rd item in the sorted main list. -
search|potato
delete|1
Deletes the 1st item in the results of thesearchcommand.
4.1.8.2. Deleting certain tags from an item
Deletes tag(s) from the specified item.
Format: delete|<index>|<tag>[<other tags>]…
Examples:
-
view|main
delete|3|#Fruit #Food
Deletes the tags#Fruitand#Foodfrom the 3rd item in the main list.
4.1.9. Clearing all entries : clear
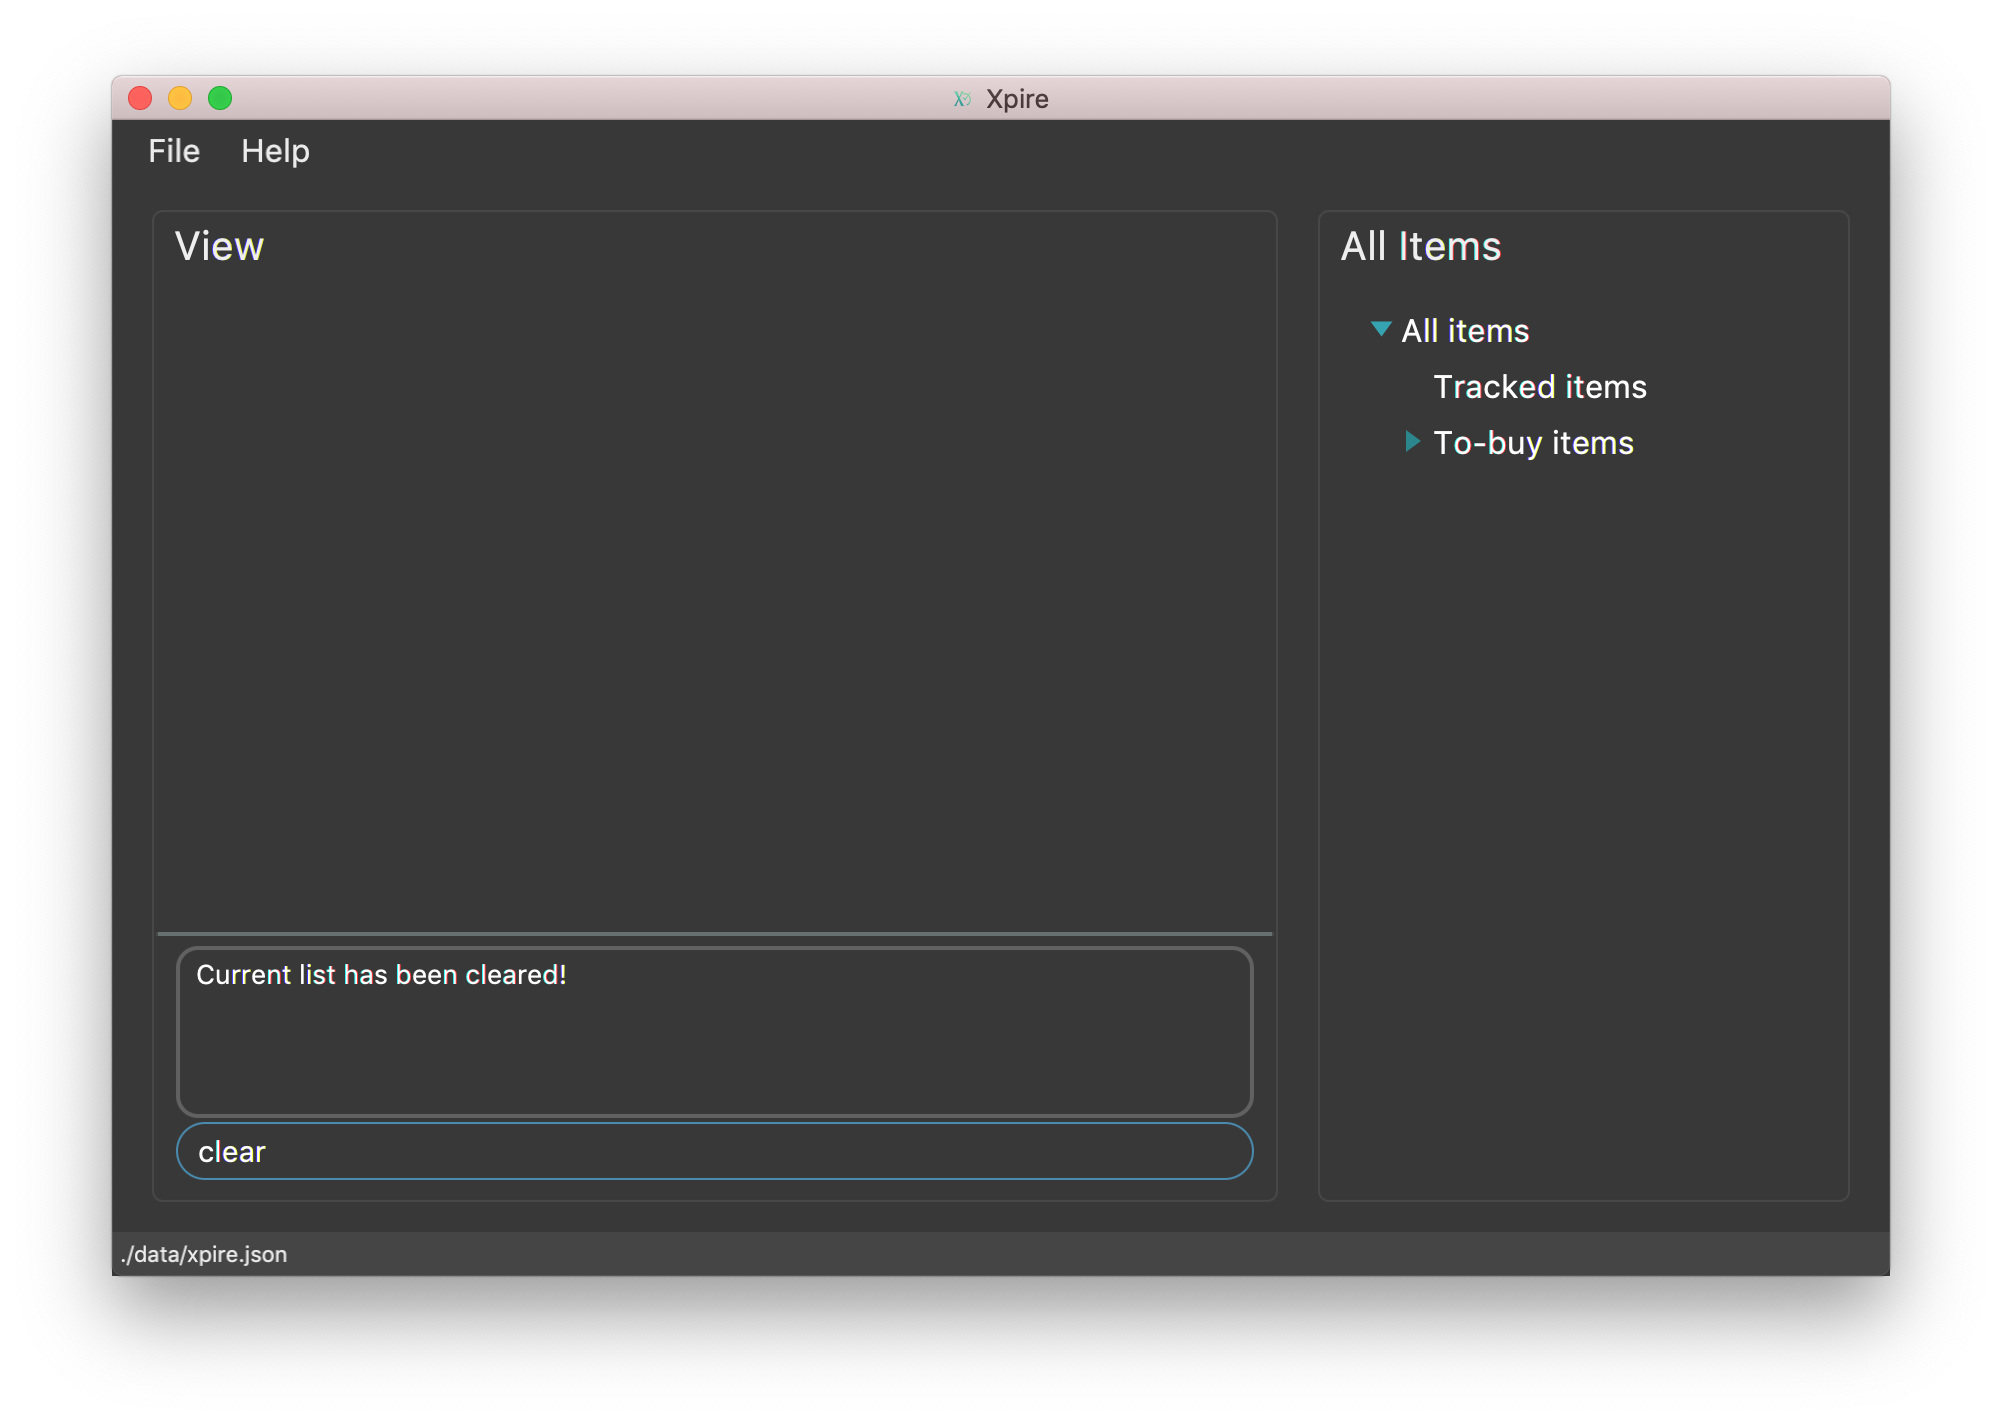
Want a quick way of deleting all the items in the current view list?
You can simply type clear and all items in the current view list will be deleted immediately.
Format: clear
clear is designed to work only on the current view list. In other words, clear will only
delete all items which exists in the current view list.
|
Example:
-
While on the current view list (see Figure 10), input
clearto remove all items in the list (see Figure 11)
4.1.10. Undo previous command : undo
Undo the previous command that you have entered in.
Format: undo
undo only works on commands that alter your items or the current view!Thus, commands such as help and export are not undoable as they do not alter items or the current view.Also, undo only works for the last 10 commands. Therefore, make sure you are certain before you type in a command!
|
The undo command also tells you the exact user input you have keyed in as well as what command was entered so that you know what you have undone.
4.1.11. Redo an earlier command : redo
Redo an earlier command that you have entered in.
Format: redo
This command works in the opposite way as undo, it will redo any command that you have undone in the past.
Keying in a new command other than redo will erase the earlier command that you have undid. Thus, doing so will not allow you to redo that command again.
|
4.1.12. Exporting data (multi-platform) : export
Thinking of viewing the list of currently tracked items on your mobile phone? Want to have a
copy of the to-buy items on your mobile phone so that you can refer to it while shopping?
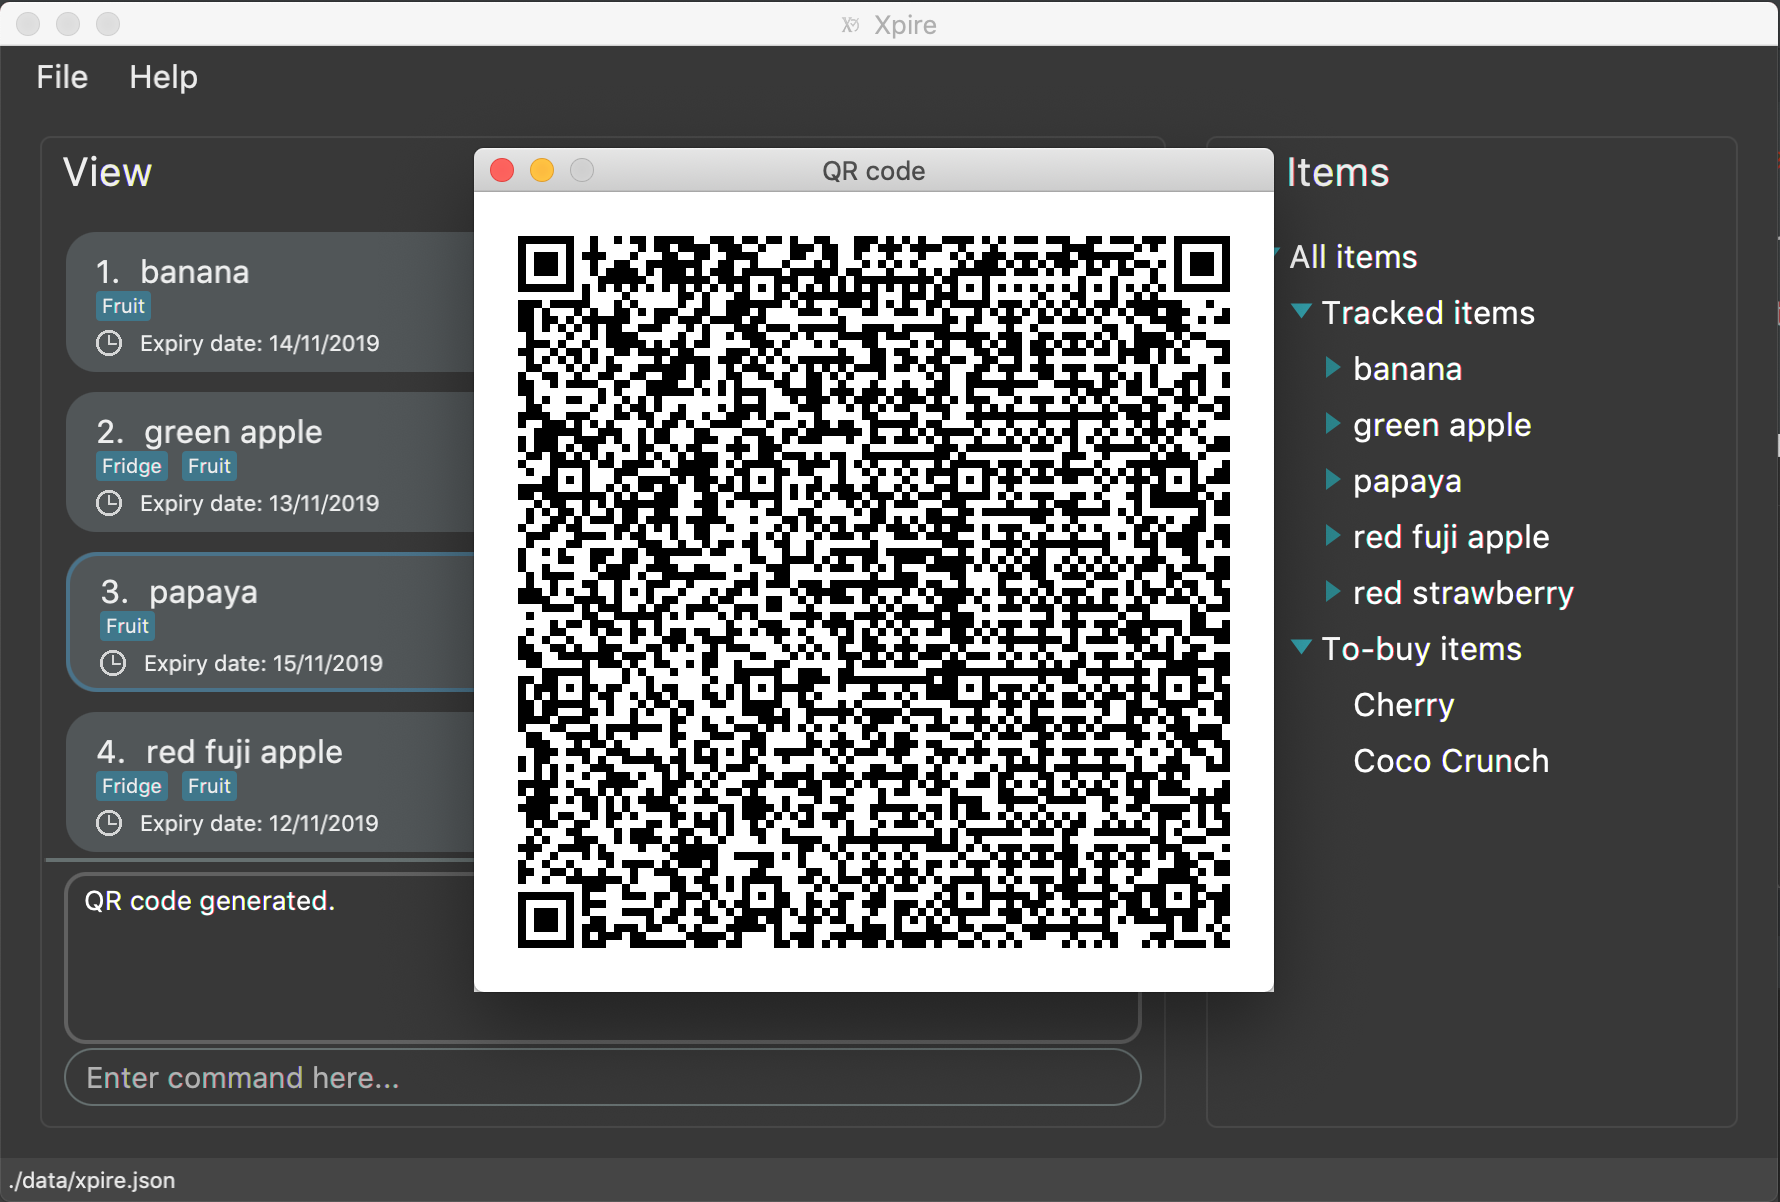
With Xpire’s export feature, you can easily transfer the list of items to any platform
by simply scanning the generated QR code.
Xpire can not only help you track your items' expiry dates, it can also export the current list of items through a QR code (see Figure 12). Any device with a QR code reader will be able to download the list of items (see Figure 13).
Format: export
|
Depending on the operating system of your mobile phone, you may be directed to a google search page after scanning the QR code. Follow the steps below to rectify this issue if necessary. |
-
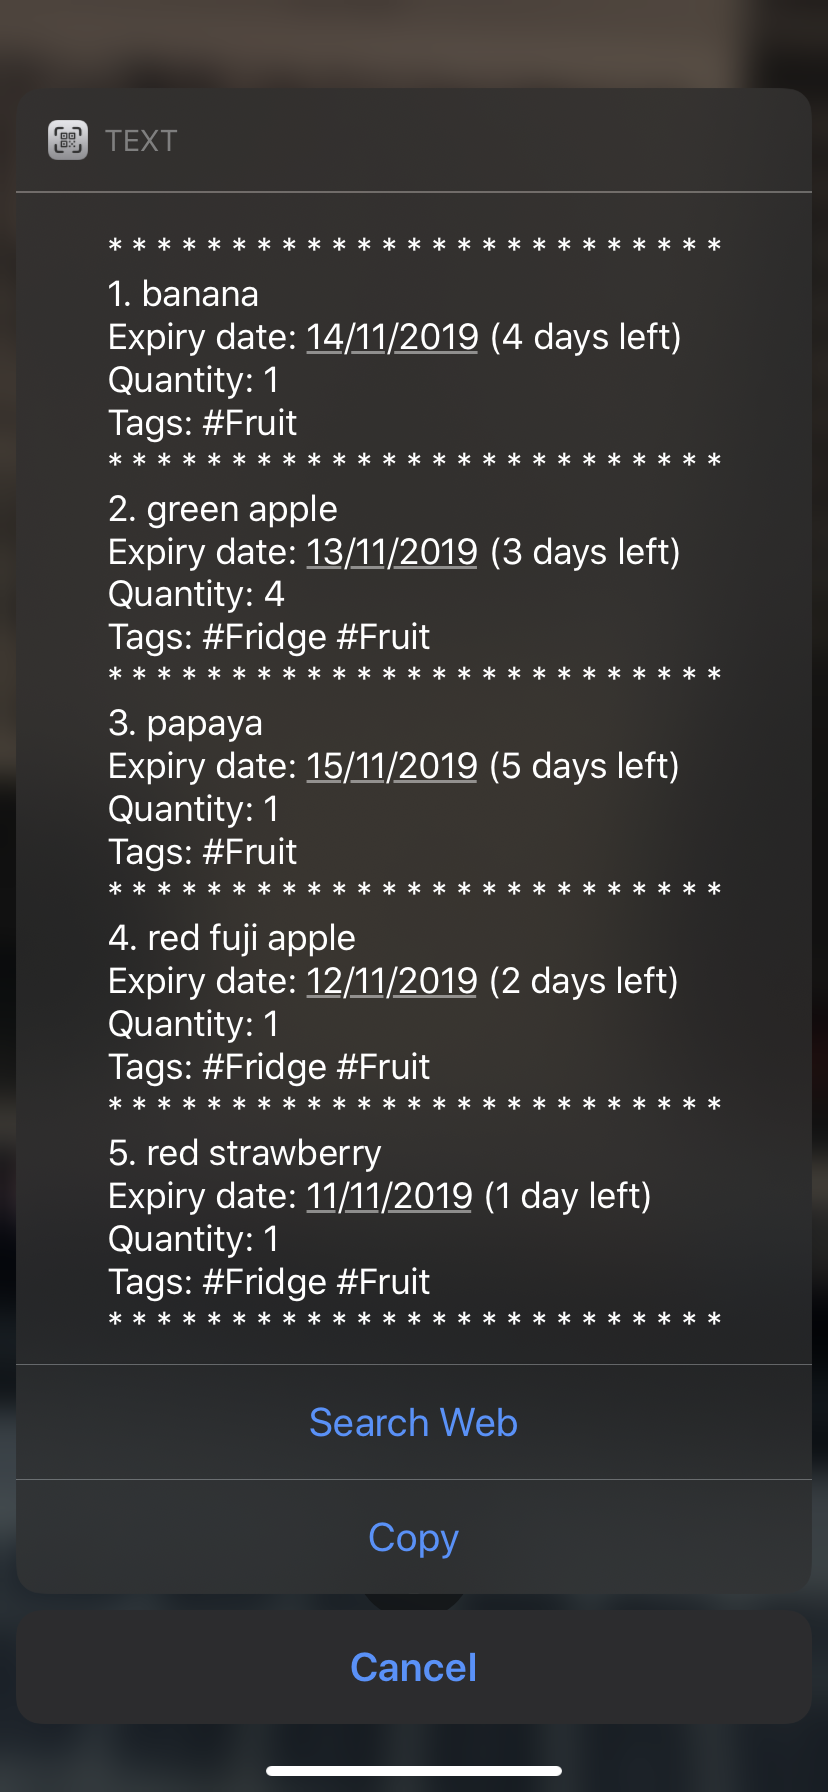
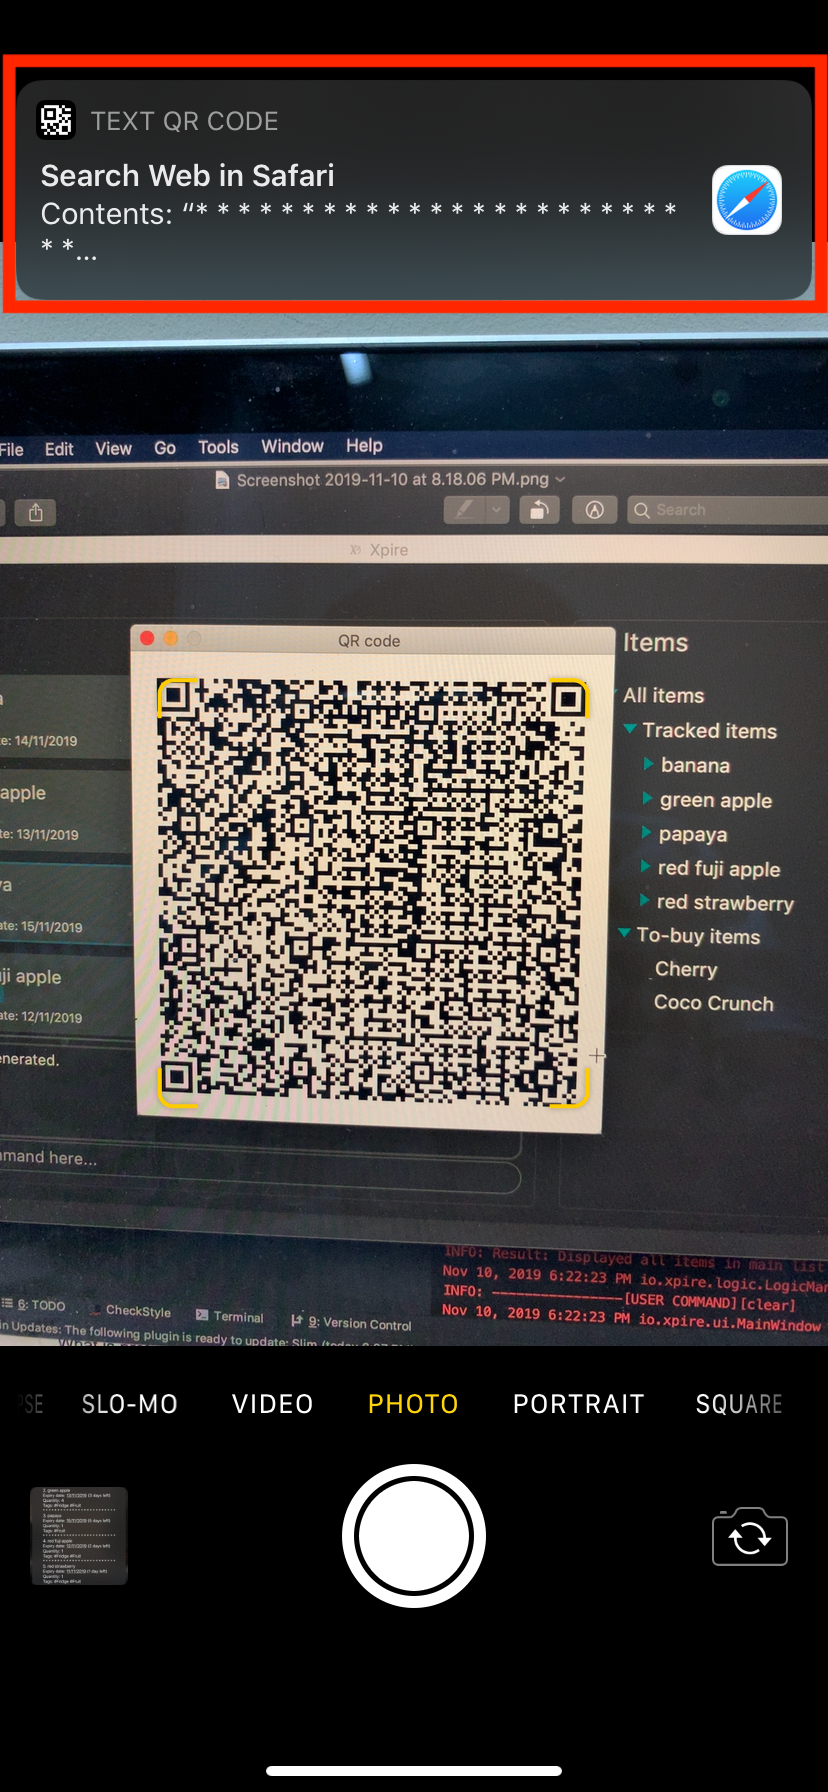
Upon scanning the QR code, you may see a pop-up prompt suggesting to you to search the content received on the web (see Figure 14).
-
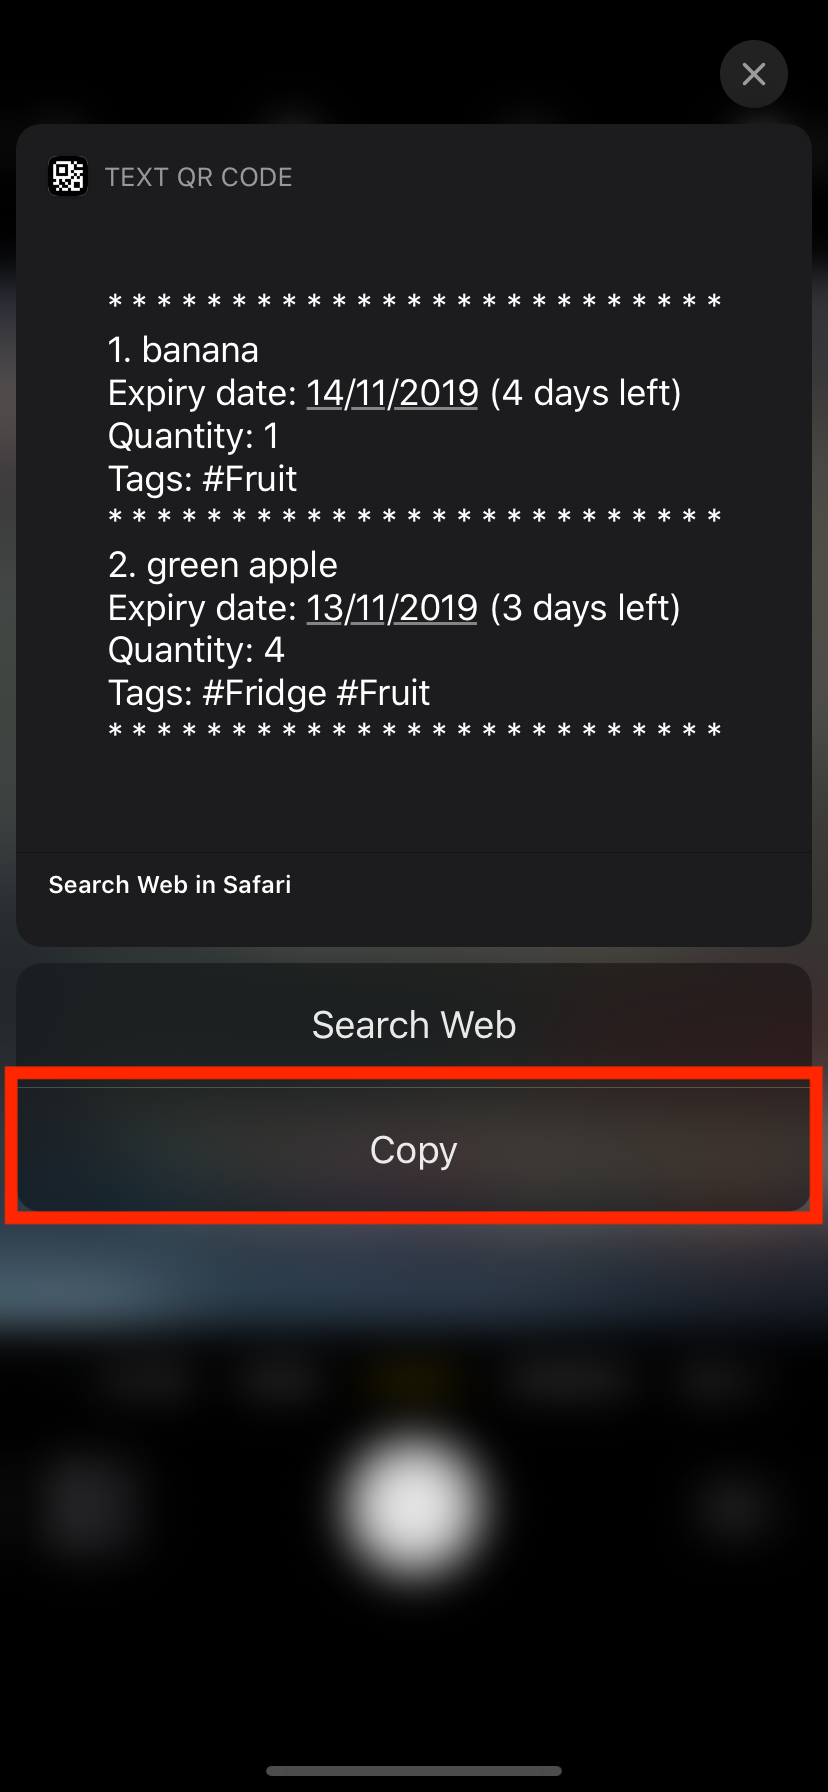
Instead of immediately accepting the suggestion, press and hold on the prompt to reveal the other options available (see Figure 15). Choose "Copy" or any other similar options.
-
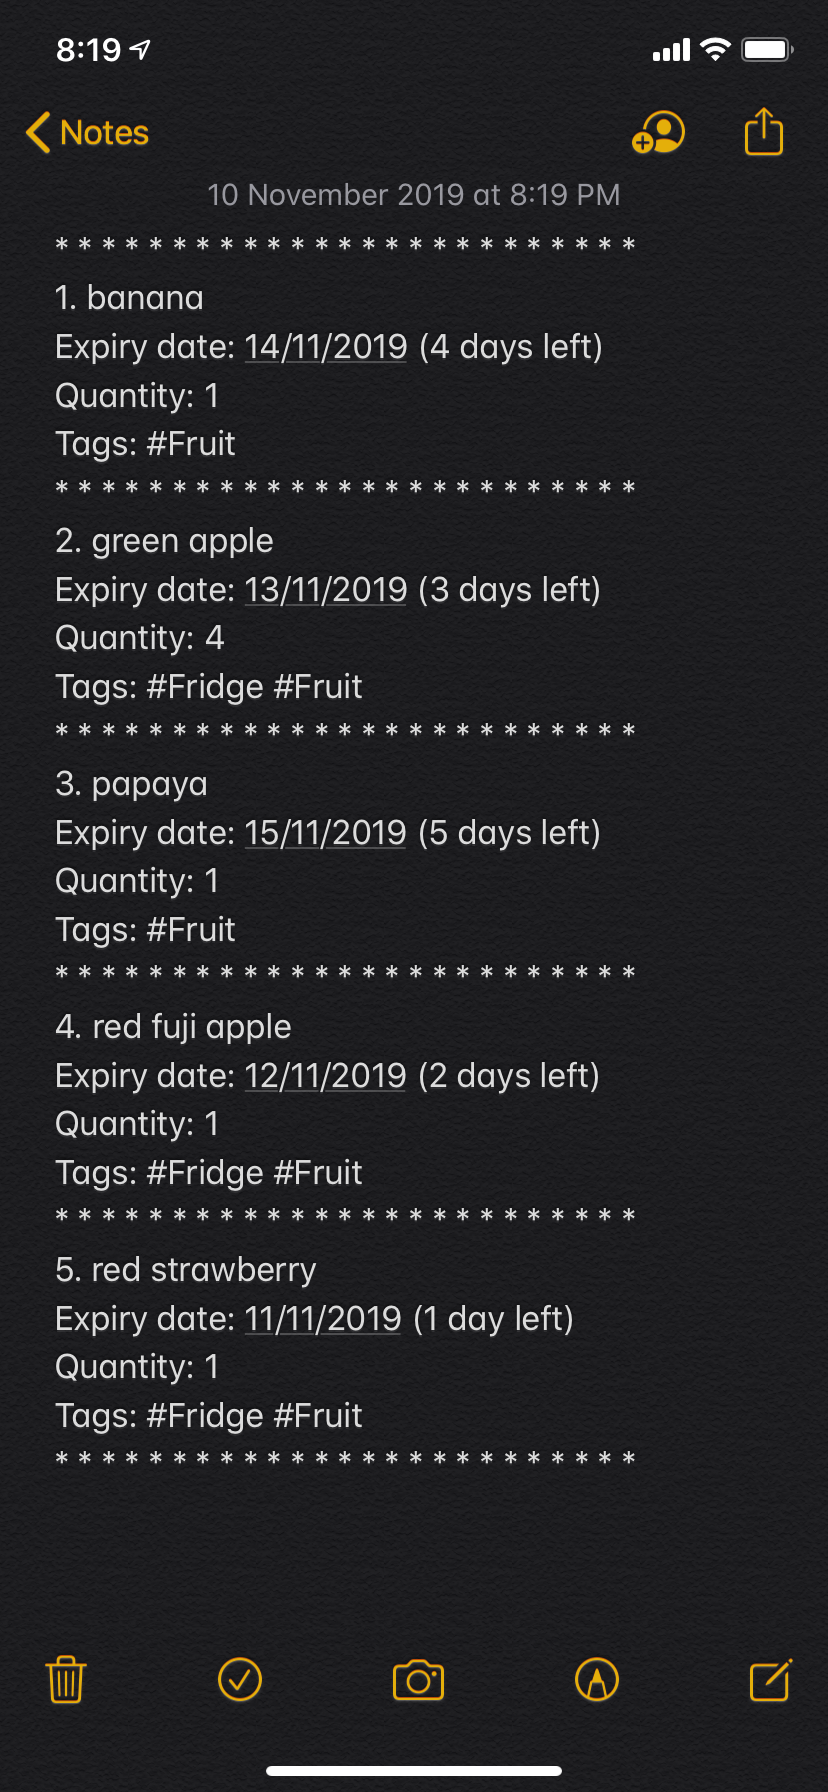
Once the content has been copied, you can simply paste and save the content on Notes or any other notepad application on your mobile phone (see Figure 16).
4.1.13. Exiting the application : exit
Exits the application.
Format: exit
4.1.14. Saving the data
As items will be saved in the hard disk automatically, you do not need to worry about saving manually after executing any command that modifies the list.
4.2. Main tracking list features only
4.2.1. Adding an item: add
Let’s say you bought an item and you want to add it into the tracker to keep track of its expiry date.
This can be done using the add command easily.
| For items with single quantity, you can save time by keying in only the item name and expiry date. |
Format: add|<item name>|<expiry date>[|<quantity>]
For example,
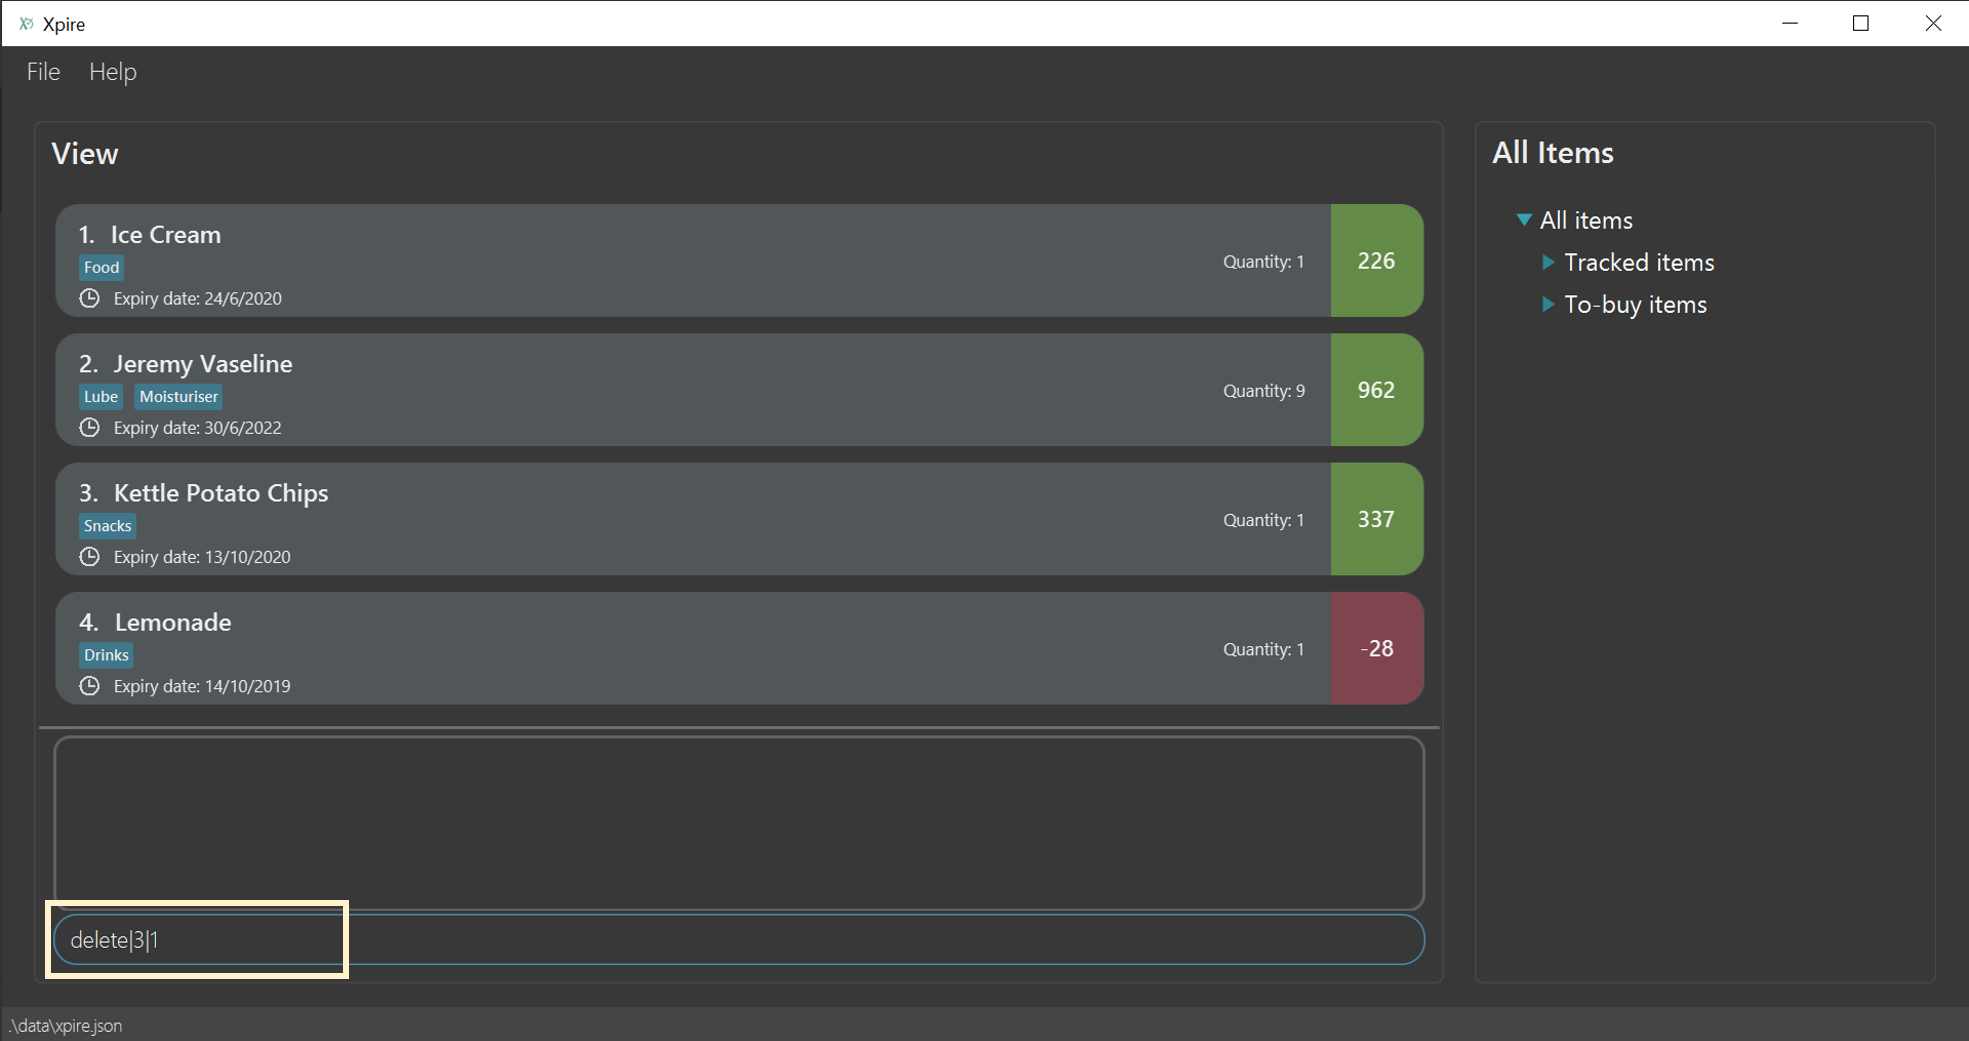
4.2.2. Deleting an item’s quantity: delete
4.2.2.1. Reducing the quantity of an item
If you would have used up a certain amount of your item, you can use the delete command.
By specifying the item number and the quantity to be reduced, you can easily decrease your item’s quantity in the tracking list.
Format: delete|<index>|<quantity>
Let’s say you have just consumed the entire bag of Kettle potato chips as shown in the list below.
Now, you no longer have any more potato chips, so you would like to update the item quantity on the tracking list.
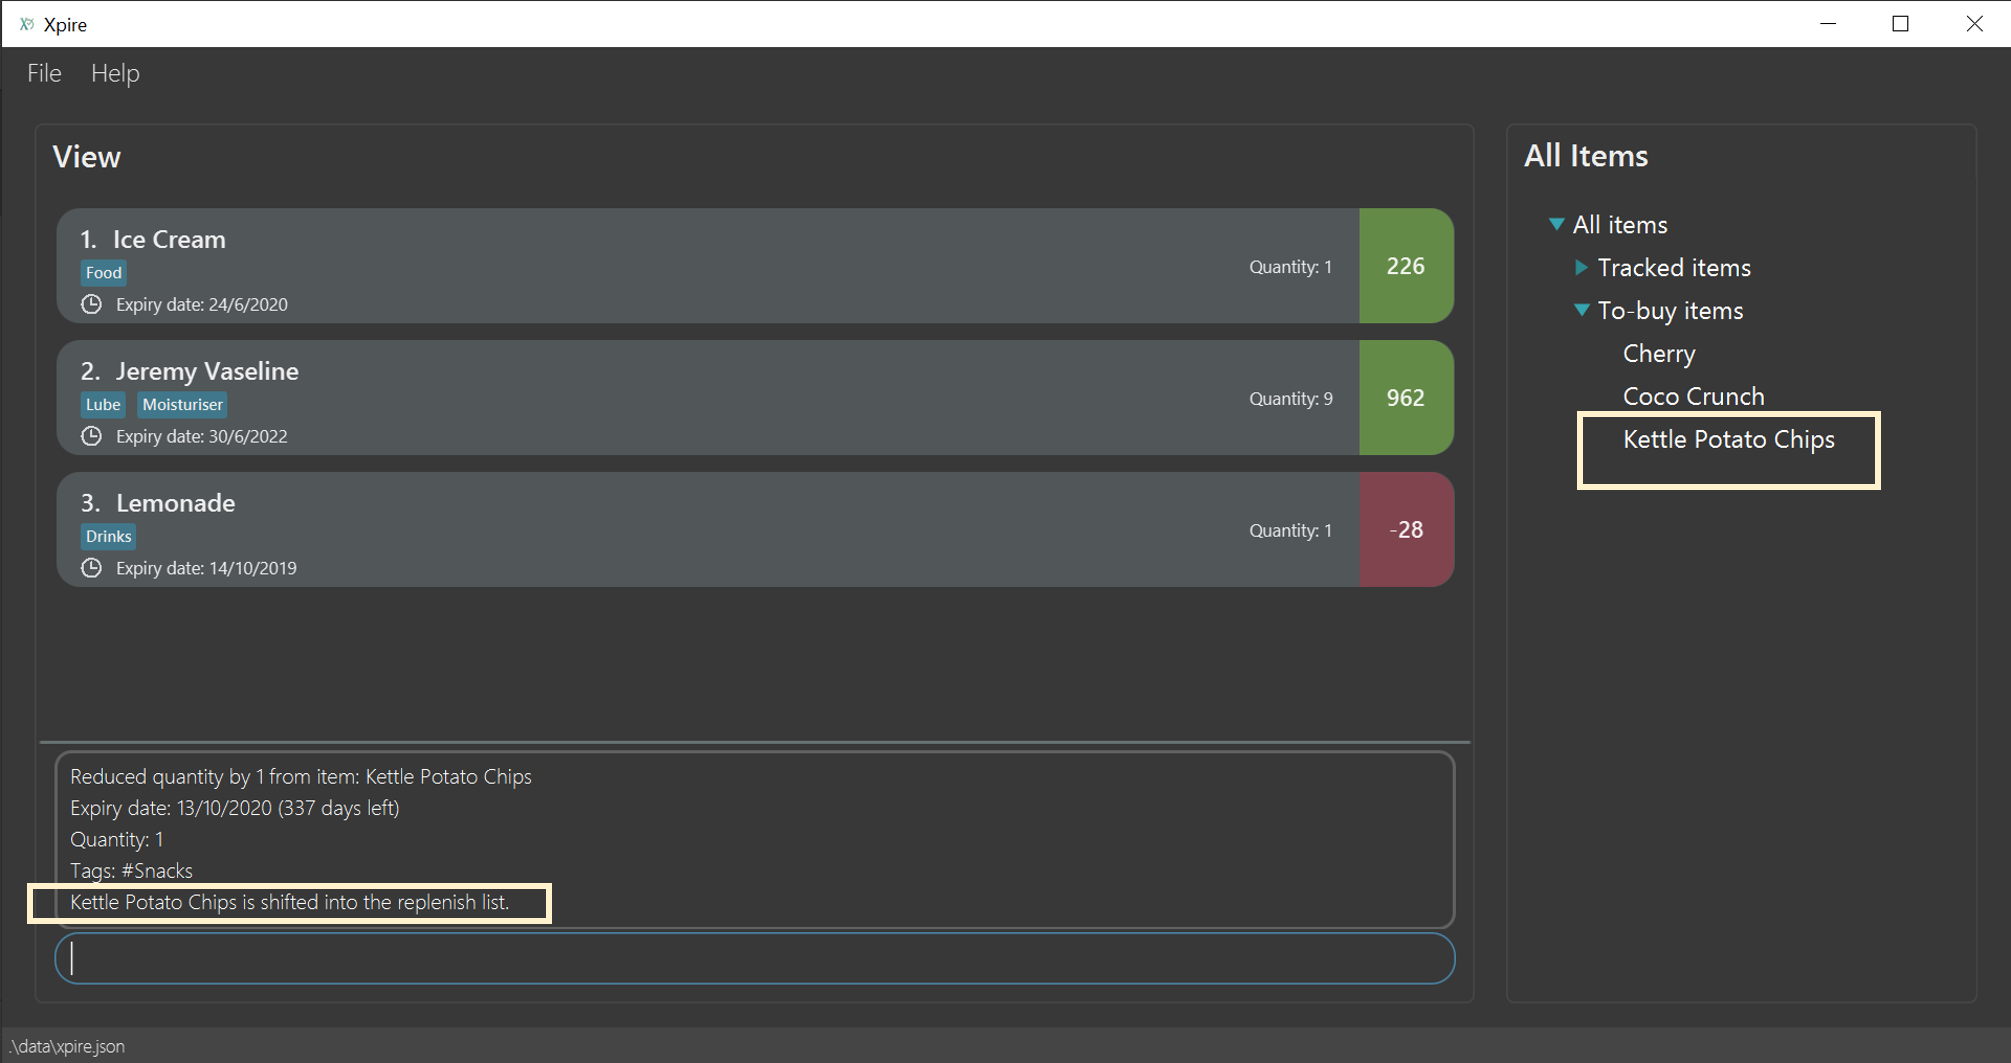
To update the potato chips with the new quantity, simply key in delete|3|1.
Since the item has run out, you would also like to add it to the replenish list so that you will be reminded to stock up on it. To save you the trouble of keying in the details again, our system has already automatically added the chips to the replenish list for you.
Examples:
-
view|main
delete|4|1
Reduces the quantity of the 4th item by 1.
4.2.3. Tagging an item : tag
4.2.3.1. Display all tags created
Shows all the tags in the current list view.
Format: tag
Like help and export, this command is not undoable.This command does not show tags of items that are not on the list you are viewing. If you want to view all the tags in the main list or replenish list, simply key in view, followed by tag.
|
4.2.3.2. Add new tag(s) to an item
| An item can have up to 5 tags. |
Tags an item from the list according to user input
Format: tag|<index>|<tag>[<other tags>]…
Examples:
-
view|main
tag|2|#Nestle #Caffeine
Tags the 2nd item in the main list with#Nestleand#Caffeine.
4.2.4. Setting reminder for an item: set reminder
4.2.4.1. Adding a reminder some days before an item’s expiry date
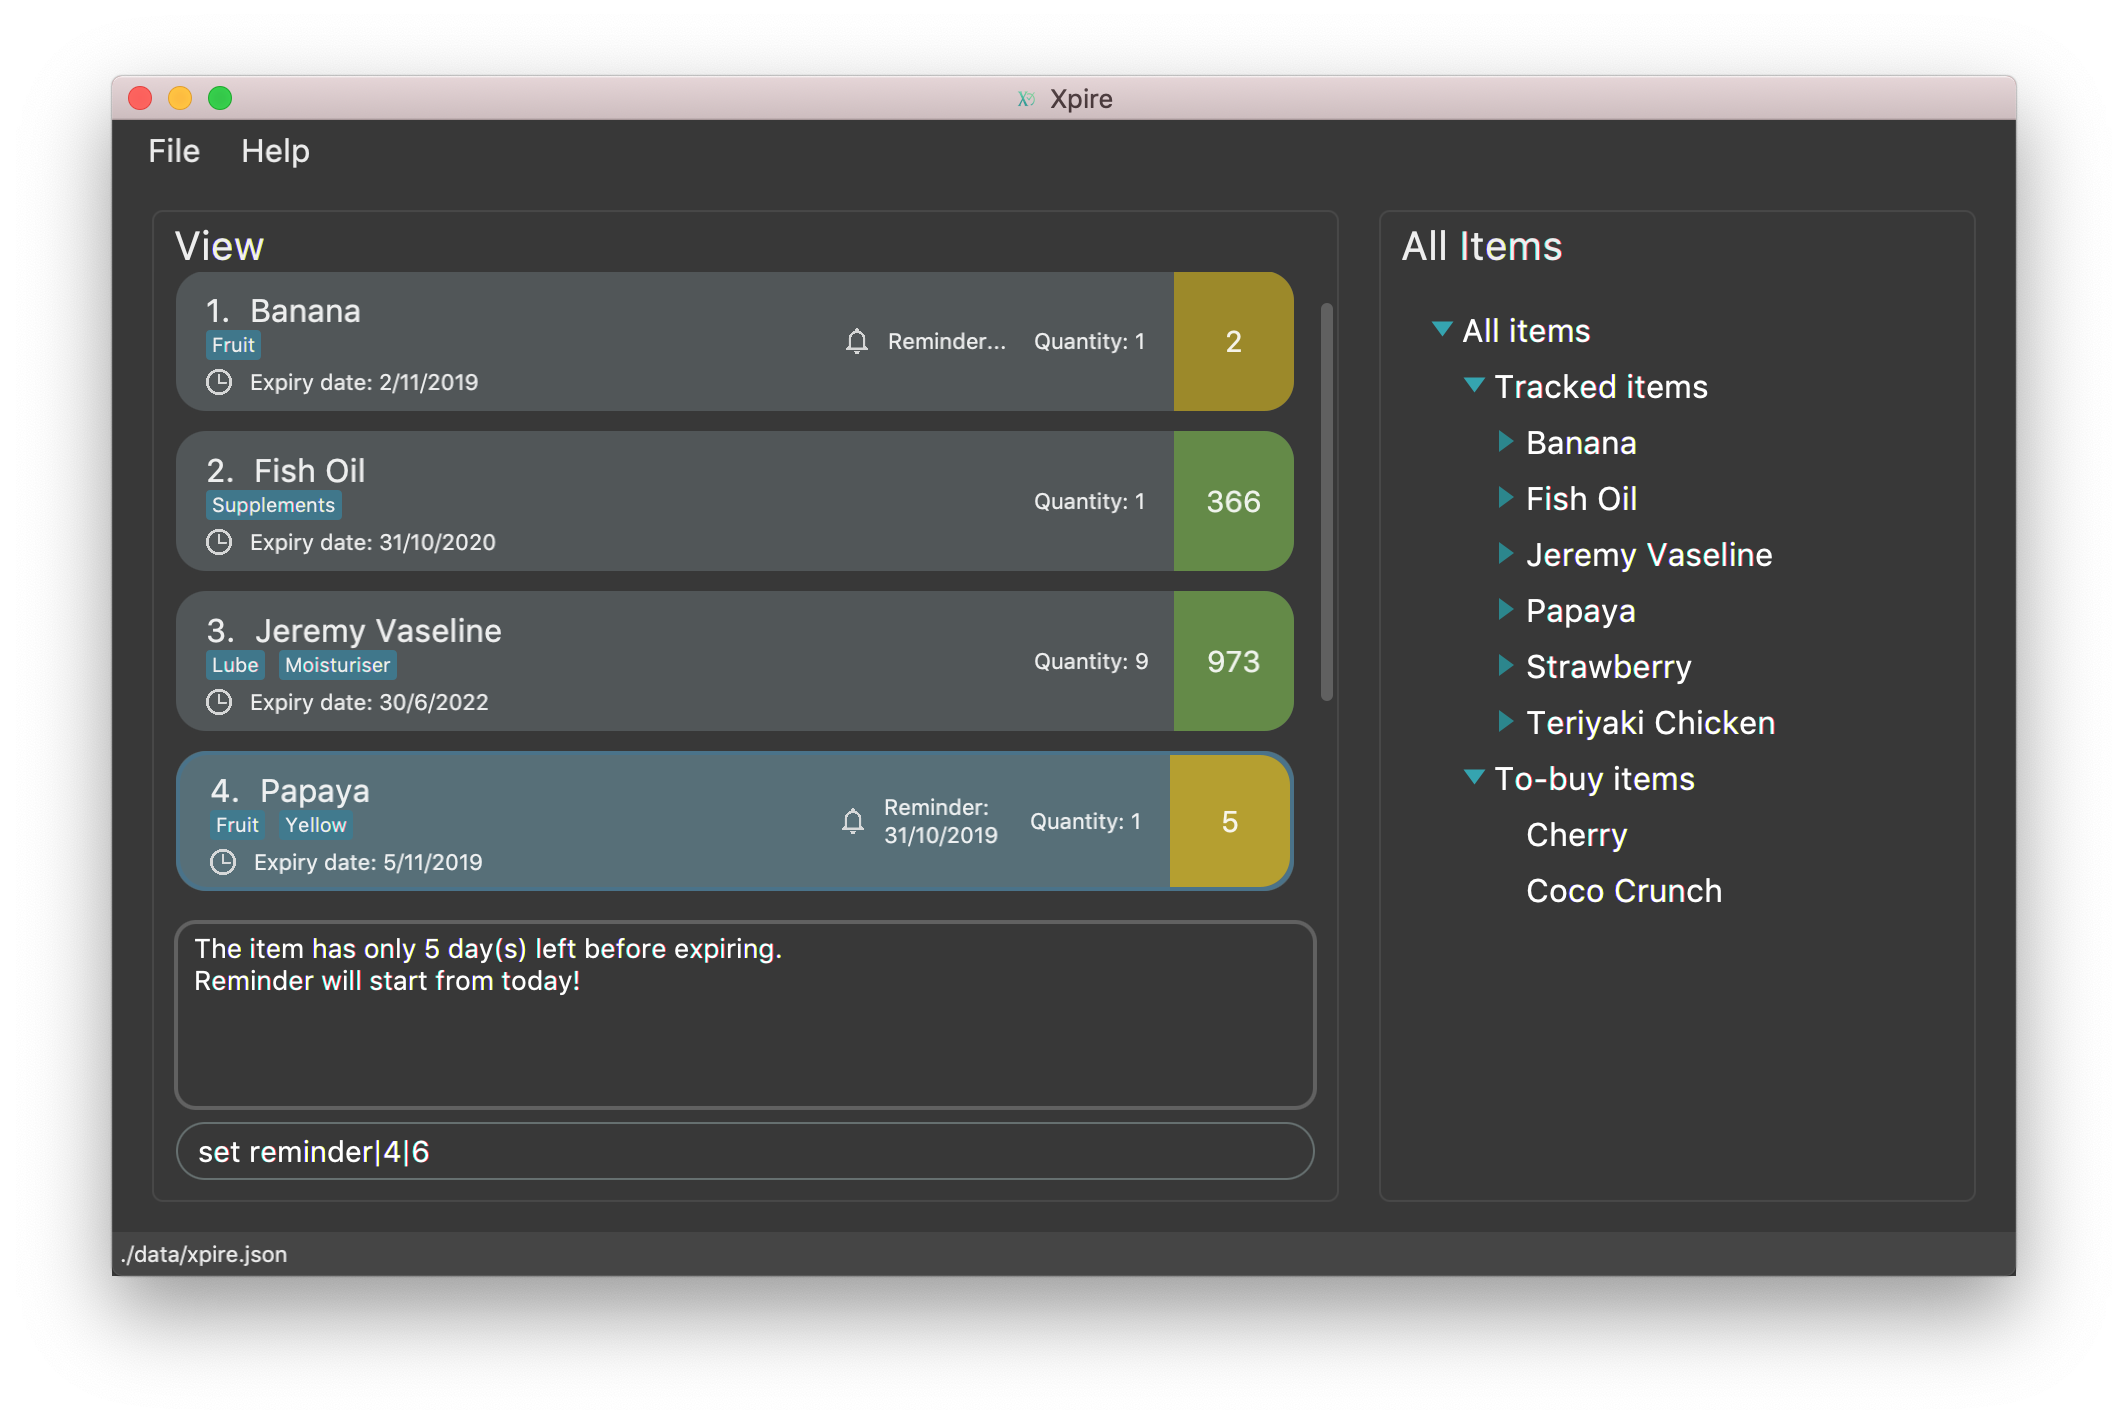
Sets a reminder for your item.
Format: set reminder|<index>|<reminder threshold>
Set reminder is designed for you to customise when you want to be alerted of an item’s condition. In the above example, reminder threshold refers to the number of days before the item’s expiry date. The reminder for an item will be activated when the number of days left before an item’s expiry date is less than or equal to the reminder threshold. In other words, by setting the reminder threshold of an item to n days, you start to be reminded of this items n days before its expiry date.
To reduce disturbance, the app does not pop up notifications. Instead, you will be reminded through the alerting yellow colour
of the item whose reminder has been activated in the View list. You can also view all items with active reminder through the check command.
(Refer to the following section.)
Examples:
-
set reminder|2|4
Sets a reminder for the second item in the list 4 days before its expiry date.
4.2.4.2. Removing the reminder for an item
You can remove the reminder for your item by resetting it to the default value 0.
Format: set reminder|<index>|0
Examples:
-
set reminder|1|0
Removes the reminder for the first item in the list.
4.2.5. Listing expiring items: check
4.2.5.1. Listing all expiring items with activated reminders and expired items
You can easily view all items whose reminder has been activated and who has already expired with the command check.
In other words, this command will show you all items that are in red and yellow
Format: check
4.2.5.2. Listing items that will expire within a certain number of days
Sometimes you forget to set a reminder for an item whose expiry date is drawing close. Don’t worry, you can
easily make a query for items that will expire within a specified number of days.
Format: check|<days>
check|0 lists items that have already expired.
|
Examples:
-
check|20
Lists items expiring in the next 20 days.
4.2.6. Sorting all items : sort
| Your items in both lists are sorted by their names by default. |
To change the way your items are sorted, you can simply use the command sort|<key>,
where <key> can be specified as either date or name.
4.2.6.1. Sorting all items by their date
Example:
Let’s say that you are currently on the main tracking list, and you wish to identify all your items expiring next year.
To expedite your search for these items, simply enter the command sort|date, and all your items will be sorted by their expiry dates
in chronological order.
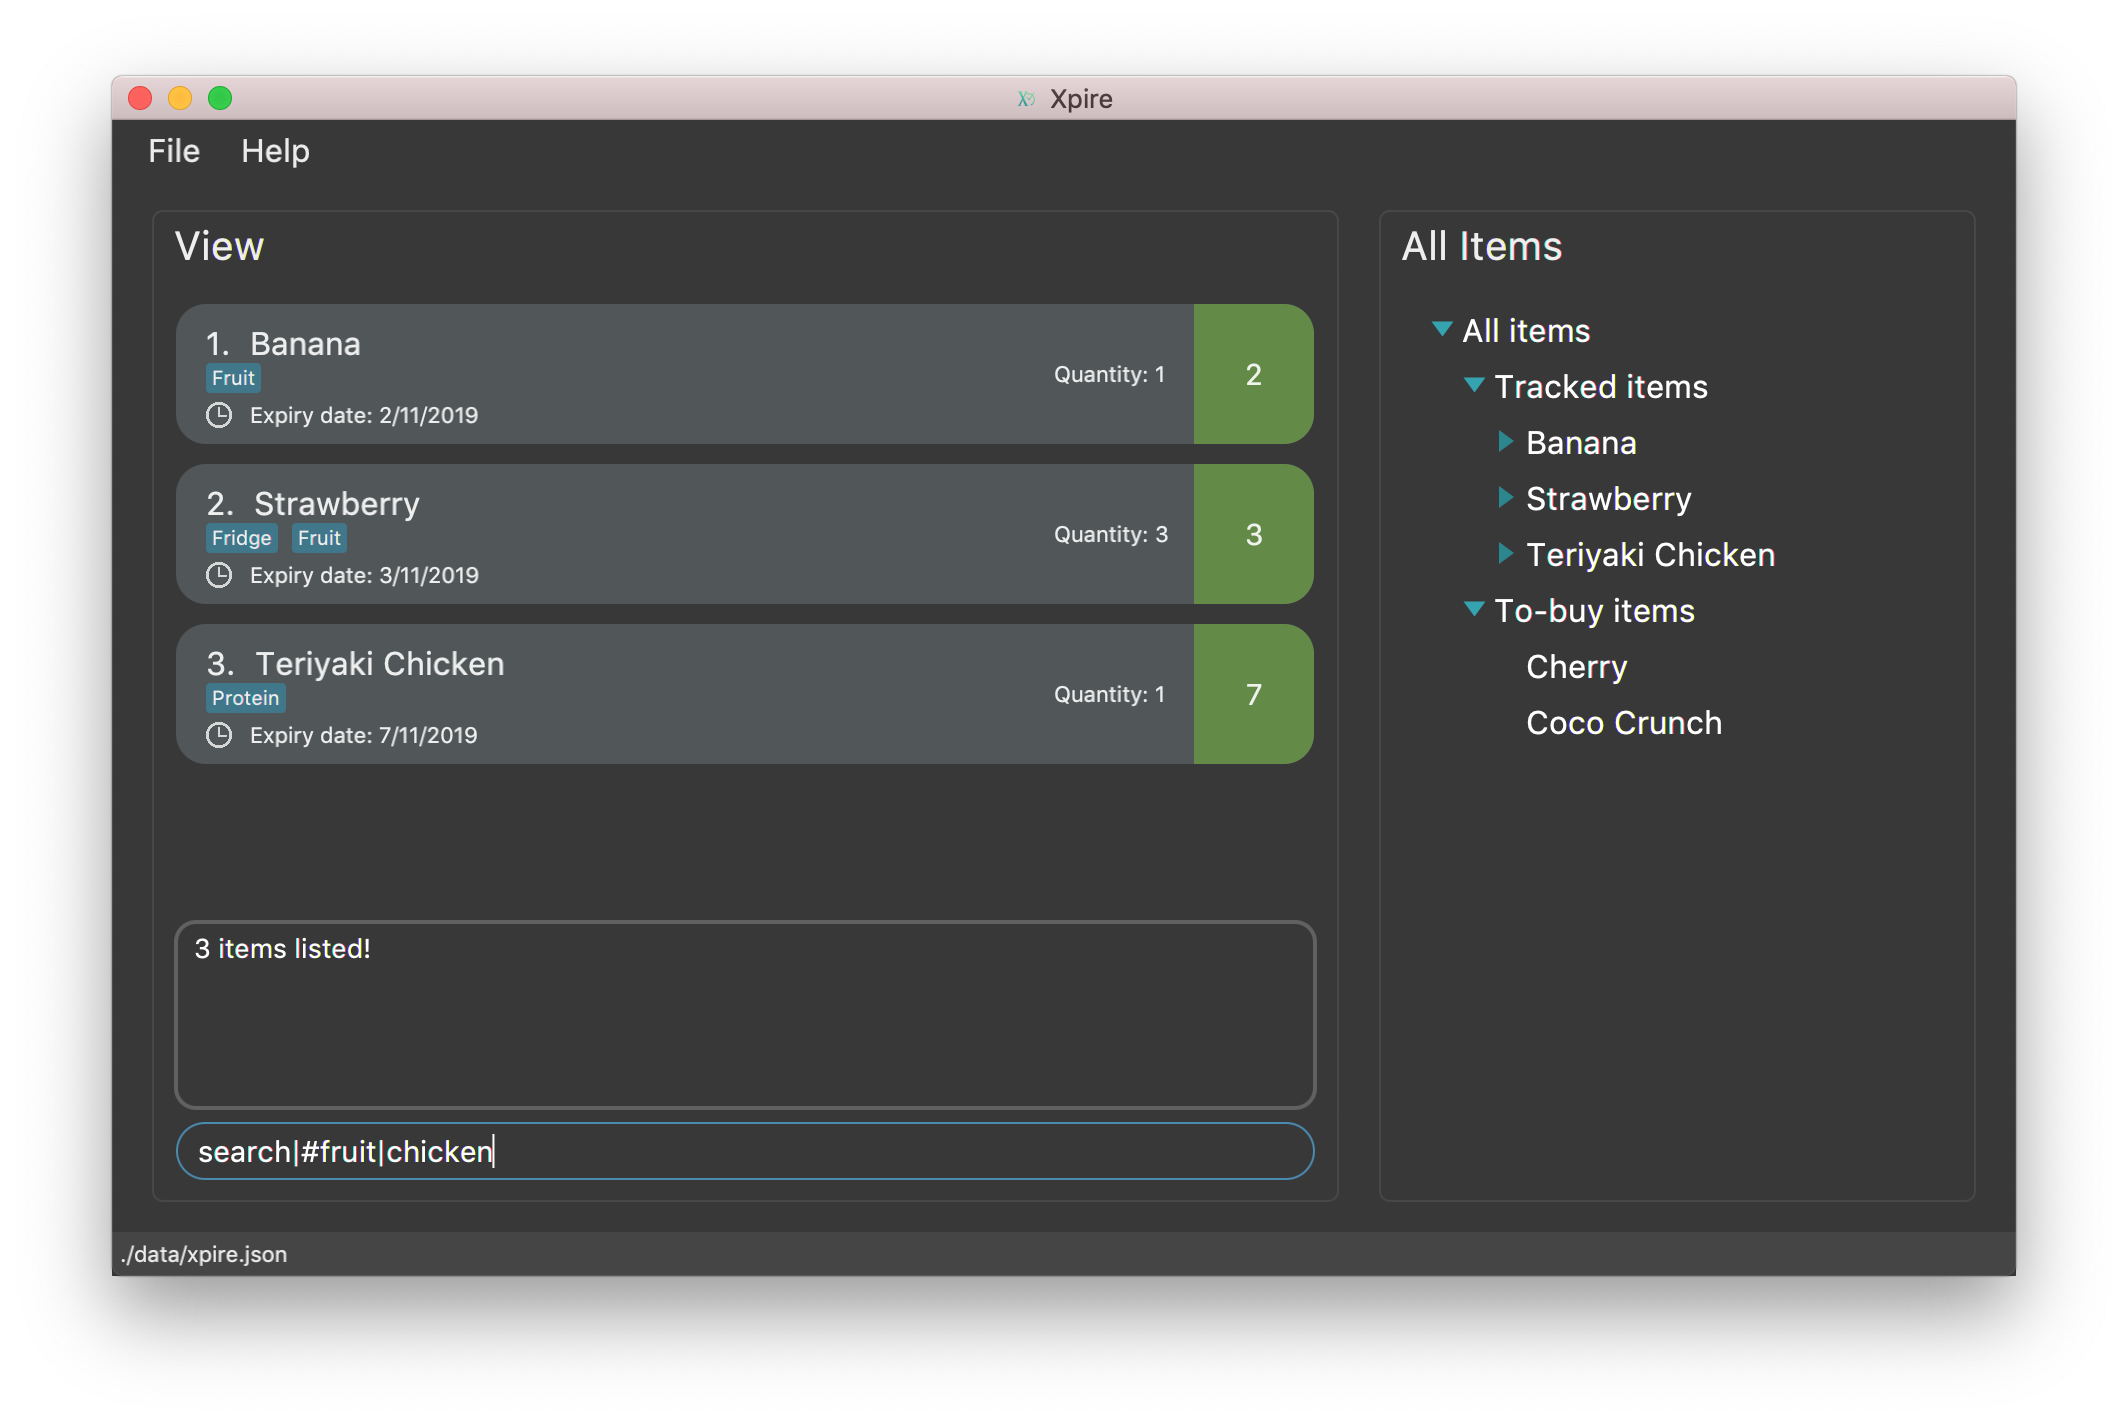
As shown in the figure below, Banana that expires on 2nd November 2019 sorts ahead of Strawberry which expires a day later.

| Items that expire on the same day will be sorted by their names. |
4.2.6.2. Sorting all items by their name
Example:
Let’s say that you have previously sorted your items by their expiry dates to find some items expiring in a certain year.
You can use the command sort|name to return your list to its default method of sorting that sorts your items by their names.
| Items with the same name will be sorted by their expiry dates. |
4.2.7. Undo previous command : undo
Undo the previous command that you have entered in.
Format: undo
undo only works on commands that alter your items or the current view!Thus, commands such as help and export are not undoable as they do not alter items or the current view.Also, undo only works for the last 10 commands. Therefore, make sure you are certain before you type in a command!
|
The undo command also tells you the exact user input you have keyed in as well as what command was entered so that you know what you have undone.
4.2.8. Redo an earlier command : redo
Redo an earlier command that you have entered in.
Format: redo
This command works in the opposite way as undo, it will redo any command that you have undone in the past.
Keying in a new command other than redo will erase the earlier command that you have undid. Thus, doing so will not allow you to redo that command again.
|
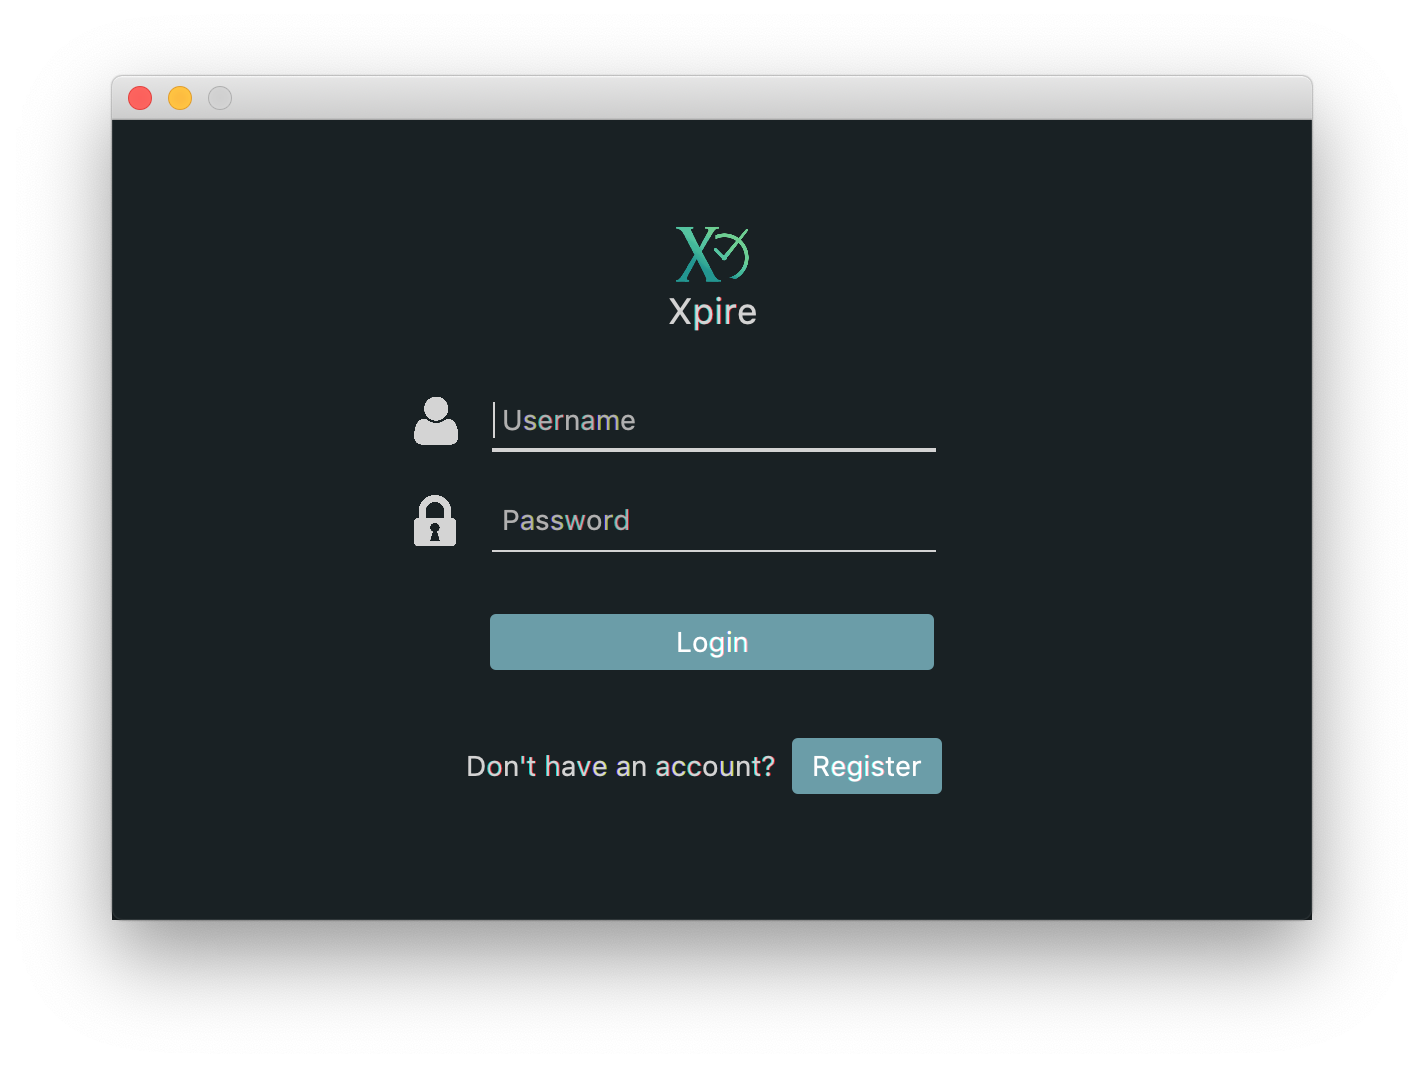
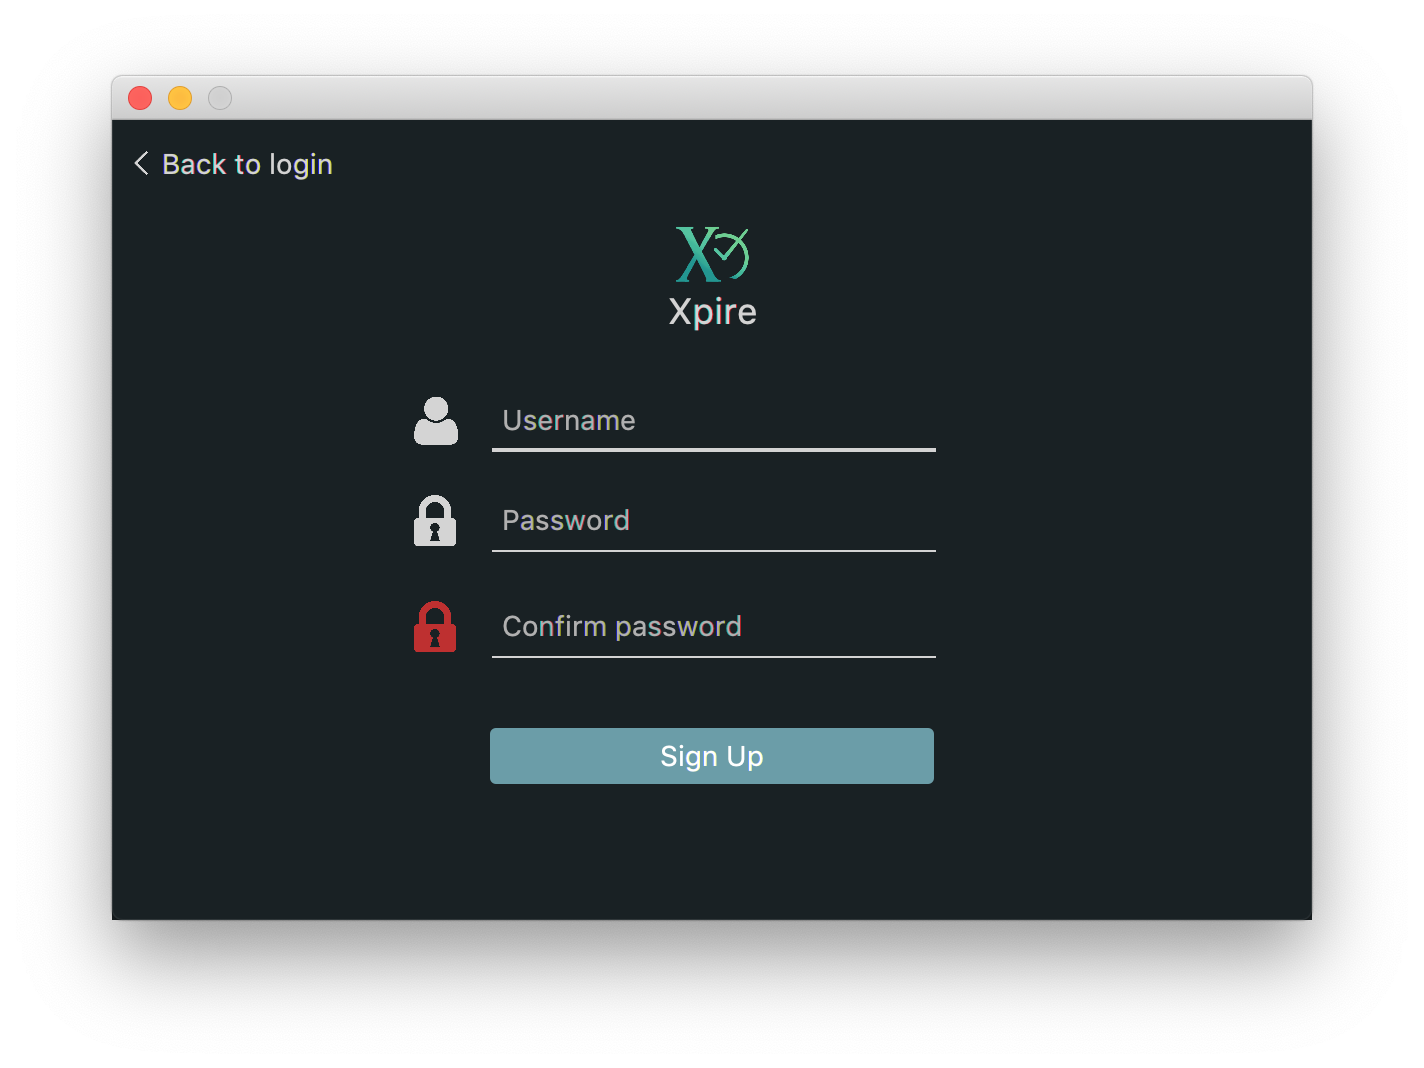
4.3. Upcoming features (coming in v2.0)
4.3.1. User authentication
Want to have your own personal password-protected account? Look forward to our user authentication functionality where you can create an account and keep your items' data safe and secure!
Here’re some sneak peeks of the upcoming feature!
5. FAQ
Q: How do I transfer my data to another Computer?
A: Install the app in the other computer and overwrite the empty data file it creates with the file that contains the data of your previous Xpire folder.
6. Command Summary
6.1. Table Summary
The table below summarises the common commands available for use in both lists.
| Command | Format | Example |
|---|---|---|
Help |
|
|
View |
|
|
|
||
Search |
|
|
|
||
|
||
Shift |
|
|
|
|
|
Tag |
|
|
|
|
|
Delete |
|
|
|
|
|
Clear |
|
|
Undo |
|
|
Redo |
|
|
Export |
|
|
Exit |
|
The table below summarises the commands only available for use in the main list.
| Command | Format | Example |
|---|---|---|
Add |
|
|
|
|
|
Delete |
|
|
Set reminder |
|
|
Check |
|
|
|
|
|
Sort |
|
|
|
7. Command Shorthands
If you are looking for a quick way to type and execute the commands, then this section is just
for you. Commands also come with command shorthands which can be used in place of the full command word.
For instance, a|Strawberry|31/12/2019 is the same as add|Strawberry|31/12/2019.
Below is a list of commands and their corresponding command shorthands:
-
help:h -
add:a -
view:v -
set reminder:sr -
shift:sh -
check:ch -
sort:so -
search:se -
delete:d -
tag:t -
clear:cl -
undo:u -
redo:r -
export:ex -
exit:x