By: TeamXpire Since: Sep 2019 Licence: MIT
- 1. Setting up
- 2. Design
- 3. Implementation
- 3.1. Replenish List
- 3.2. Auto-sorting of items by name then date
- 3.3. Reminders for expiring items
- 3.4. Undo/Redo feature
- 3.5. Search by name or tag(s)
- 3.6. Tag Feature
- 3.7. Export
- 3.8. Spelling correction with alternative recommendations
- 3.9. Retrieval of Previous Commands
- 3.10. User Interface
- 3.11. Logging
- 3.12. Configuration
- 4. Documentation
- 5. Testing
- 6. Dev Ops
- Appendix A: Product Scope
- Appendix B: User Stories
- Appendix C: Use Cases
- Appendix D: Non Functional Requirements
- Appendix E: Glossary
- Appendix F: Product Survey
- Appendix G: Instructions for Manual Testing
- G.1. Launch and Shutdown
- G.2. Command Box
- G.3. All Items Panel
- G.4. View Panel
- G.5. Viewing items
- G.6. Adding expired items to the tracking list for testing
- G.7. Adding an item
- G.8. Deleting an item
- G.9. Shifting an item to the replenish list
- G.10. Shifting an item to the main list
- G.11. Tagging an item
- G.12. Setting a reminder for an item
- G.13. Filtering items based on its expiry date and status
- G.14. Undo/Redo commands
- G.15. Sorting items
- G.16. Searching items
- G.17. Export data
- G.18. Saving data
1. Setting up
Refer to the guide here.
2. Design
2.1. Architecture
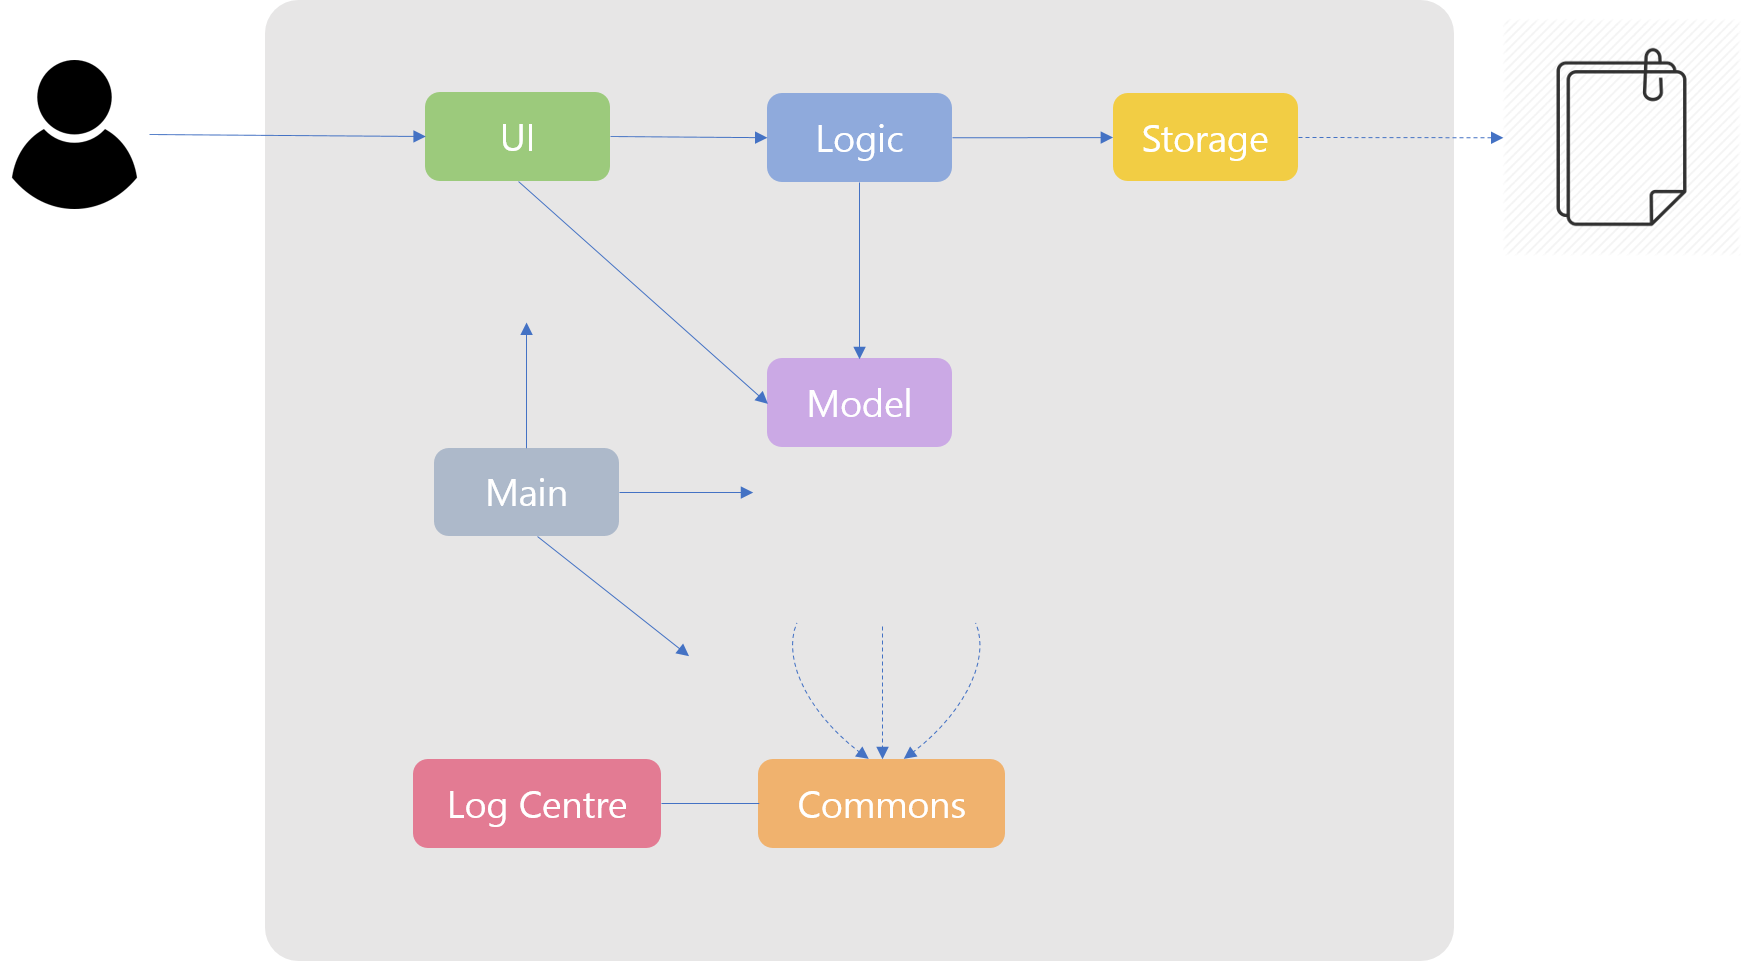
The Architecture Diagram given above explains the high-level design of the App. Given below is a quick overview of each component.
-
At app launch: Initializes the components in the correct sequence, and connects them up with each other.
-
At shut down: Shuts down the components and invokes cleanup method where necessary.
Commons represents a collection of classes used by multiple other components.
The following class plays an important role at the architecture level:
-
LogsCenter: Used by many classes to write log messages to the App’s log file.
The rest of the App consists of four components.
Each of the four components
-
Defines its API in an
interfacewith the same name as the Component. -
Exposes its functionality using a
{Component Name}Managerclass.
For example, the Logic component (see the class diagram given below) defines it’s API in the Logic.java interface and exposes its functionality using the LogicManager.java class.
How the architecture components interact with each other
The Sequence Diagram below shows how the components interact with each other for the scenario where the user issues the command delete|1.
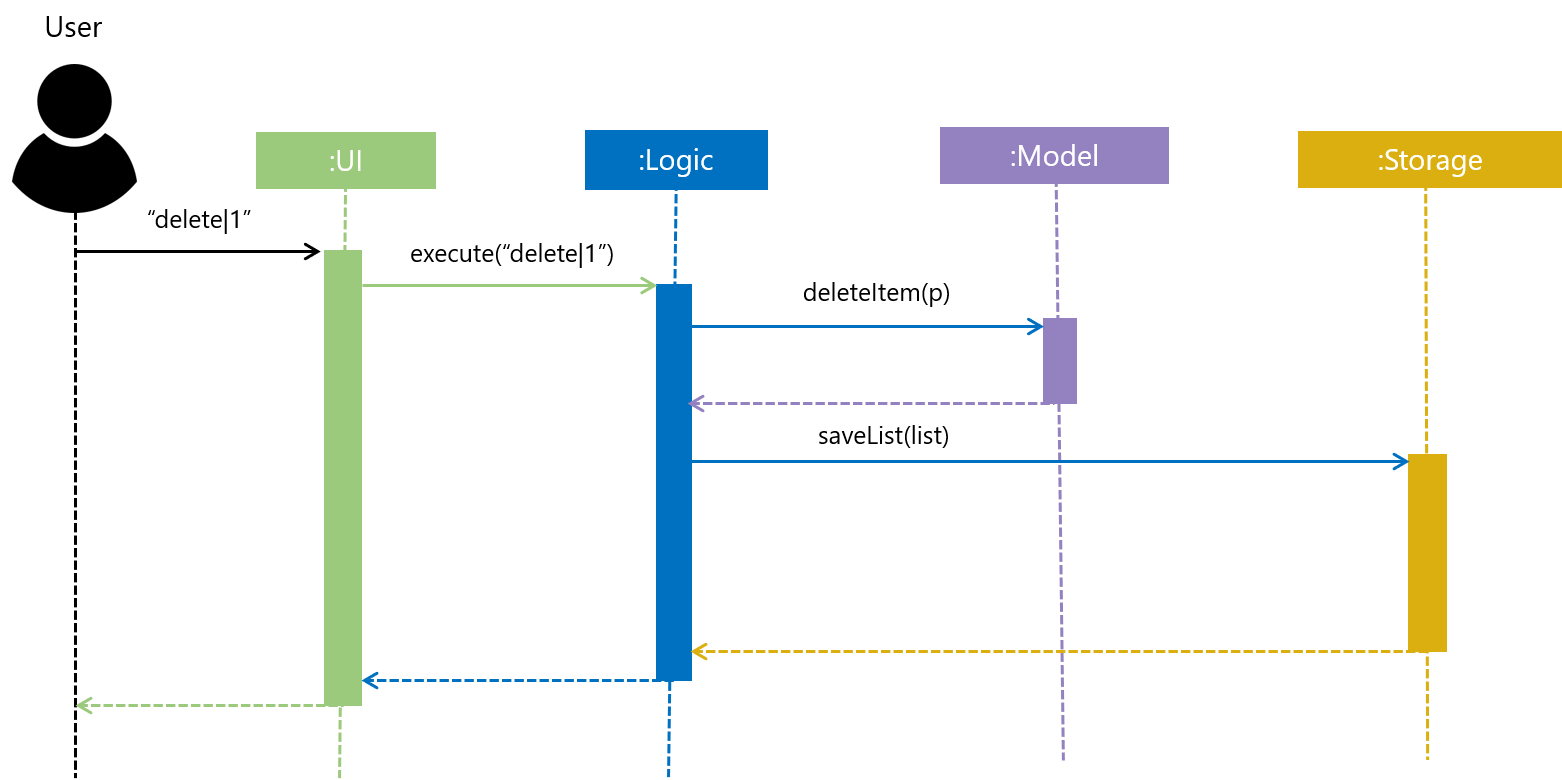
delete|1 commandThe sections below give more details of each component.
2.2. UI component
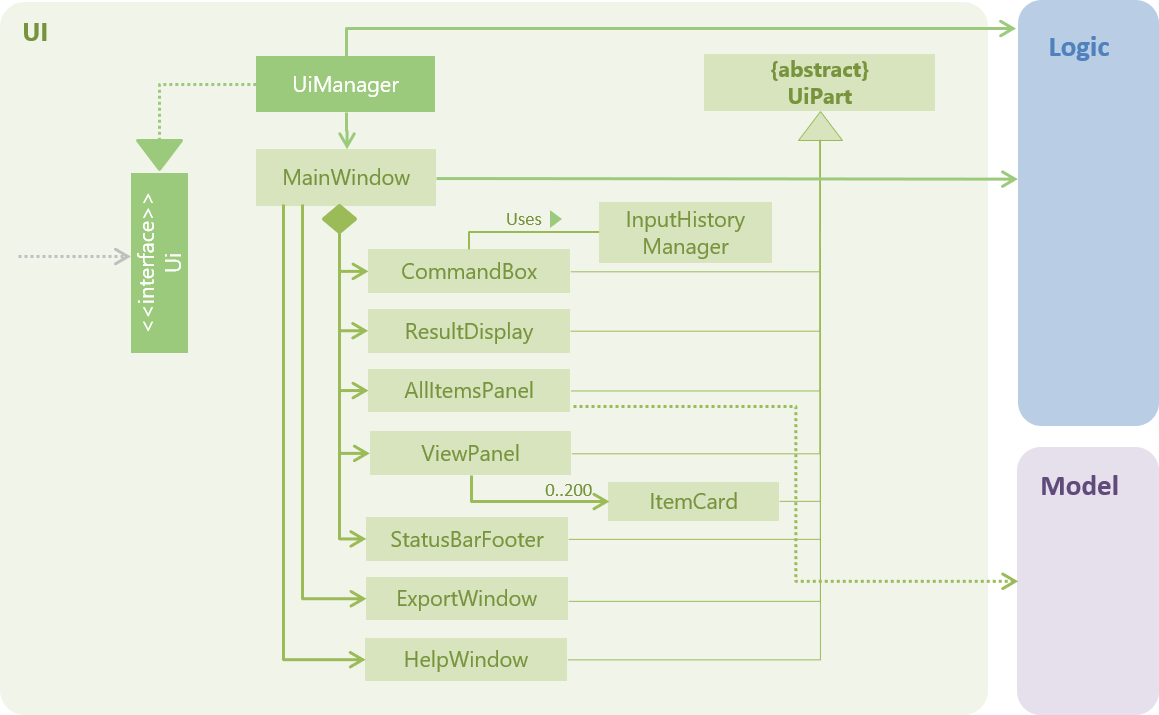
API : Ui.java
The UI consists of a MainWindow that is made up of parts e.g.CommandBox, ResultDisplay, ViewPanel, StatusBarFooter etc. All these, including the MainWindow, inherit from the abstract UiPart class.
The UI component uses JavaFx UI framework. The layout of these UI parts are defined in matching .fxml files that are in the src/main/resources/view folder. For example, the layout of the MainWindow is specified in MainWindow.fxml
The UI component,
-
Executes user commands using the
Logiccomponent. -
Listens for changes to user’s input so that the UI can be updated with the modified data in
Model.
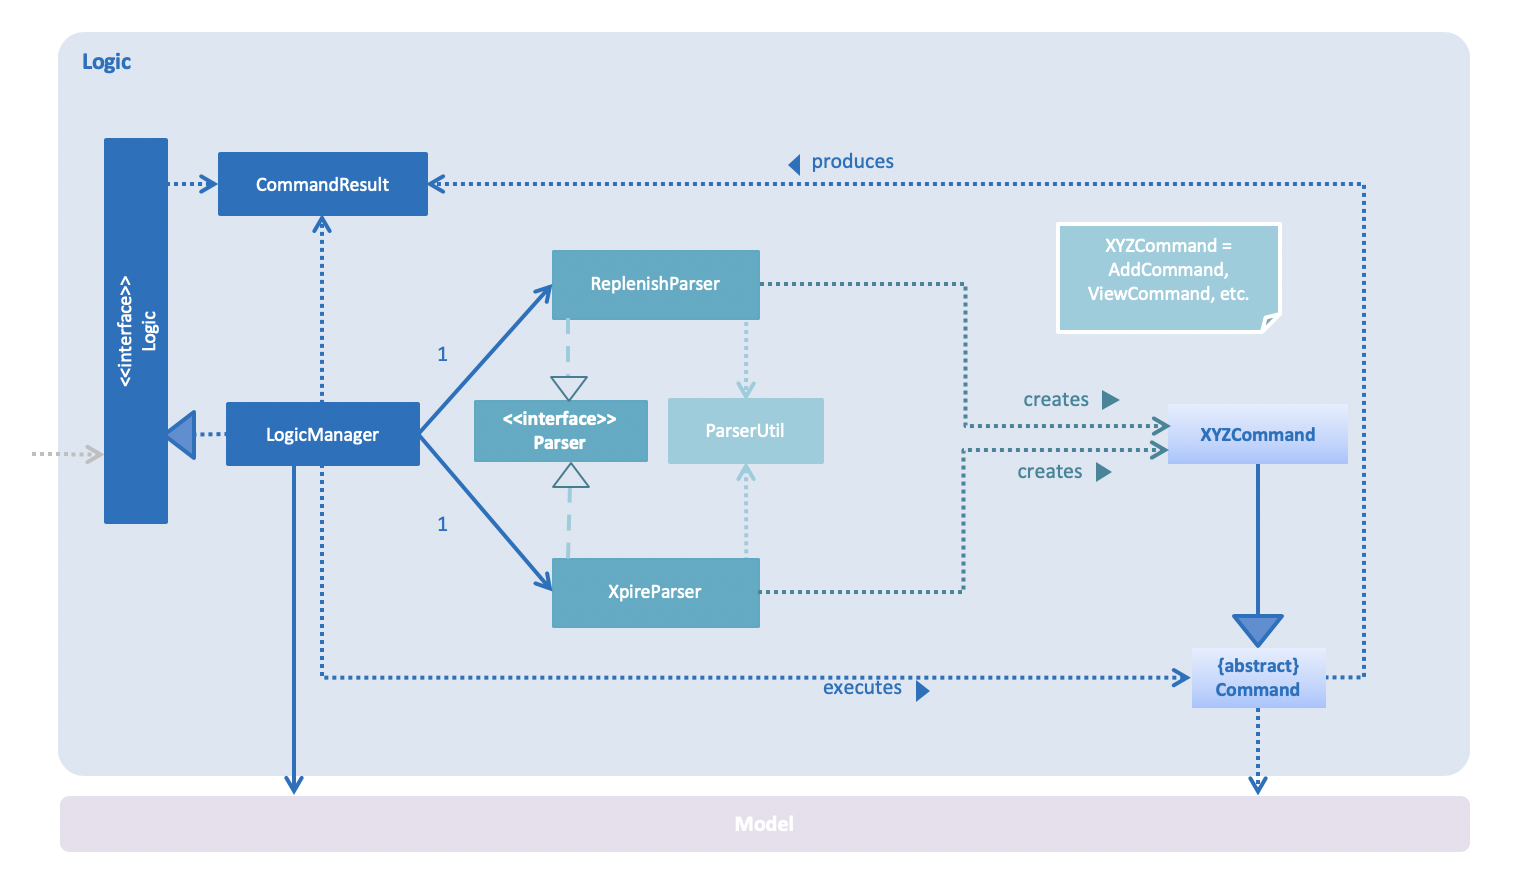
2.3. Logic component
API :
Logic.java
-
Logicuses theXpireParserorReplenishParserclass to parse the user command. -
This results in a
Commandobject which is executed by theLogicManager. -
The command execution can affect the
Model(e.g. adding an item). -
The result of the command execution is encapsulated as a
CommandResultobject which is passed back to theUi. -
In addition, the
CommandResultobject can also instruct theUito perform certain actions, such as displaying help to the user.
Given below is the Sequence Diagram for interactions within the Logic component for the execute("delete|1") API call when the user is viewing the main list.
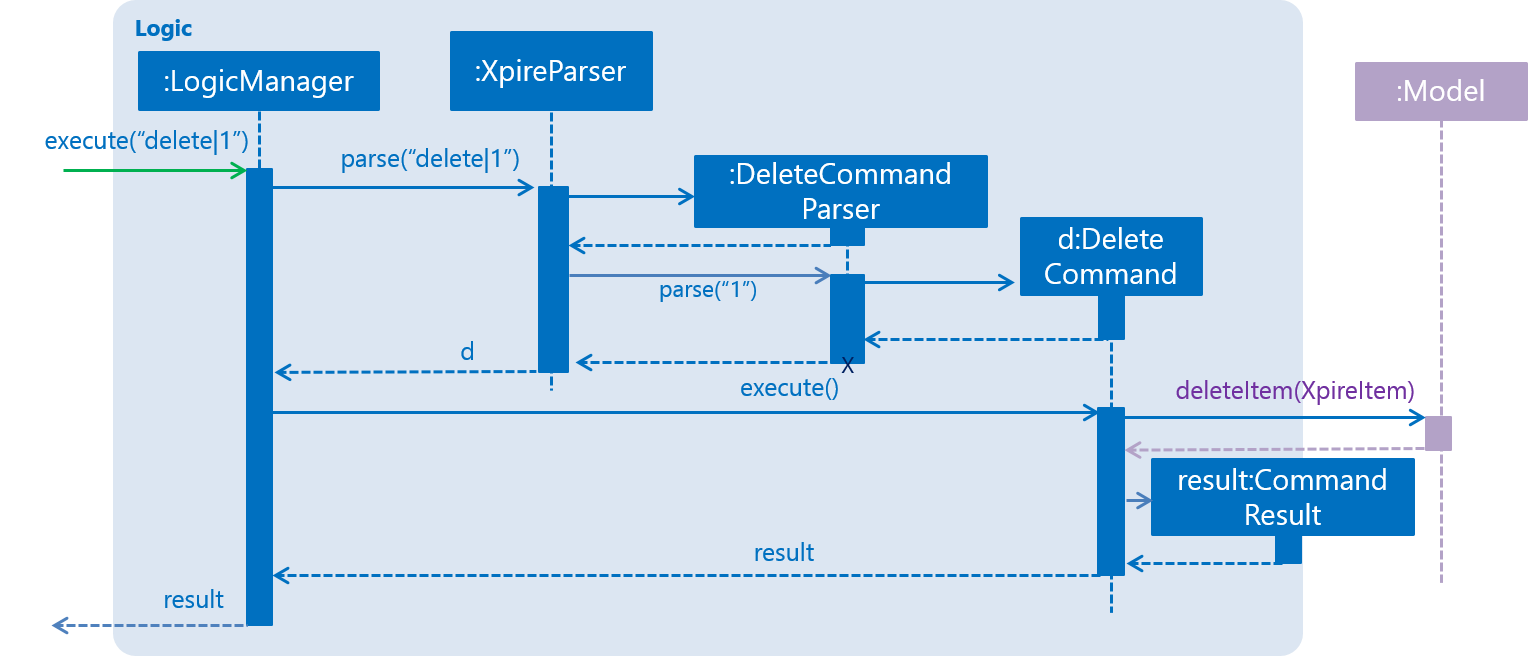
delete|1 Command2.4. Model component
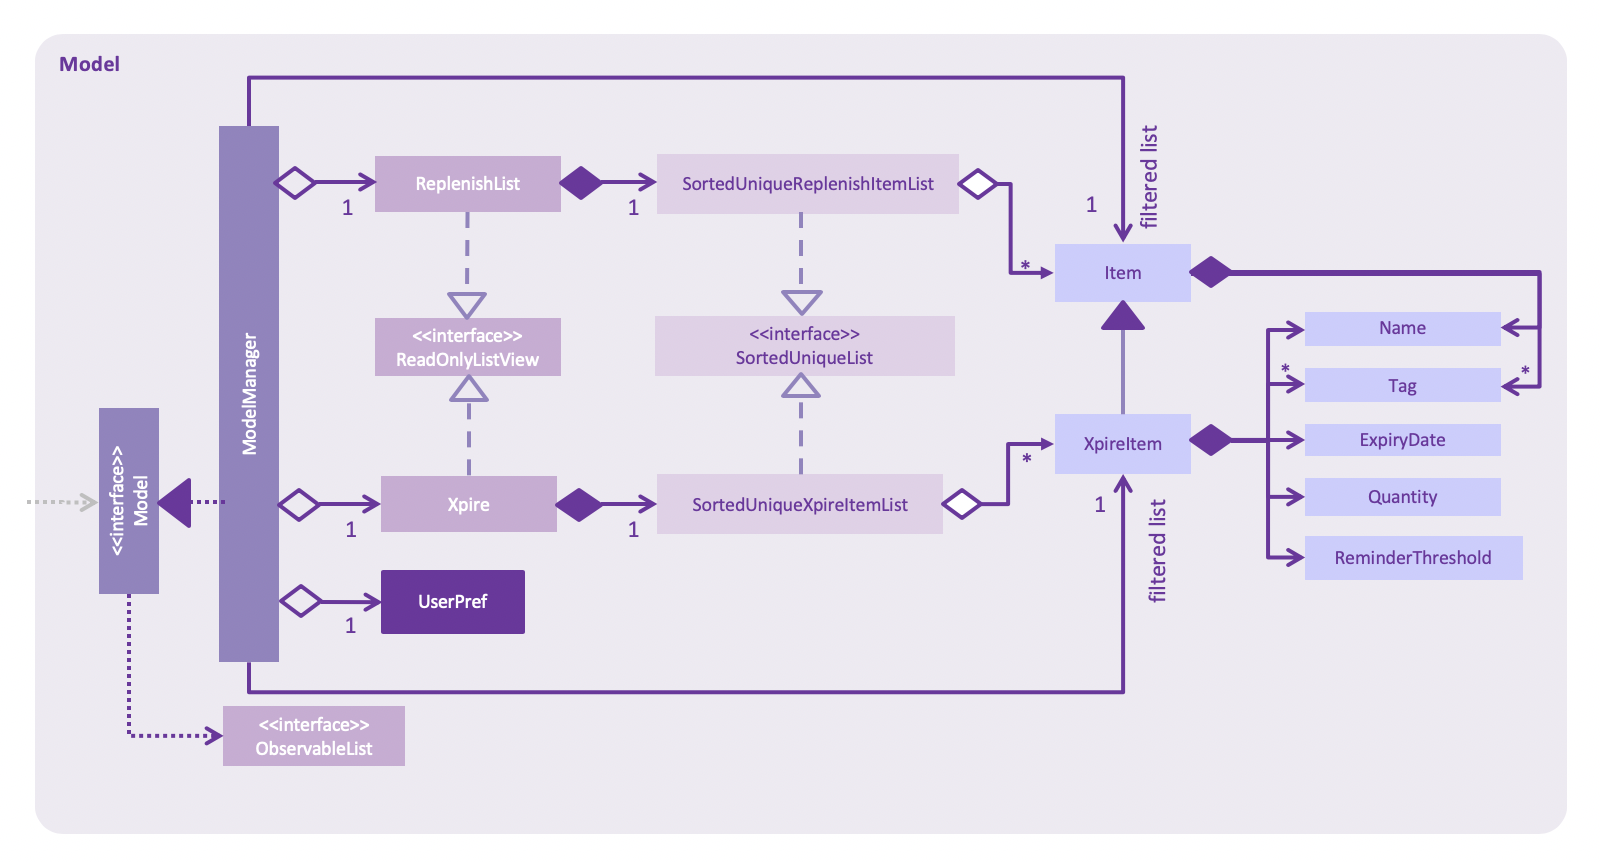
API : Model.java
The Model,
-
stores a
UserPrefobject that represents the user’s preferences. -
stores the Xpire and ReplenishList data.
-
exposes an unmodifiable
ObservableList<Item>that can be 'observed' e.g. the UI can be bound to this list so that the UI automatically updates when the data in the list change. -
does not depend on any of the other three components.
2.5. Storage component
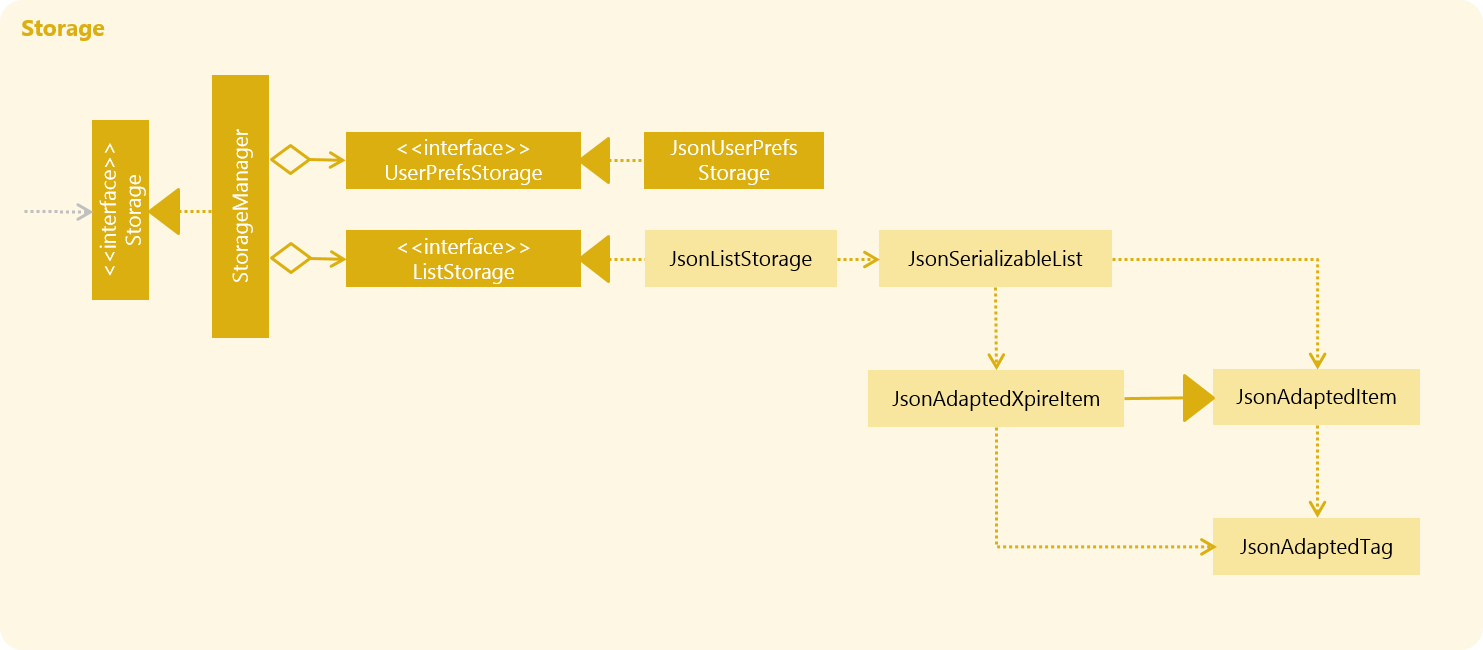
API : Storage.java
The Storage component,
-
can save
UserPrefobjects in json format and read it back. -
can save the
XpireandReplenishListdata in JSON format and read it back.
2.6. Common classes
Classes used by multiple components are in the io.xpire.commons package.
3. Implementation
This section describes some noteworthy details on how certain features are implemented.
3.1. Replenish List
3.1.1. Items in replenish list and main list
Items in the replenish list with only Name and Tag fields are represented by the Item class.
On the other hand, items in the main list with additional fields such as ExpiryDate,
Quantity and ReminderThreshold are represented by the XpireItem class.
To utilise the concept of inheritance and reduce duplicate data and methods, XpireItem is written to inherit from Item.
This relationship can be observed from the diagram below.
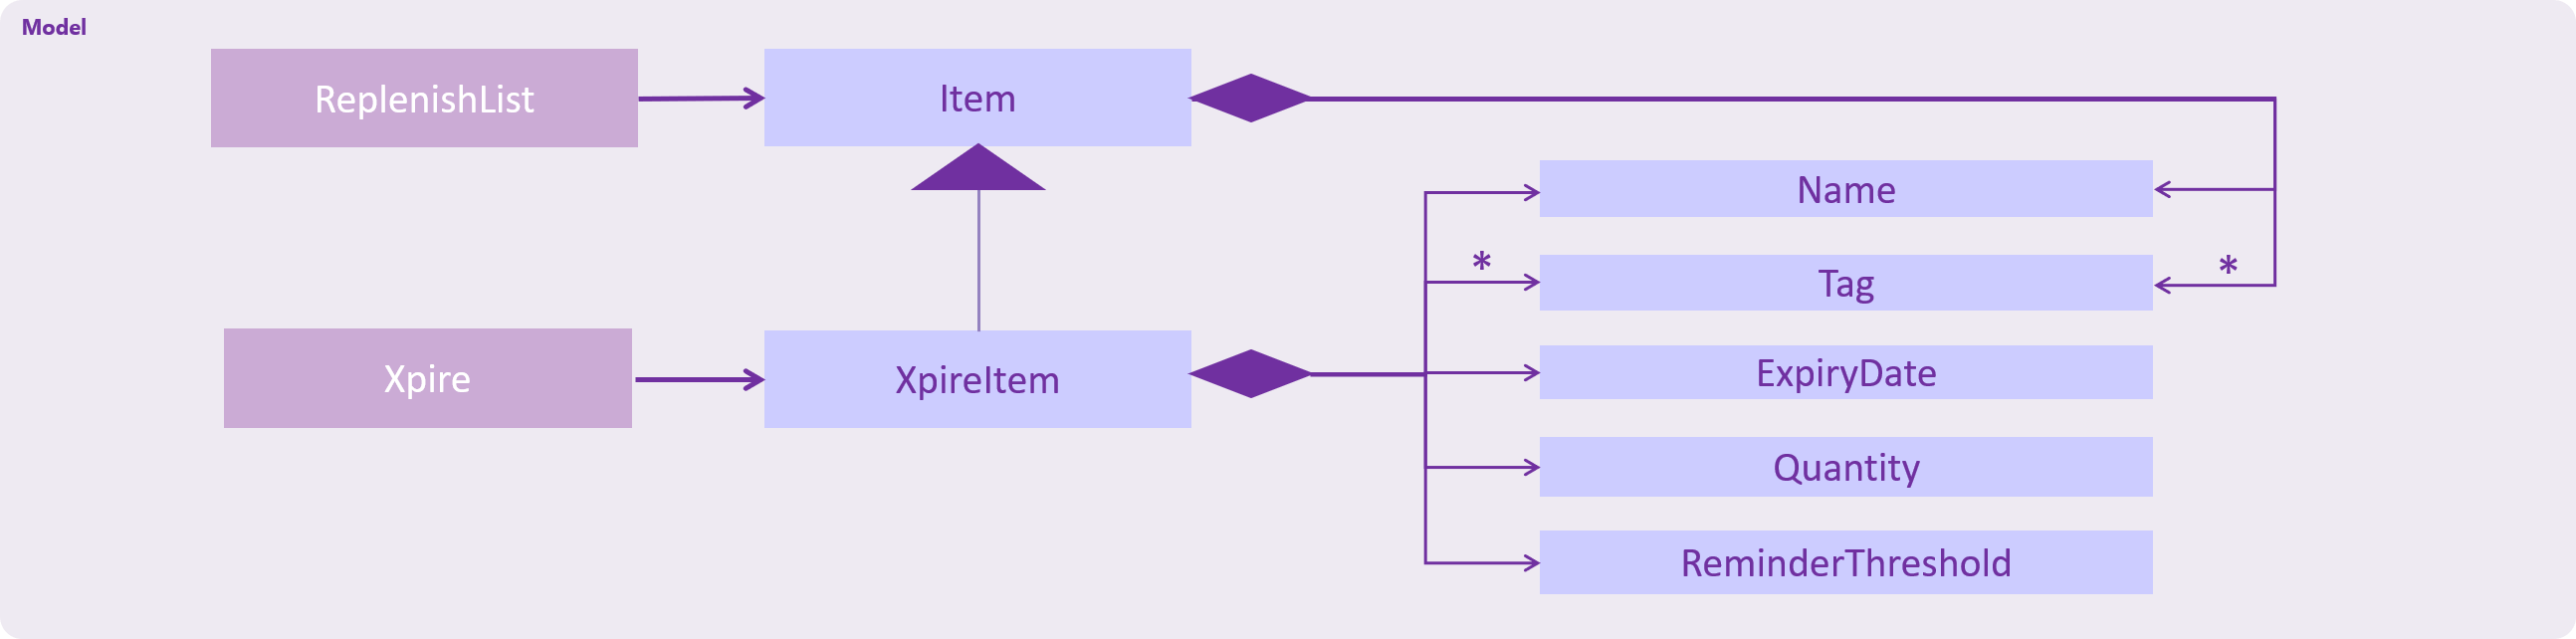
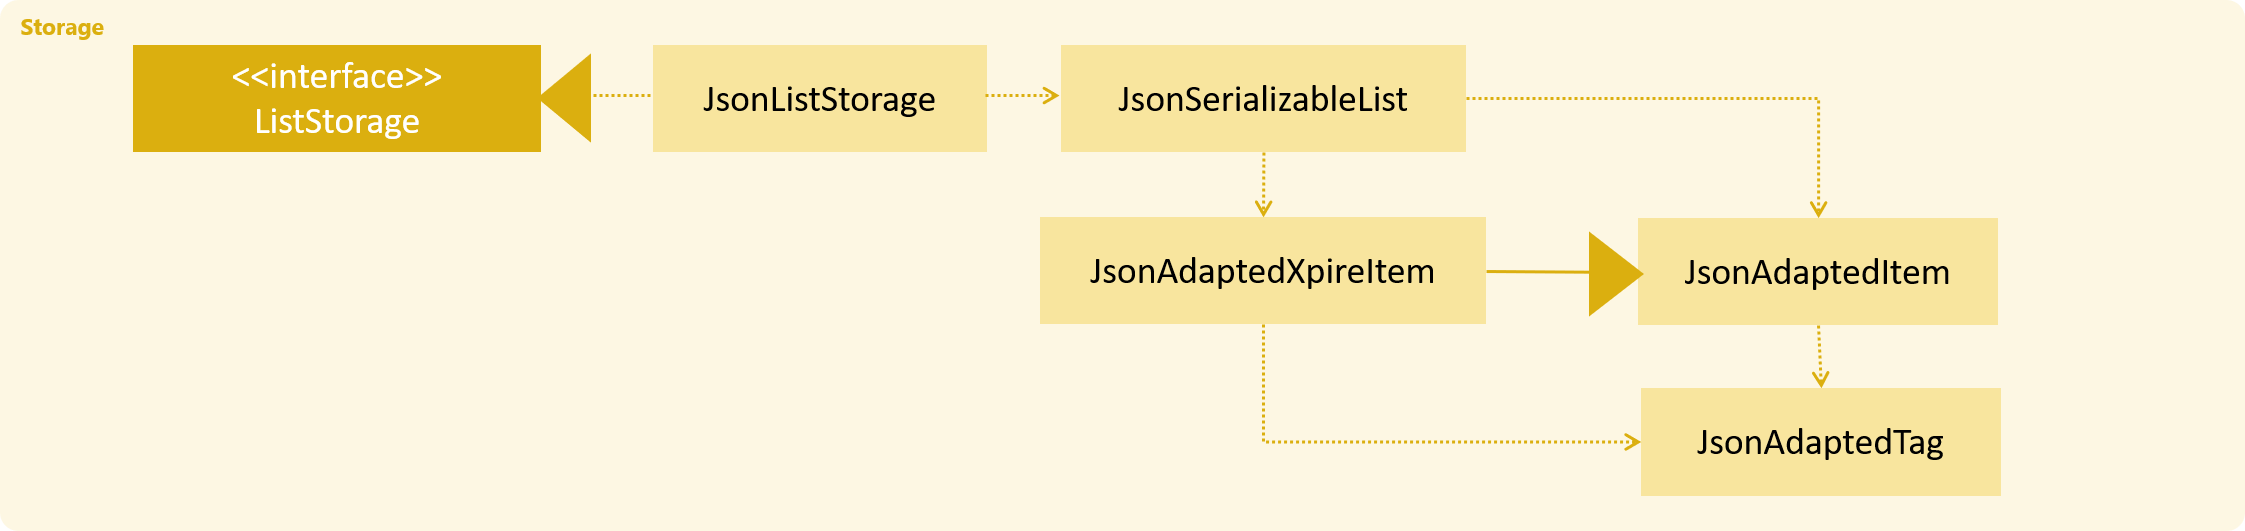
XpireItem from Item.3.1.2. Storage of items in the replenish list
An XpireItem is converted to a JsonAdaptedXpireItem whereas an Item is converted to a JsonAdaptedItem for storage.
To store both the replenish list and main list in a single JSON file, both lists are wrapped in the JsonSerializableList class
for serializing and deserializing using the Jackson Library.
3.1.2.1. Design Considerations
3.1.2.1.1. Aspect: Storage of replenish list and main list
-
Alternative 1 (current choice): Store both lists in the same JSON file
-
Pros: Updating the storage would be less cumbersome as only one file needs to be read and written into.
-
Cons: Challenging to find a suitable and efficient data structure that wraps both lists for storage into a single file.
-
-
Alternative 2: Store both lists as separate JSON files
-
Pros: Easier to implement as there is no need to find a data structure to wrap both lists for storage.
-
Cons: Makes updating the storage troublesome as both files need to be updated at the same time for any changes made to the lists.
-
3.1.3. Moving items in the main list into the replenish list
An XpireItem in the main list can be transferred to the replenish list using the ShiftToReplenishCommand.
Any XpireItem whose quantity is 0 will also be automatically added to the replenish list.
3.1.3.1. Implementation
When the user executes a ShiftToReplenishCommand, the target item in the main list will be adapted from a XpireItem into an Item.
The adapted item will be subsequently added to the replenish list, while the target item is removed from the main list.
The following sequence diagrams demonstrate how the command makes changes to both the main list and replenish list.

ShiftToReplenishCommand.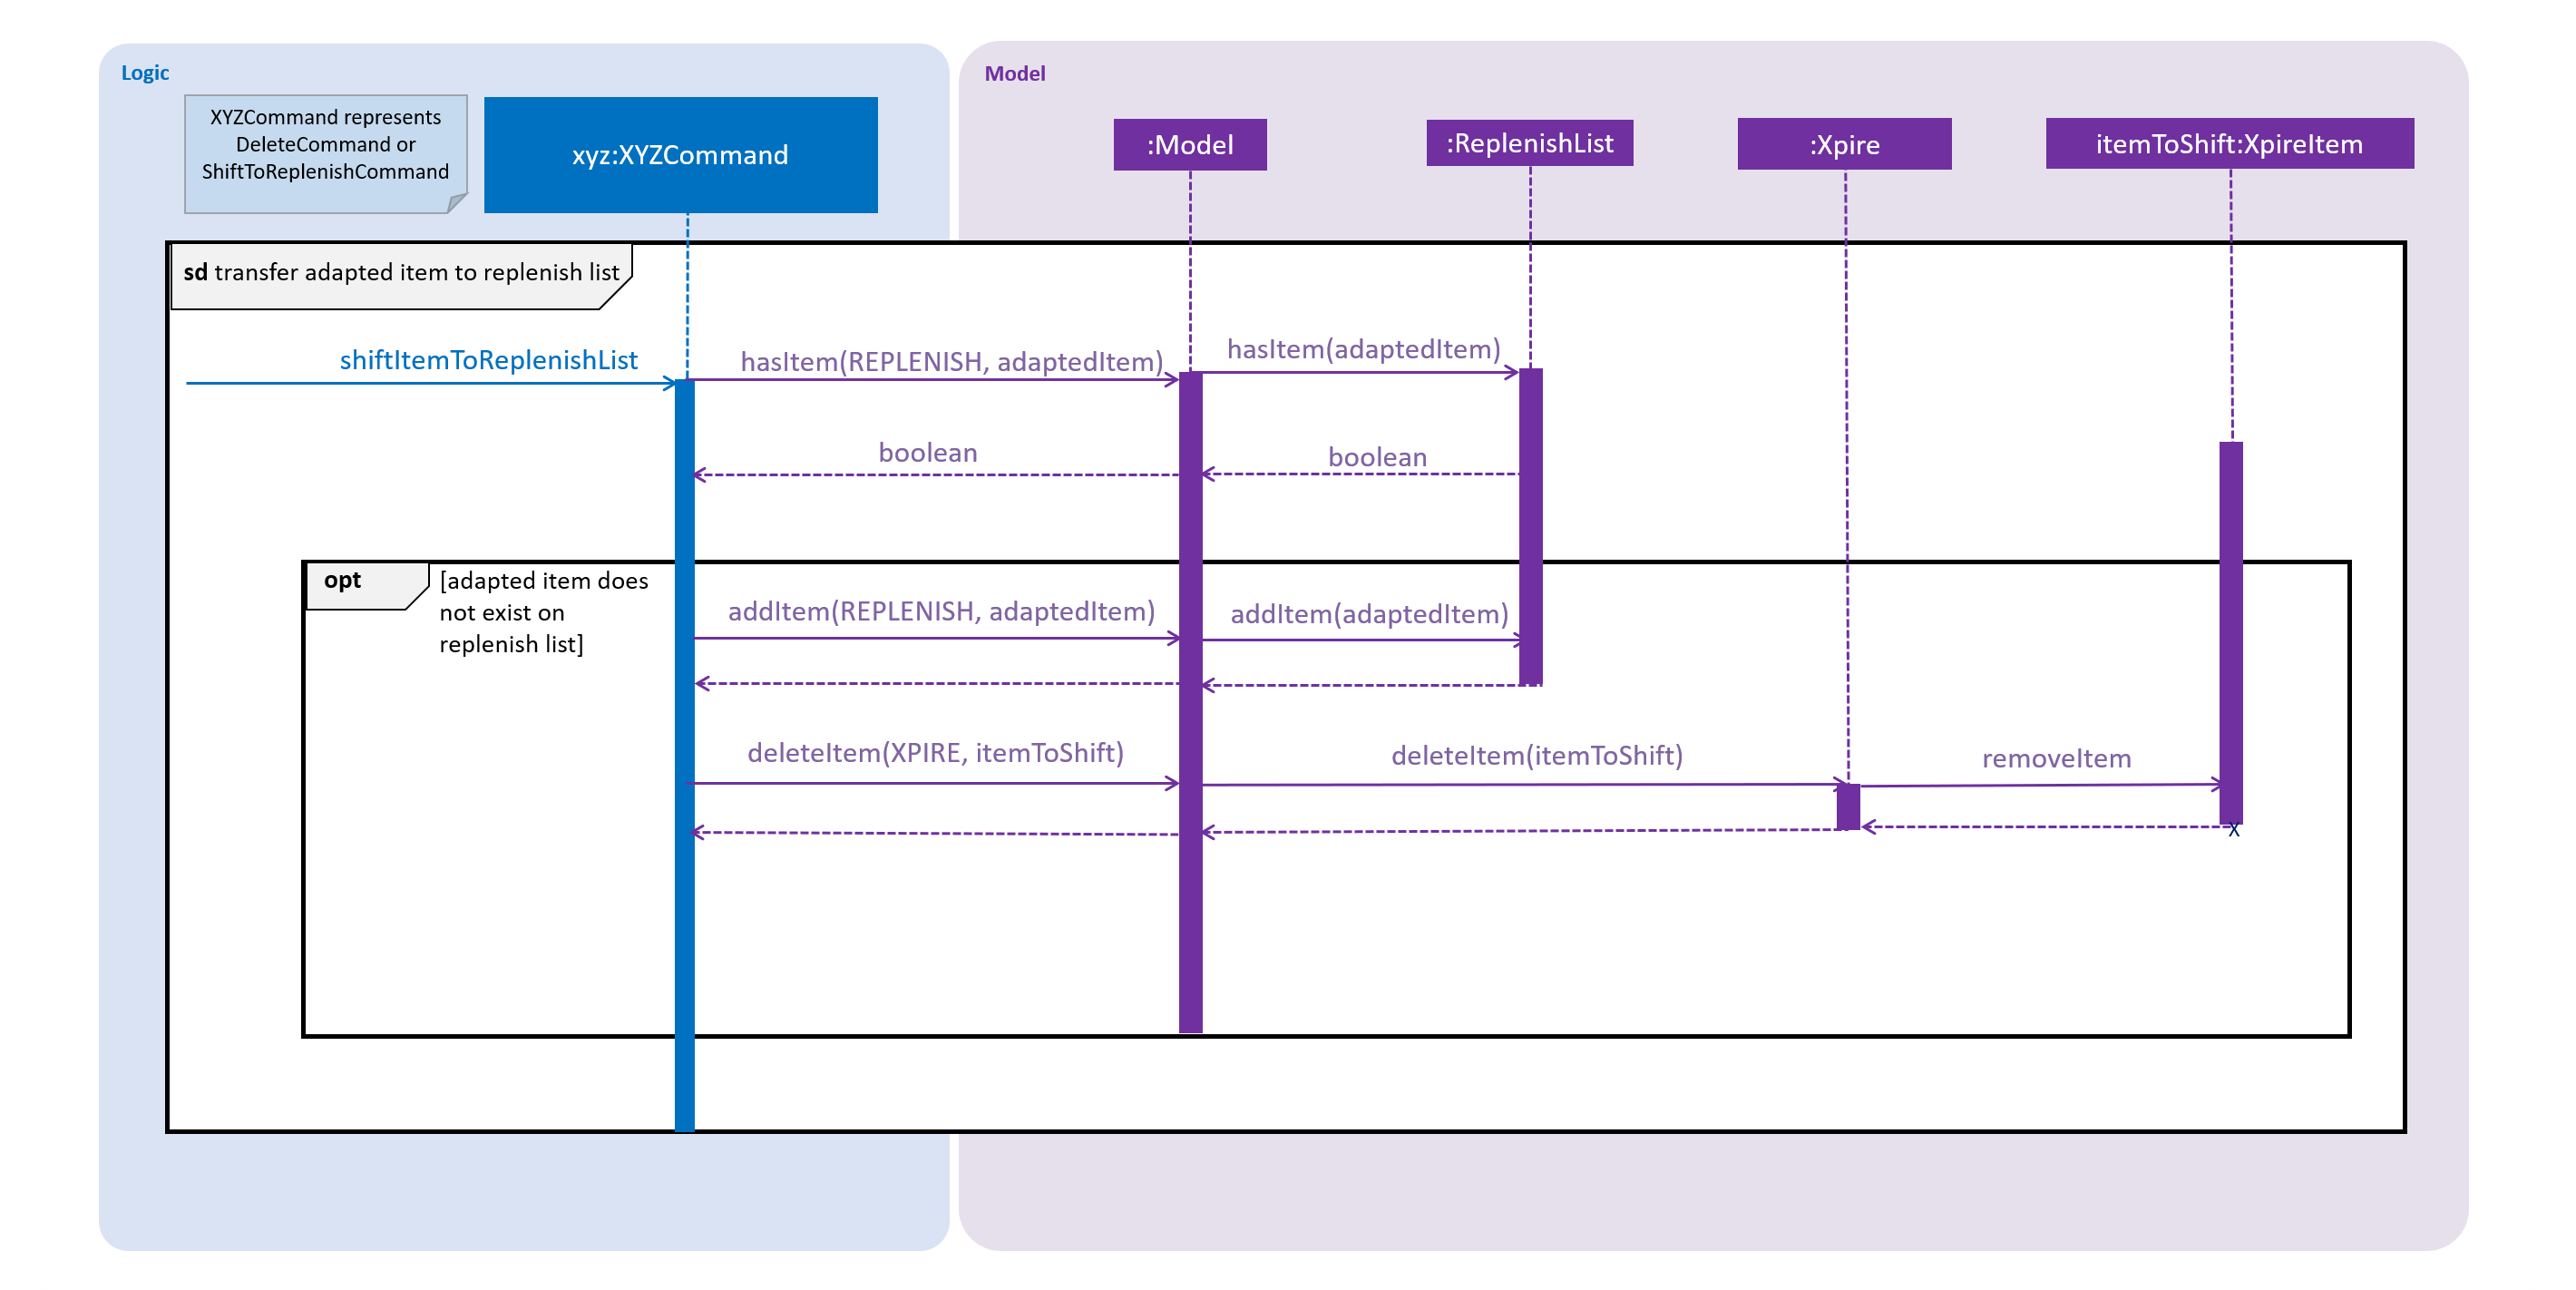
When the user executes a DeleteCommand to reduce the Quantity of an XpireItem to 0, the item is automatically
shifted to the replenish list. The item shift is demonstrated in the activity diagram below.
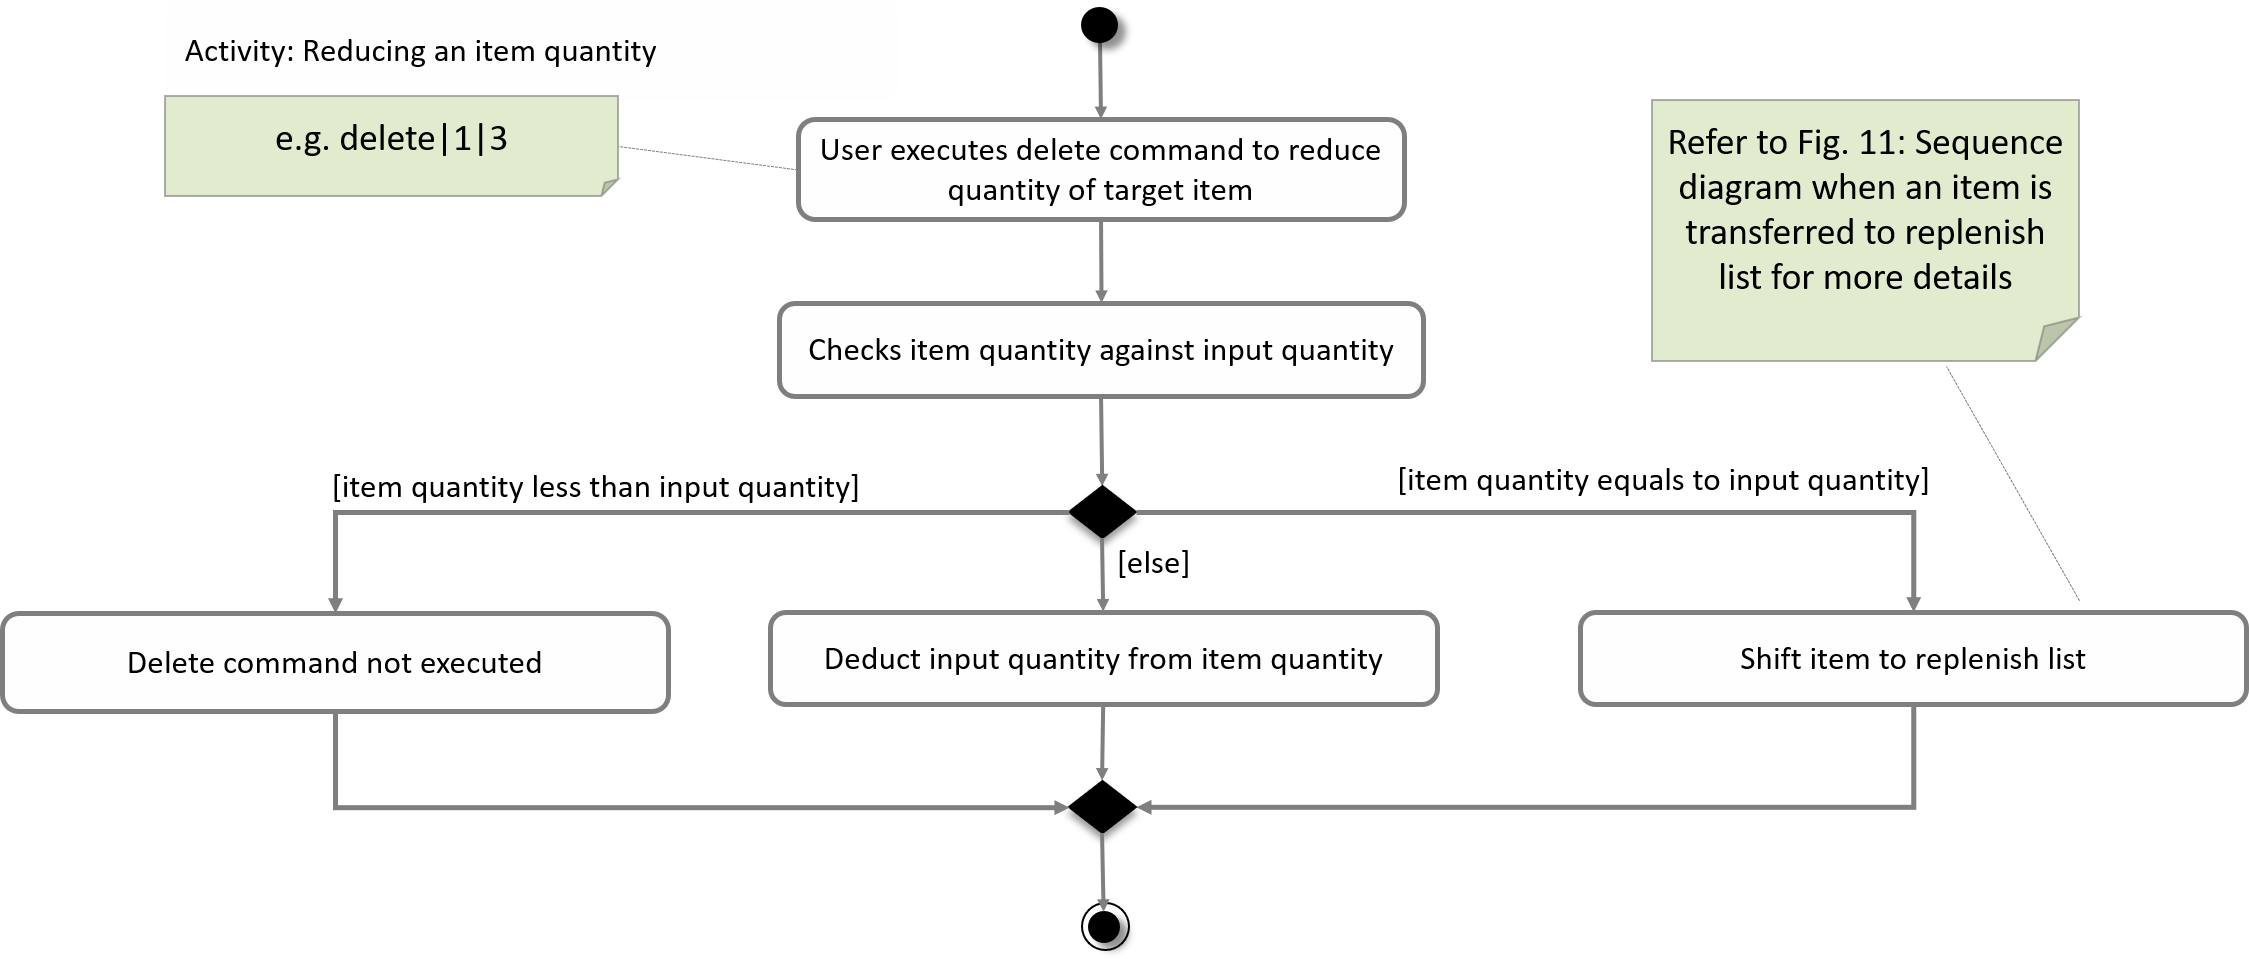
The shift would not be successful if an item with the same Name already exists on the replenish list.
The user would be prompted to delete the existing item in the replenish list in order to add the target item into the replenish list.
|
3.1.4. Moving items in the replenish list to the main list
On the other hand, items can be transferred into the main list using the ShiftToMainCommand.
The following activity diagram summarises how the command works:
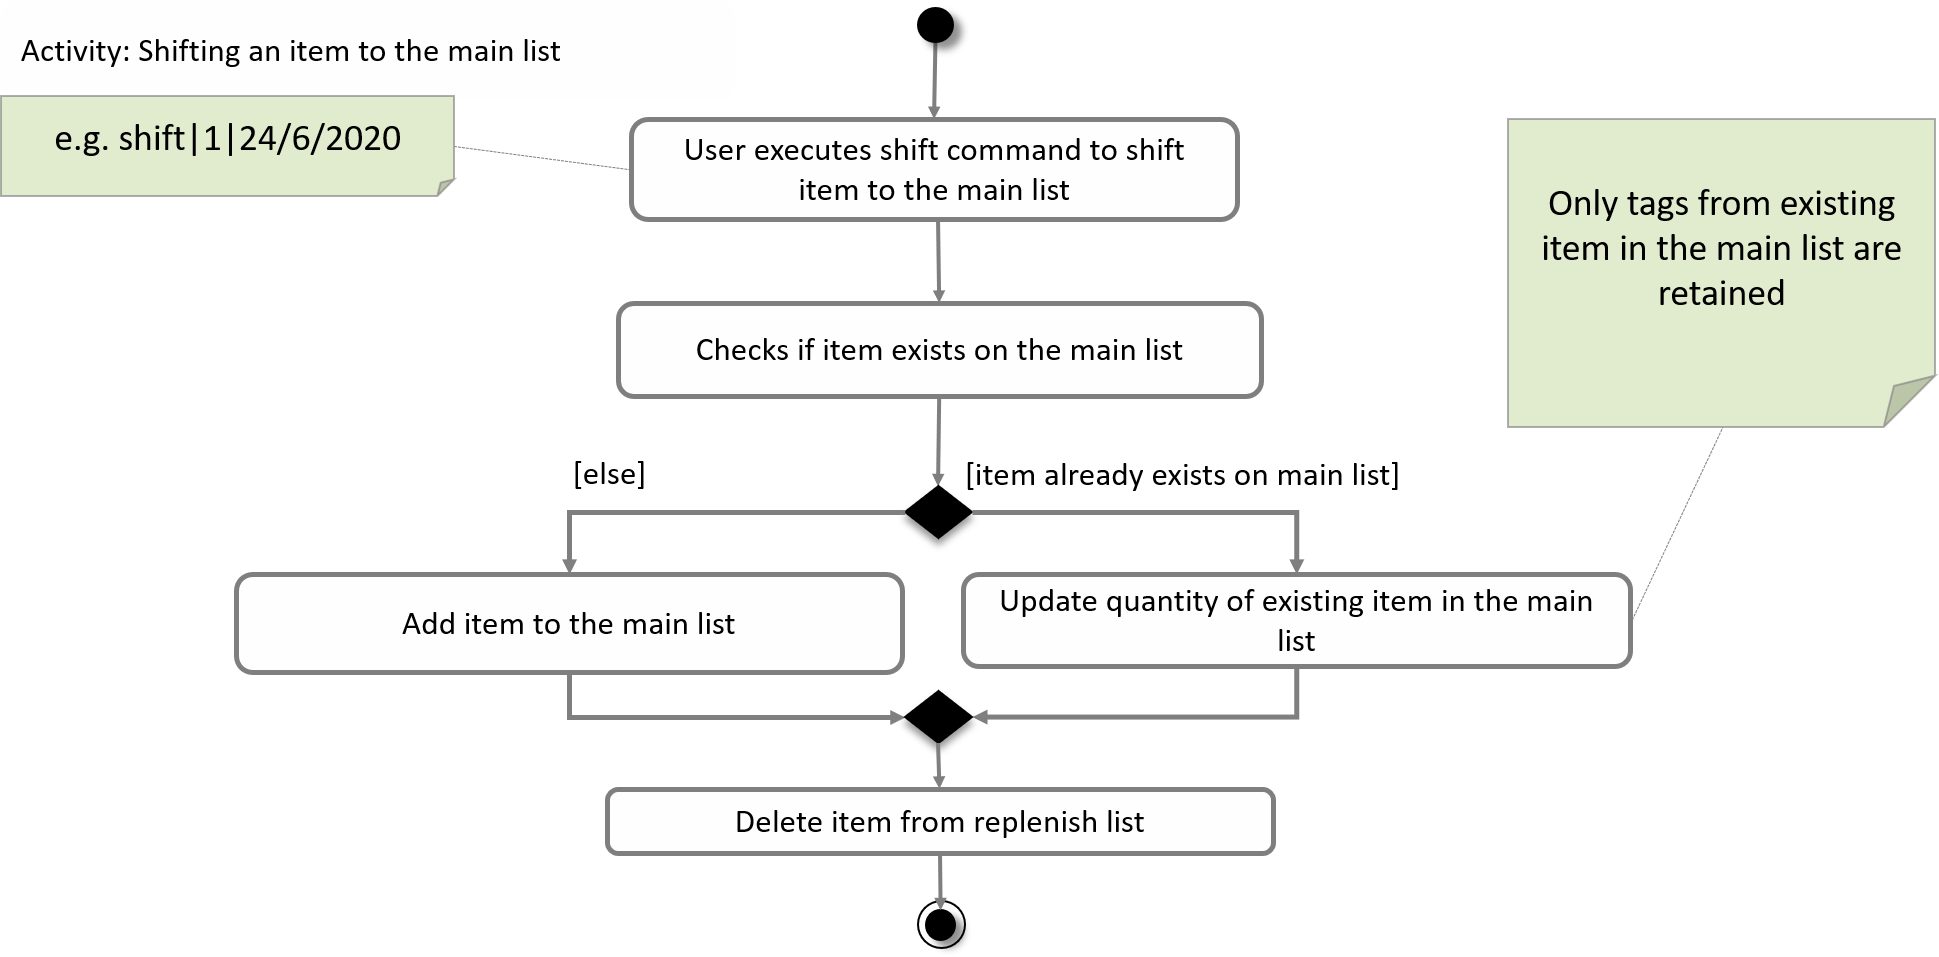
ShiftToMainCommand.When utilising the ShiftToMainCommand, the user would have to input the item’s ExpiryDate and Quantity (optional)
so that the Item can be adapted into an XpireItem.
If an item with the same Name and ExpiryDate already exists on the main list, the Quantity of the item would be updated.
However, only the tags of the item on the main list will be retained.
|
3.1.4.1. Design Considerations
3.1.4.1.1. Aspect: Handling of items that have run out
-
Alternative 1 (current choice): Automatically shift an item to the replenish list when the item’s quantity reaches 0
-
Pros: User does not need to input any command to perform the shifting, making the user experience more fuss-free.
-
Cons: User has to delete the item from the replenish list if the user does not want to stock up on the item in future.
-
-
Alternative 2: Delete item from the main list without any shift
-
Pros: Items that the user may not want to replenish will not be automatically added to the replenish list.
-
Cons: User has to go through the trouble to key in details of an item that was already in the main list.
-
3.1.5. Commands in the replenish list
3.1.5.1. Implementation
As shown in a snippet of the Logic class diagram below, both XpireParser and ReplenishParser implement the interface Parser.
In particular, ReplenishParser is the one that parses and handles the commands in the replenish list.
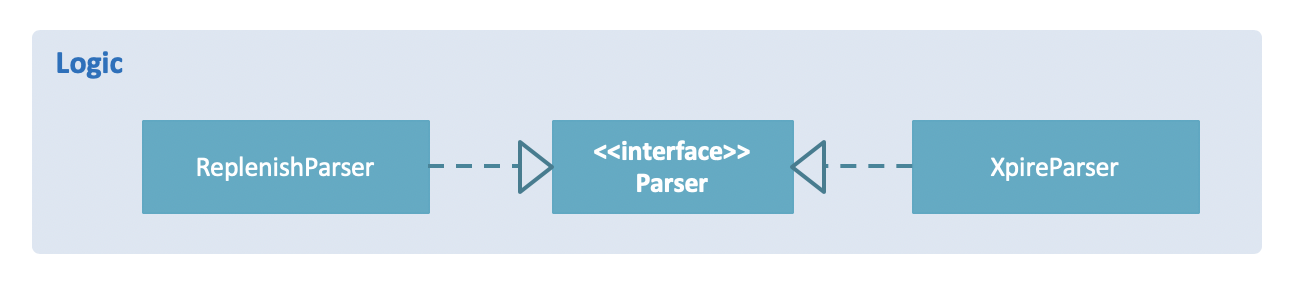
Certain commands such as sorting by date, or deleting
of item quantities are not permitted by ReplenishParser, as items in the replenish list do not have expiry dates or quantities.
|
The activity diagram below follows the general path of a command executed in either the main tracking list Xpire, or the
replenish list.
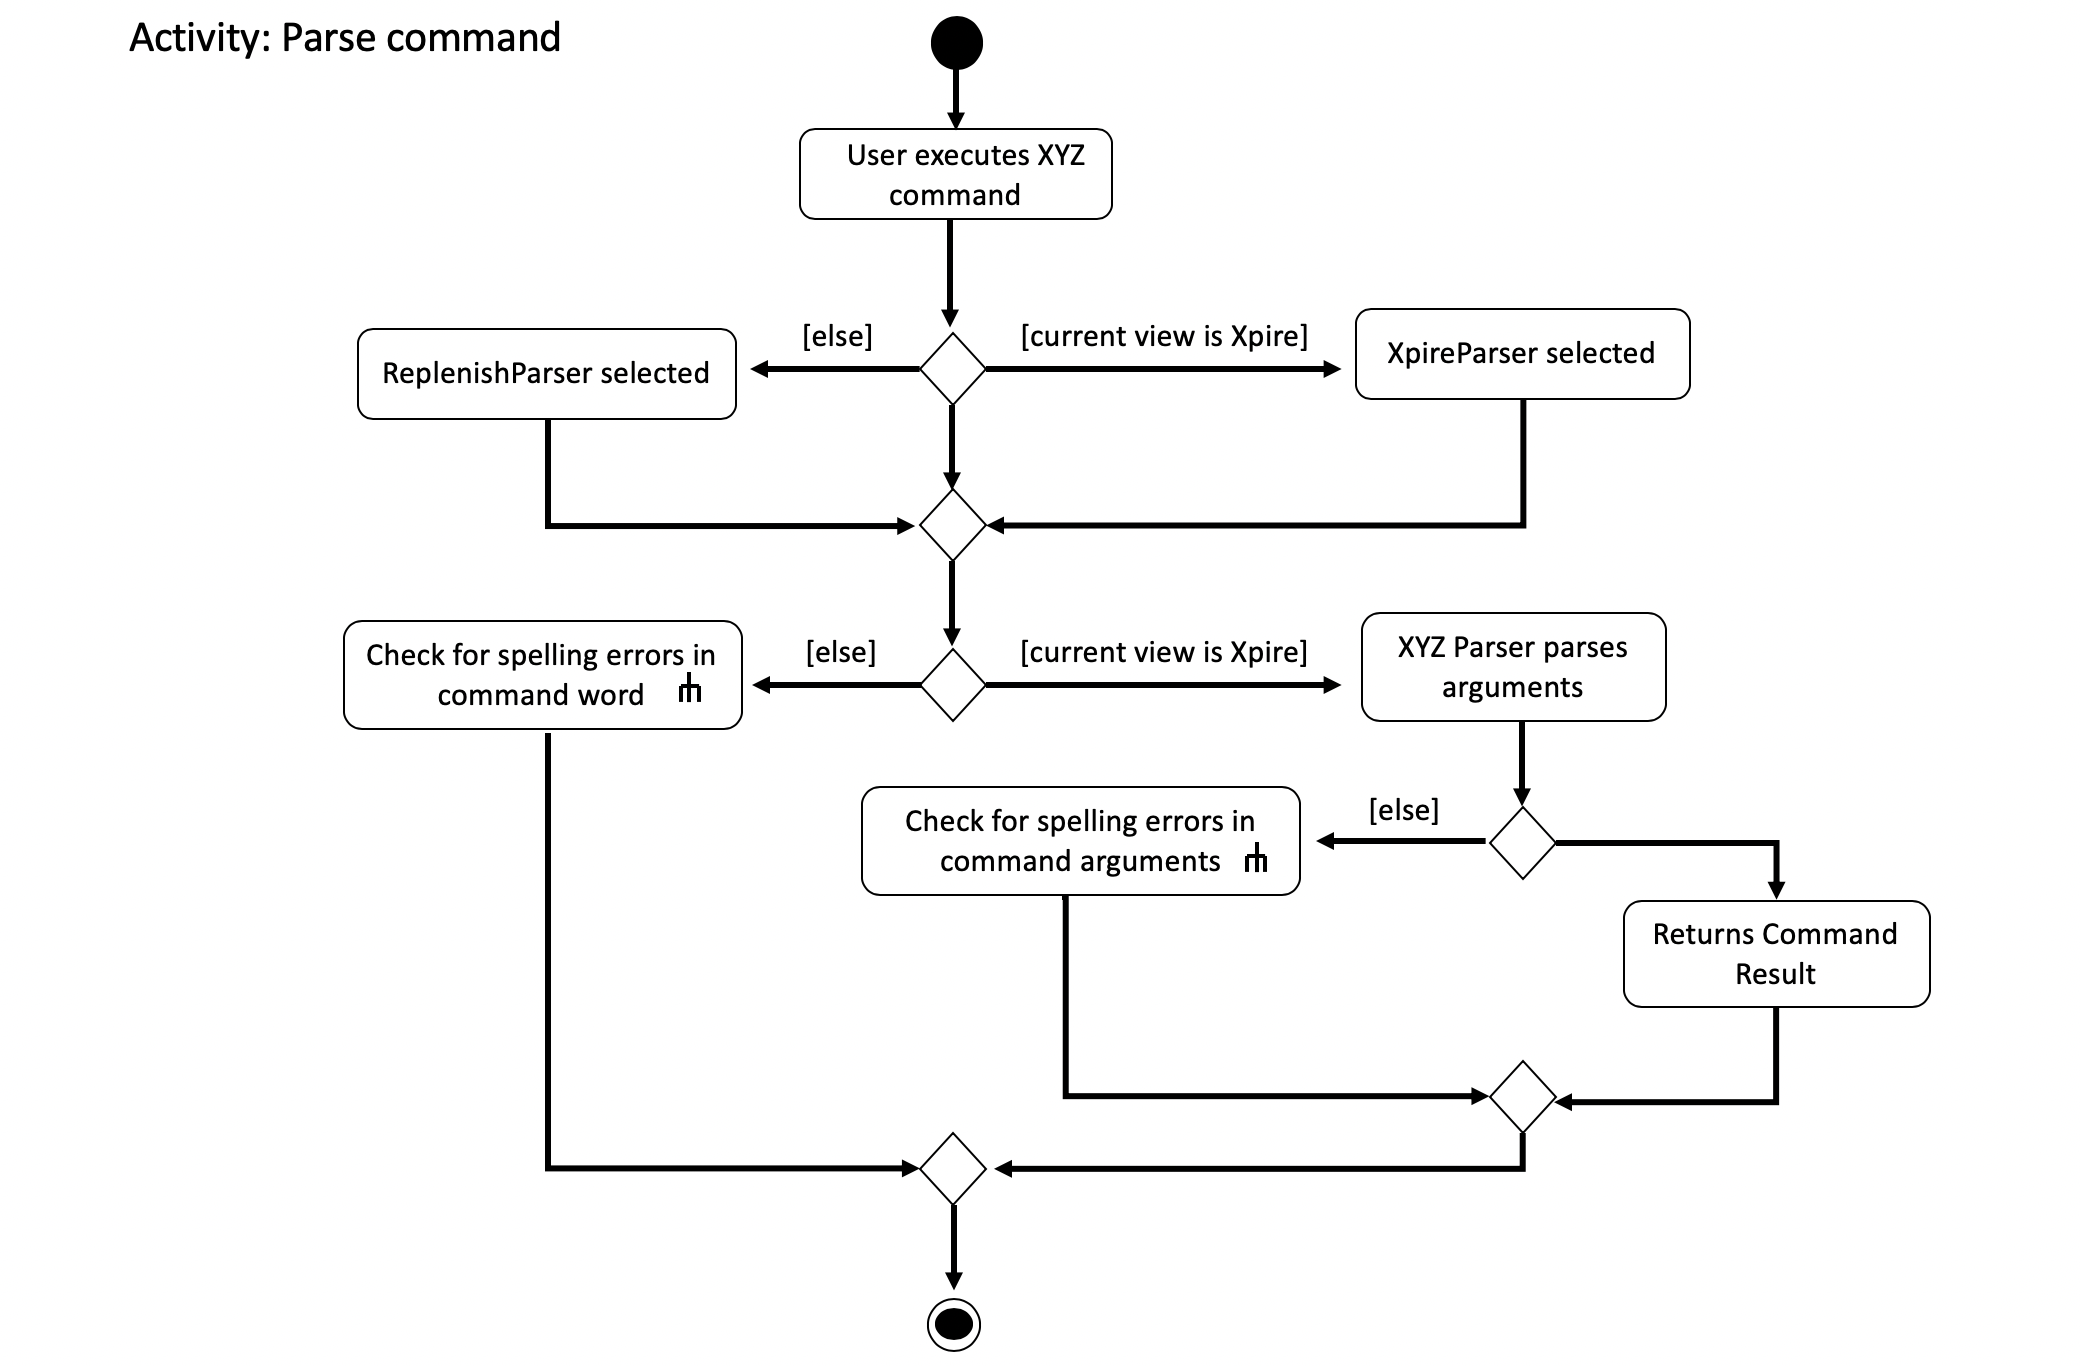
In the event that ReplenishParser is selected, it will prevent any invalid or prohibited commands and also check for spelling mistakes in the user input.
This will be further explained to you in a later section.
3.1.5.2. Design Considerations
When designing the replenish list, I had to make decisions on how best to parse and execute commands in an efficient manner that would minimise code repetition and delay in runtime. The following is a brief summary of my analysis and decisions.
3.1.5.2.1. Aspect: How commands are executed in the list
-
Alternative 1 (current choice): Create two separate parsers, one for the main tracking list and another for the replenish list.
-
Pros: This allows us to reuse existing commands that are currently functional for the main tracking list in the replenish list as well, without extensive repetition of code.
-
Cons: This would require us to check which parser is to be used every time a command is executed.
-
-
Alternative 2: Create two versions of each command, one for each list.
-
Pros: This allows us to greatly customise the command for each list.
-
Cons: This however would lead to unnecessary repetition of code across the code base.
-
3.2. Auto-sorting of items by name then date
3.2.1. Implementation
As mentioned previously, items in both lists are automatically sorted by their name then date.
This auto-sorting mechanism is facilitated by SortedUniqueXpireItemList and SortedUniqueReplenishItemList
that both implement SortedUniqueItemList, in a relationship summarised in the class diagram below.
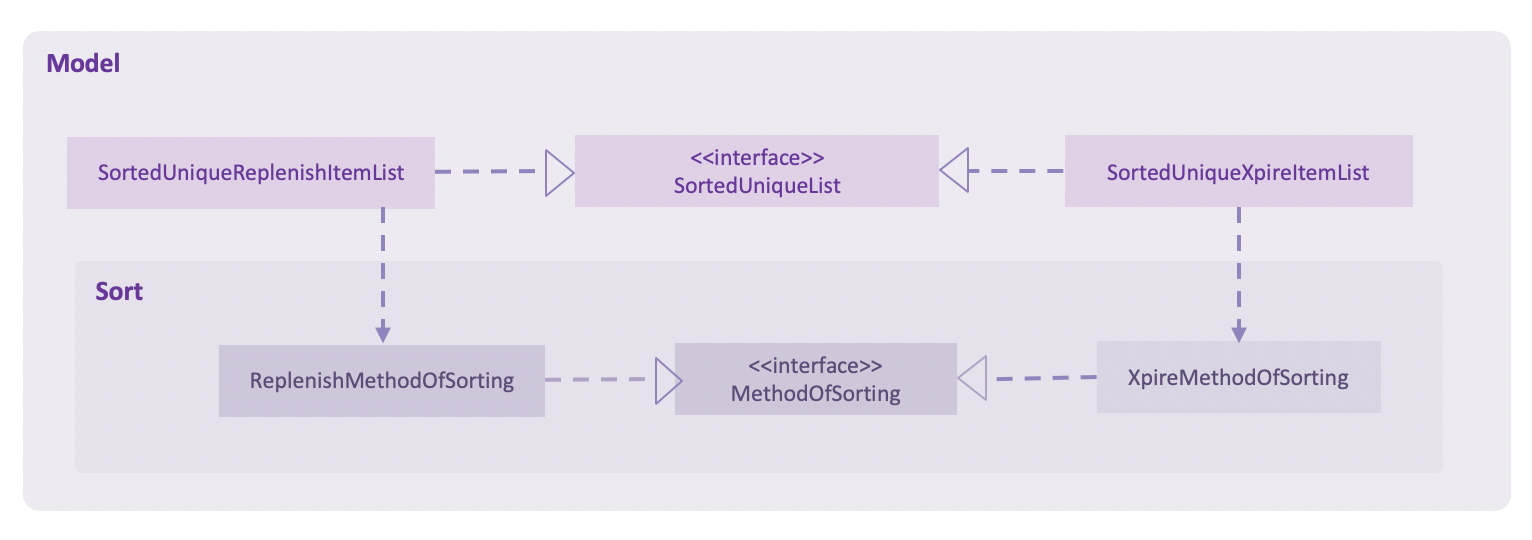
In both SortedUniqueXpireItemList and SortedUniqueReplenishItemList, items are stored in a SortedList<Item> and
subsequently sorted based on the comparator defined. SortedUniqueXpireItemList supports a new function, SortedUniqueItemList#setMethodOfSorting(), that specifies the
MethodOfSorting and comparator to be used for the list.
The following sequence diagrams break down the intricacies in the view operation that works to display the sorted items in each list:
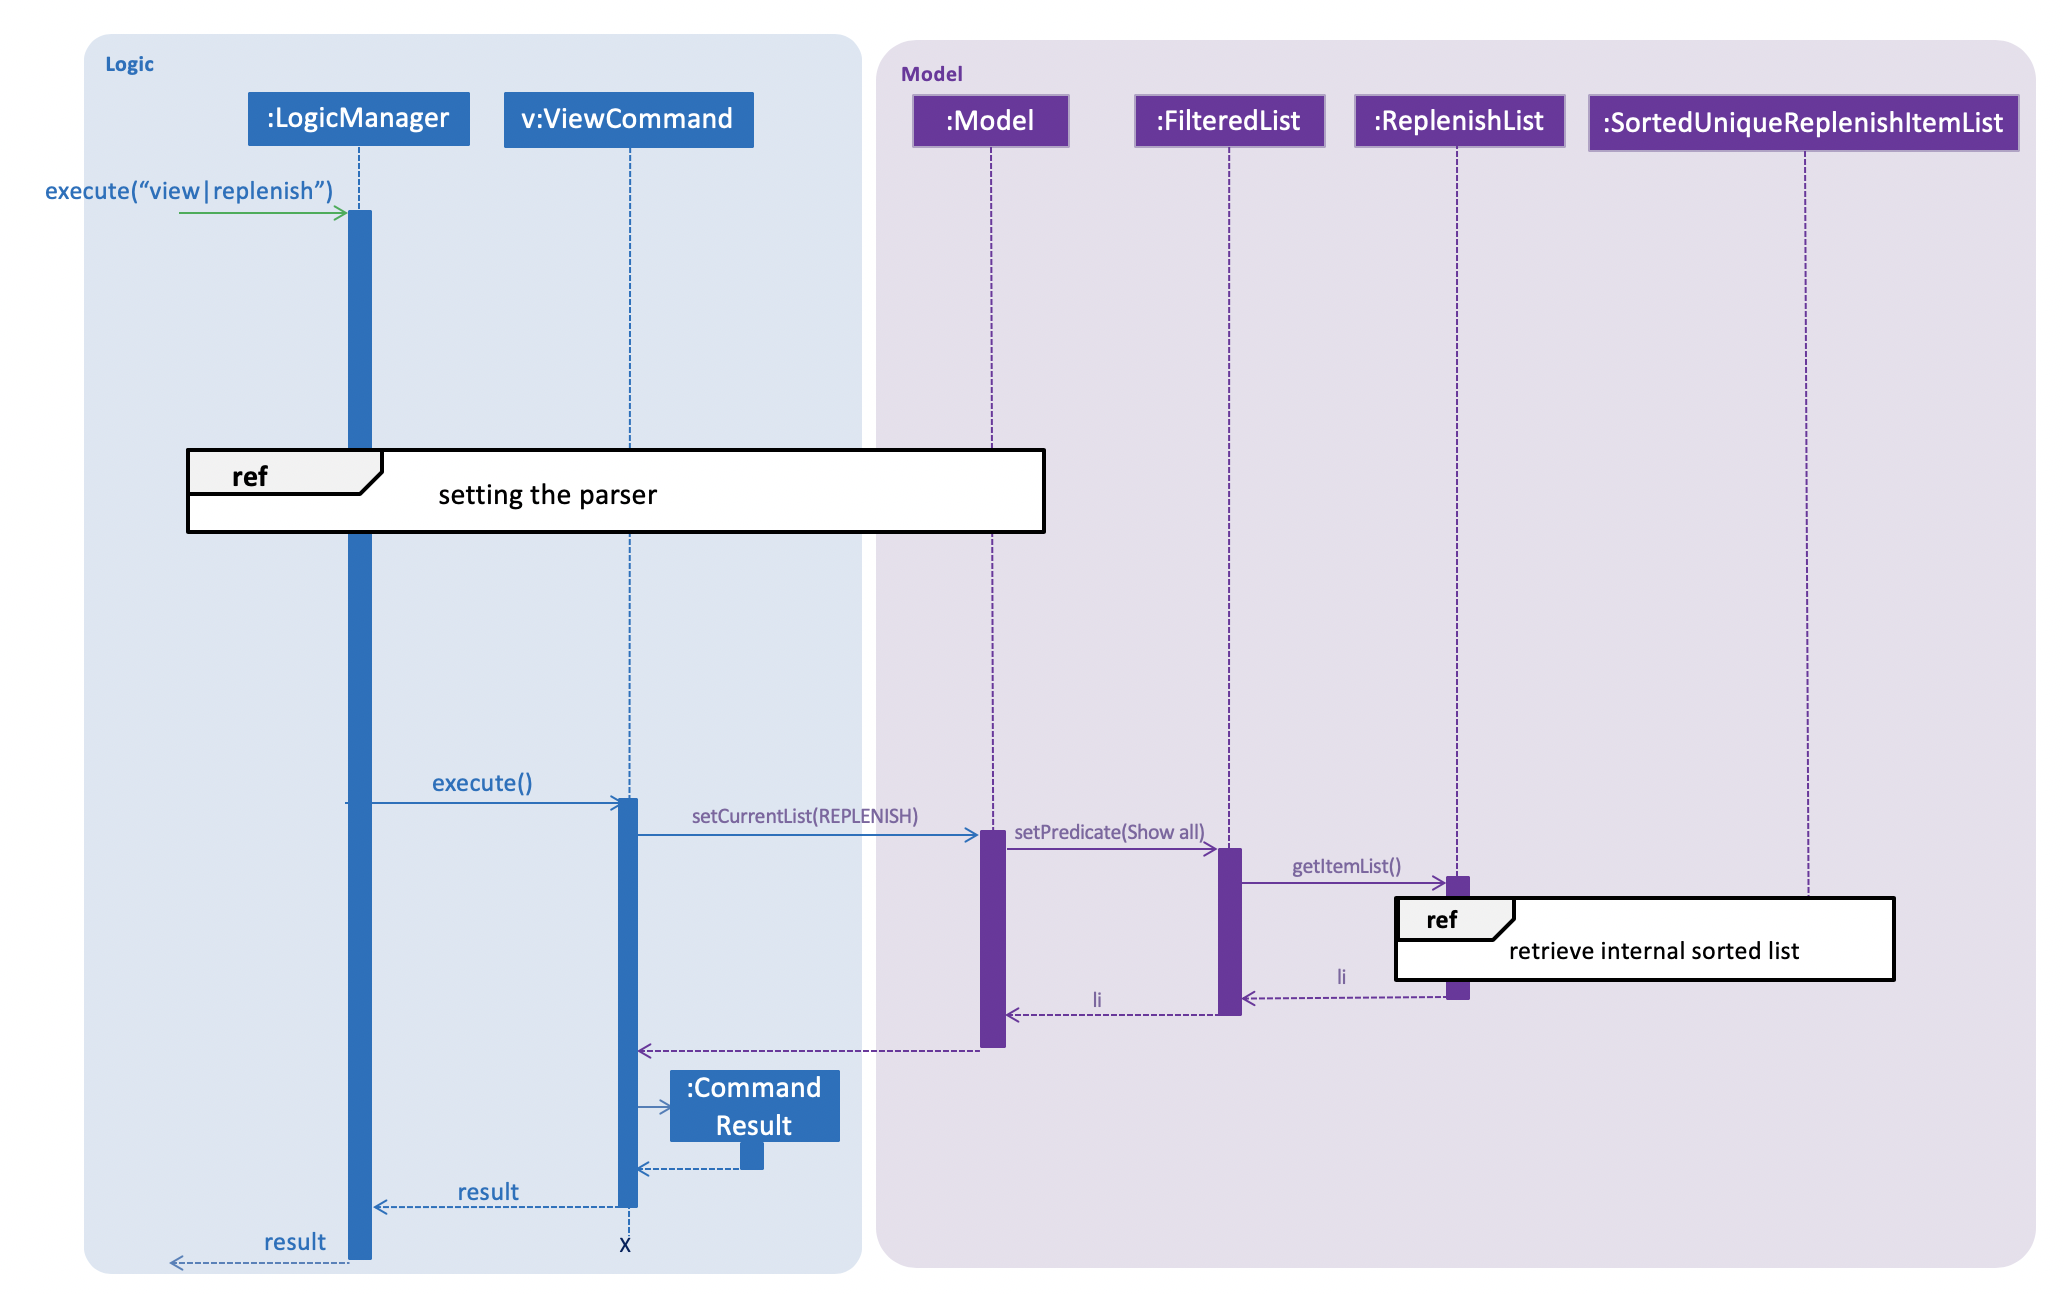
| Parsers are omitted from the diagram above to place greater emphasis on the parser selection process and sorting mechanism. |
The figure above shows a view|replenish command executed to change the current view from that of the main tracking list Xpire
to the replenish list, while the figure below initialises this process.

LogicManager creates and allocates a parser to parse commands entered by the user each time. It does so by first identifying the current view
displayed. In this example, the current view is found to be XPIRE, and thus XpireParser is selected. Following that,
new objects ViewCommandParser and ViewCommand are created and returned to LogicManager to be used in the execution of the view|replenish command.
The figure below pictures the process of retrieving the internal sorted list of items in ReplenishList.
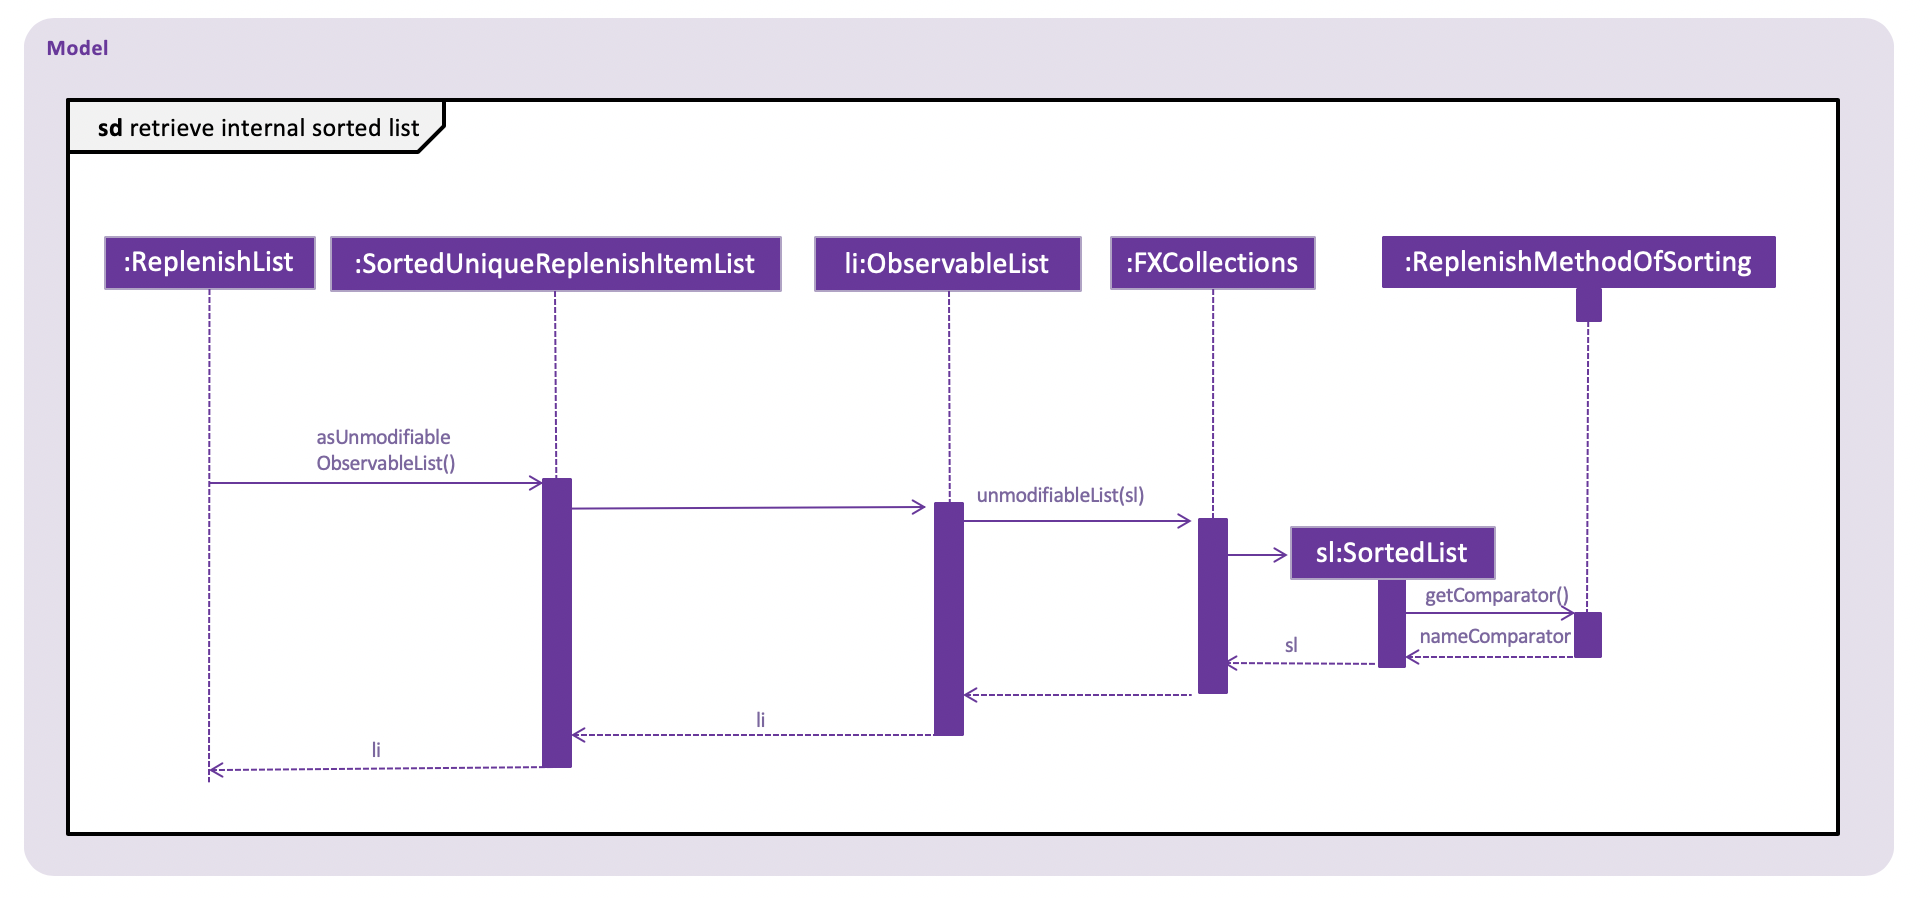
As items in the replenish list lack expiry dates, the command to sort by date is rendered irrelevant and thereby disallowed entirely in the replenish list.
Instead, items are automatically sorted by their names. Therefore, in the diagram above, a nameComparator is always returned by default.
| The list returned is the sortedInternalList wrapped as an unmodifiable list. |
this.internalUnmodifiableList = FXCollections.unmodifiableList(this.sortedInternalList);
|
Every time view is called, the current method of sorting specified is retrieved. If it has not been explicitly specified,
the default method of sorting (by name) is then retrieved. |
The following sequence diagram demonstrates how the sort command changes the default order of items displayed:
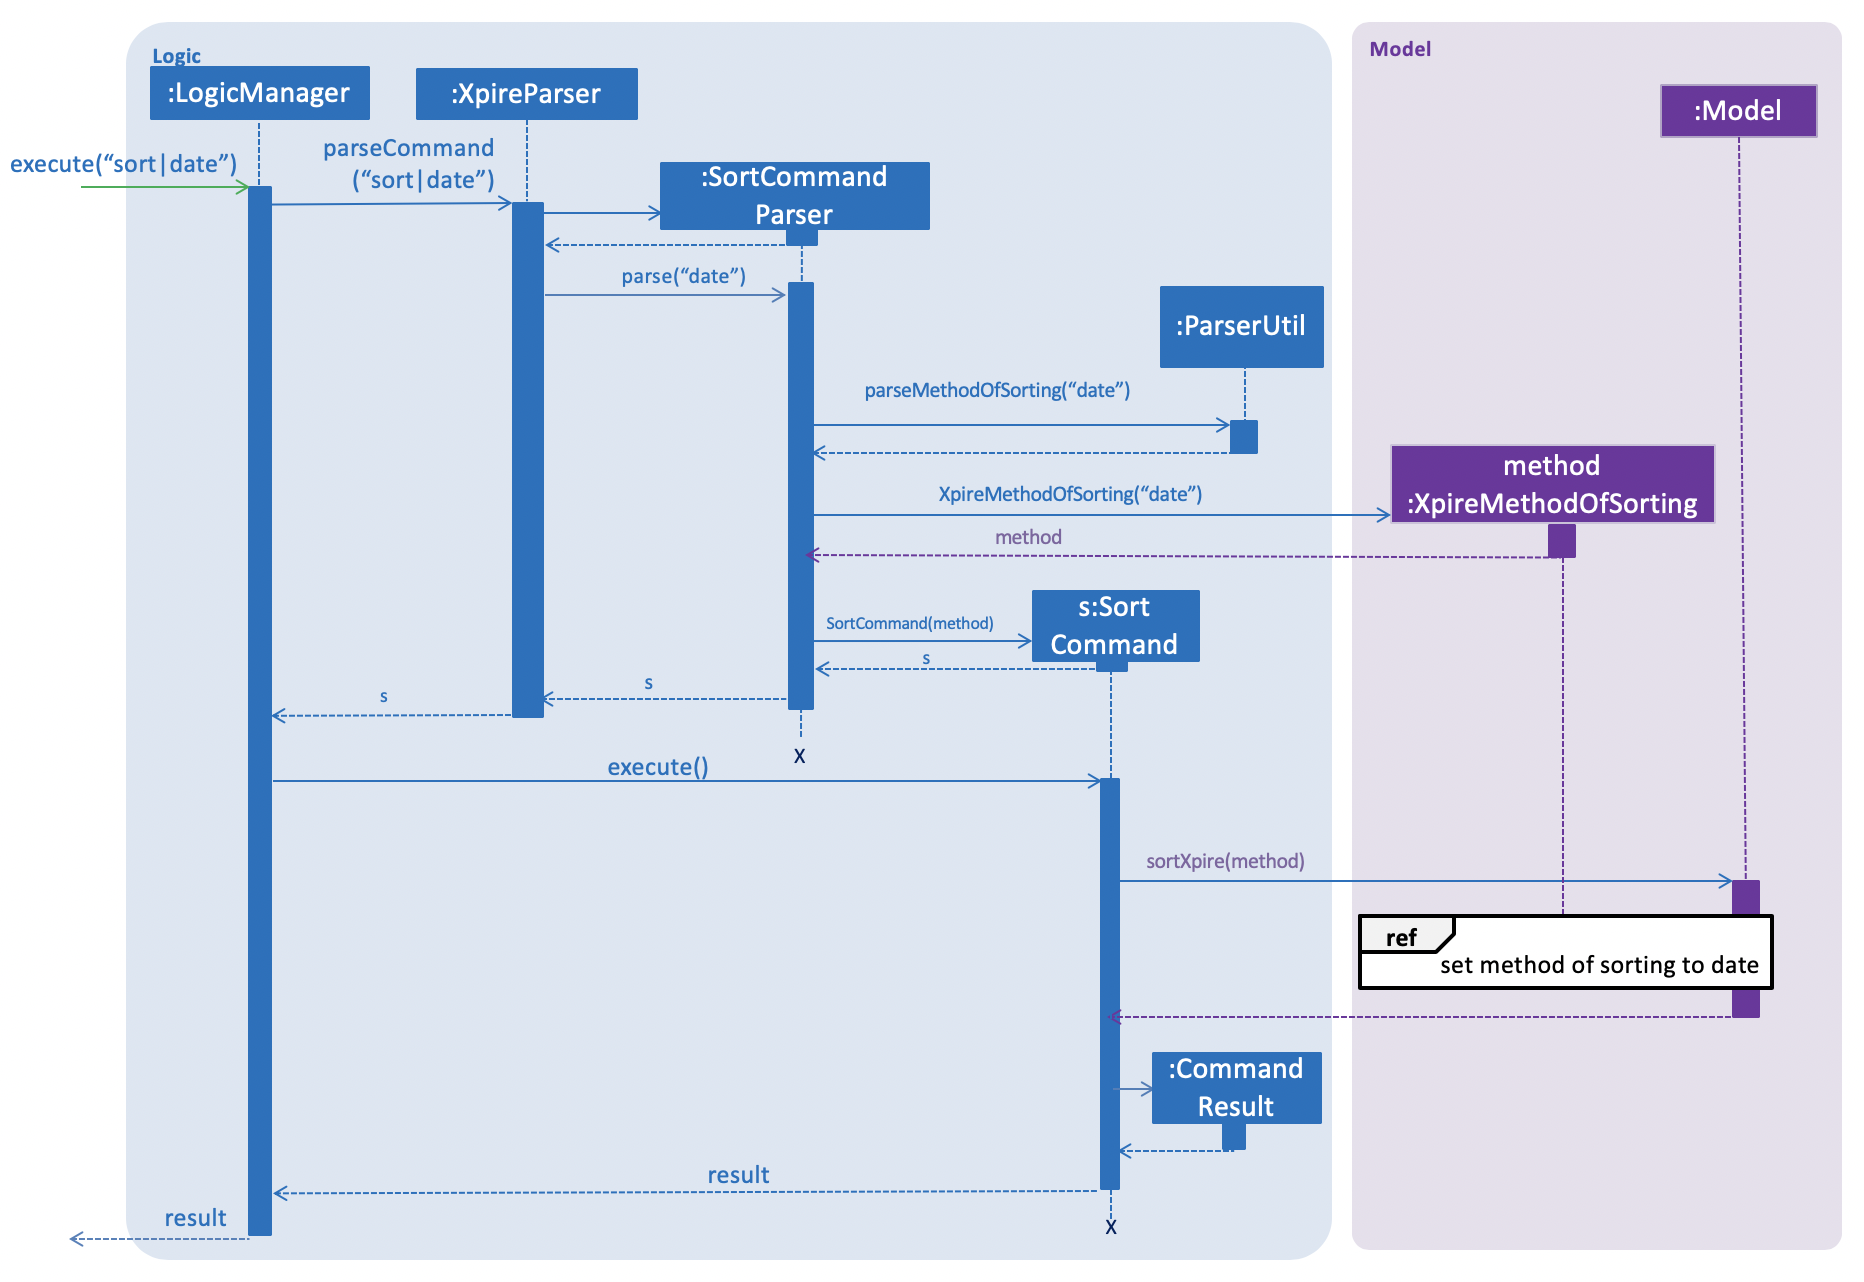
| When sort is called, the method of sorting is redefined by the user. |
In this example, the user has chosen to re-sort the items by date. As indicated above, ParserUtil primarily verifies that the method of sorting is valid, i.e. either name or date. Next, s,
the SortCommand object created executes the sort|date command. The figure below exhibits the specific process which sorts the items by their expiry dates.
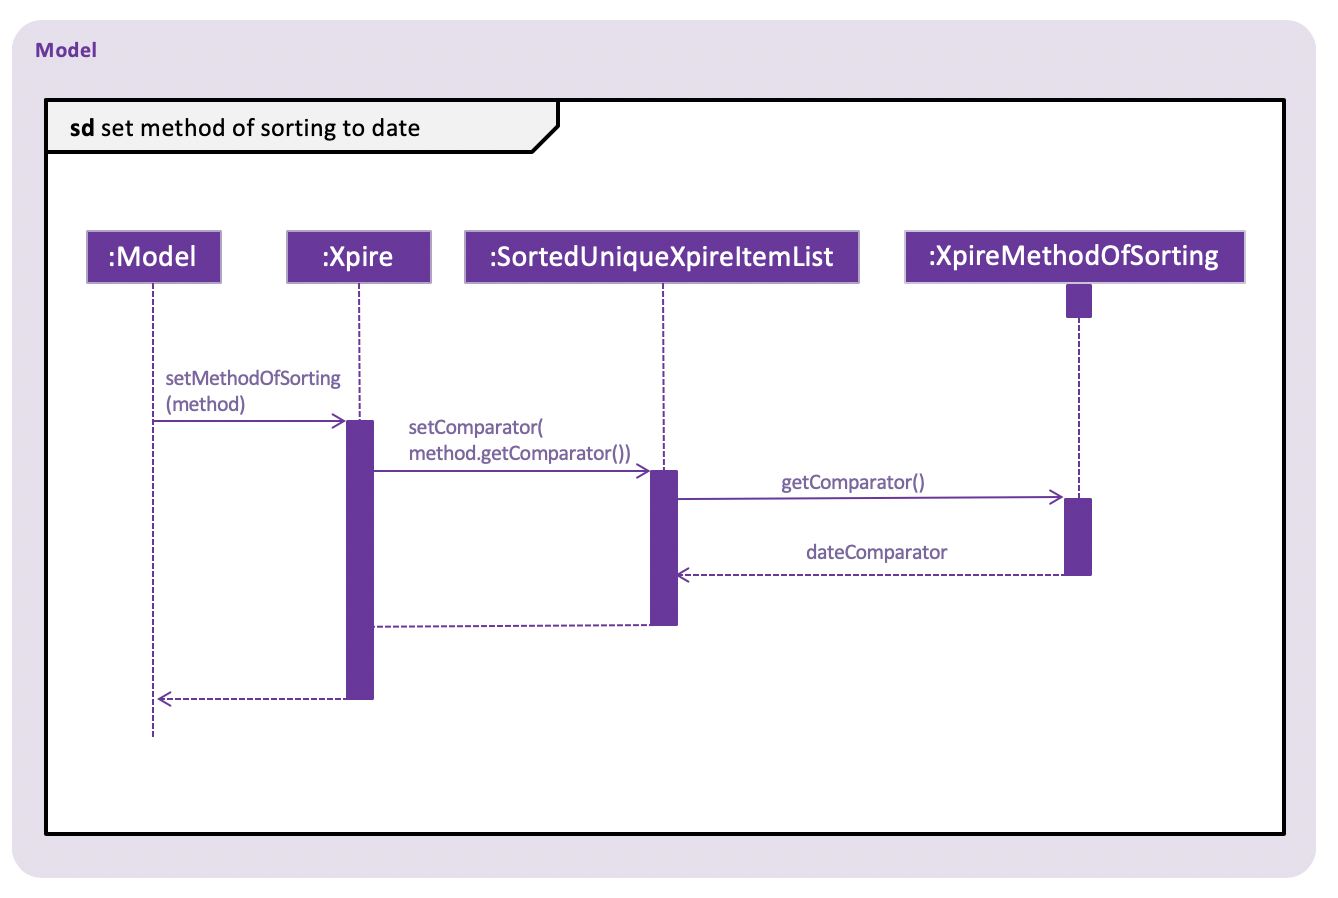
In the above example, the user has specified to sort items by their expiry date, thus a dateComparator is returned.
| The SortedList changes accordingly based on the method of sorting specified. |
sortedInternalList = new SortedList<>(internalList, methodOfSorting.getComparator());
The activity diagram below details the explicit steps in the execution of a sort command.
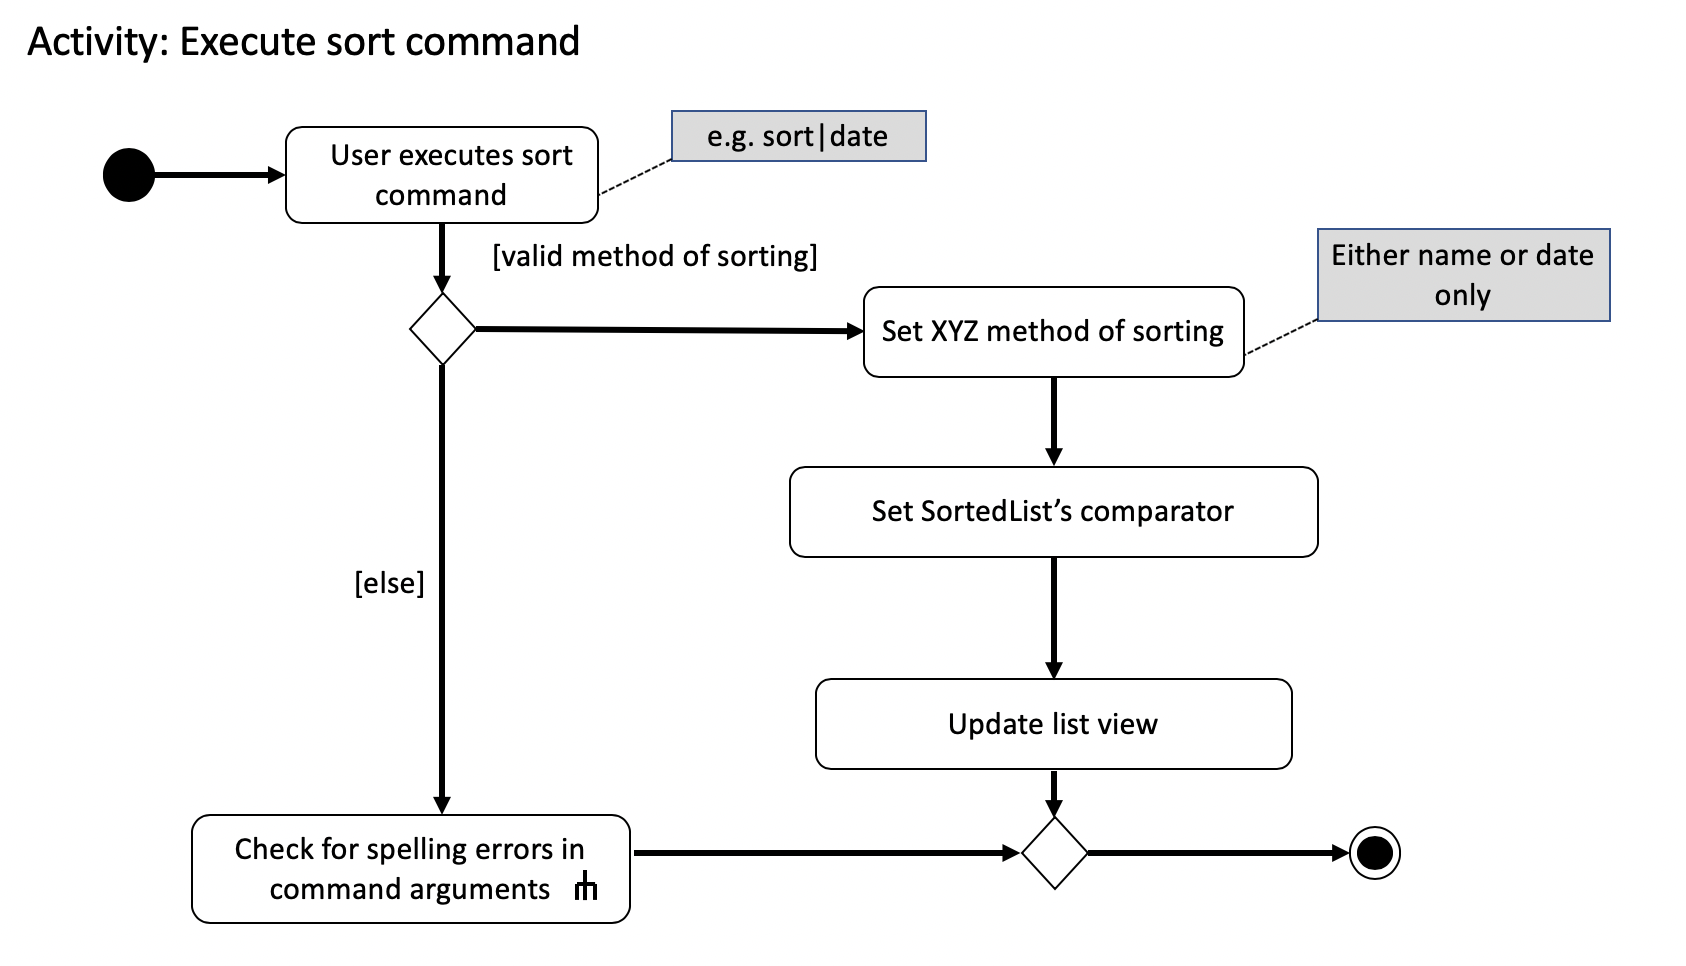
If a sort|date command is executed, the comparator of the internal sorted list is set to be that of a dateComparator,
and the list of items are updated accordingly.
| The ability to check for spelling errors of command arguments is explained in a later section. |
3.2.2. Design Considerations
In the process of actualising this feature, I contemplated on when items should be automatically sorted by their names and displayed. I also tried and tested varied options to derive an optimal data structure to store the sorted items. The following is a brief summary of my analysis and decisions.
3.2.2.1. Aspect: When items auto-sorted by their names are displayed
-
Alternative 1 (current choice): Maintain the current method of sorting unless a sort command is executed.
-
Pros: Does not reset the method of sorting back to name by default with the addition of every item.
-
Cons: The user might not be able to find items recently added.
-
-
Alternative 2: Re-sort the list of items by their names with the addition of every item.
-
Pros: Allows the user to find any added item with ease as items are sorted by their name in lexicographical order.
-
Cons: Resets the method of sorting back to name by default every time an item is added.
-
3.2.2.2. Aspect: Data structure to store the auto-sorted items
-
Alternative 1 (current choice):
SortedList<Item>.-
Pros: Smooth integration with the internal ObservableList. Comparator can also be easily changed when necessary.
-
Cons: Sorted List can only be viewed when
asUnmodifiableObservableList()inSortedUniqueItemListis called.
-
-
Alternative 2:
TreeSet<Item>.-
Pros: Disallows addition of identical items to the set.
-
Cons: May not be as compatible with the internalList which is of type ObservableList.
-
3.3. Reminders for expiring items
The reminder function comprises two parts. Firstly, user sets a date designated to active the reminder through the command
set reminder. Then, user will be able to find all items whose reminder has been activated at present through the command check.
There is also an enhanced function which allows the user to filter items expiring within a specified number of days,
through the check|<days> command.
3.3.1. Implementation
3.3.1.1. Set reminder
The set reminder function is implemented in a similar way as delete, add and tag. It is facilitated by the method setItem in Model
where the old item in Xpire will be replaced by a new item with an updated value for the field ReminderThreshold.
It is activated using the command set reminder.
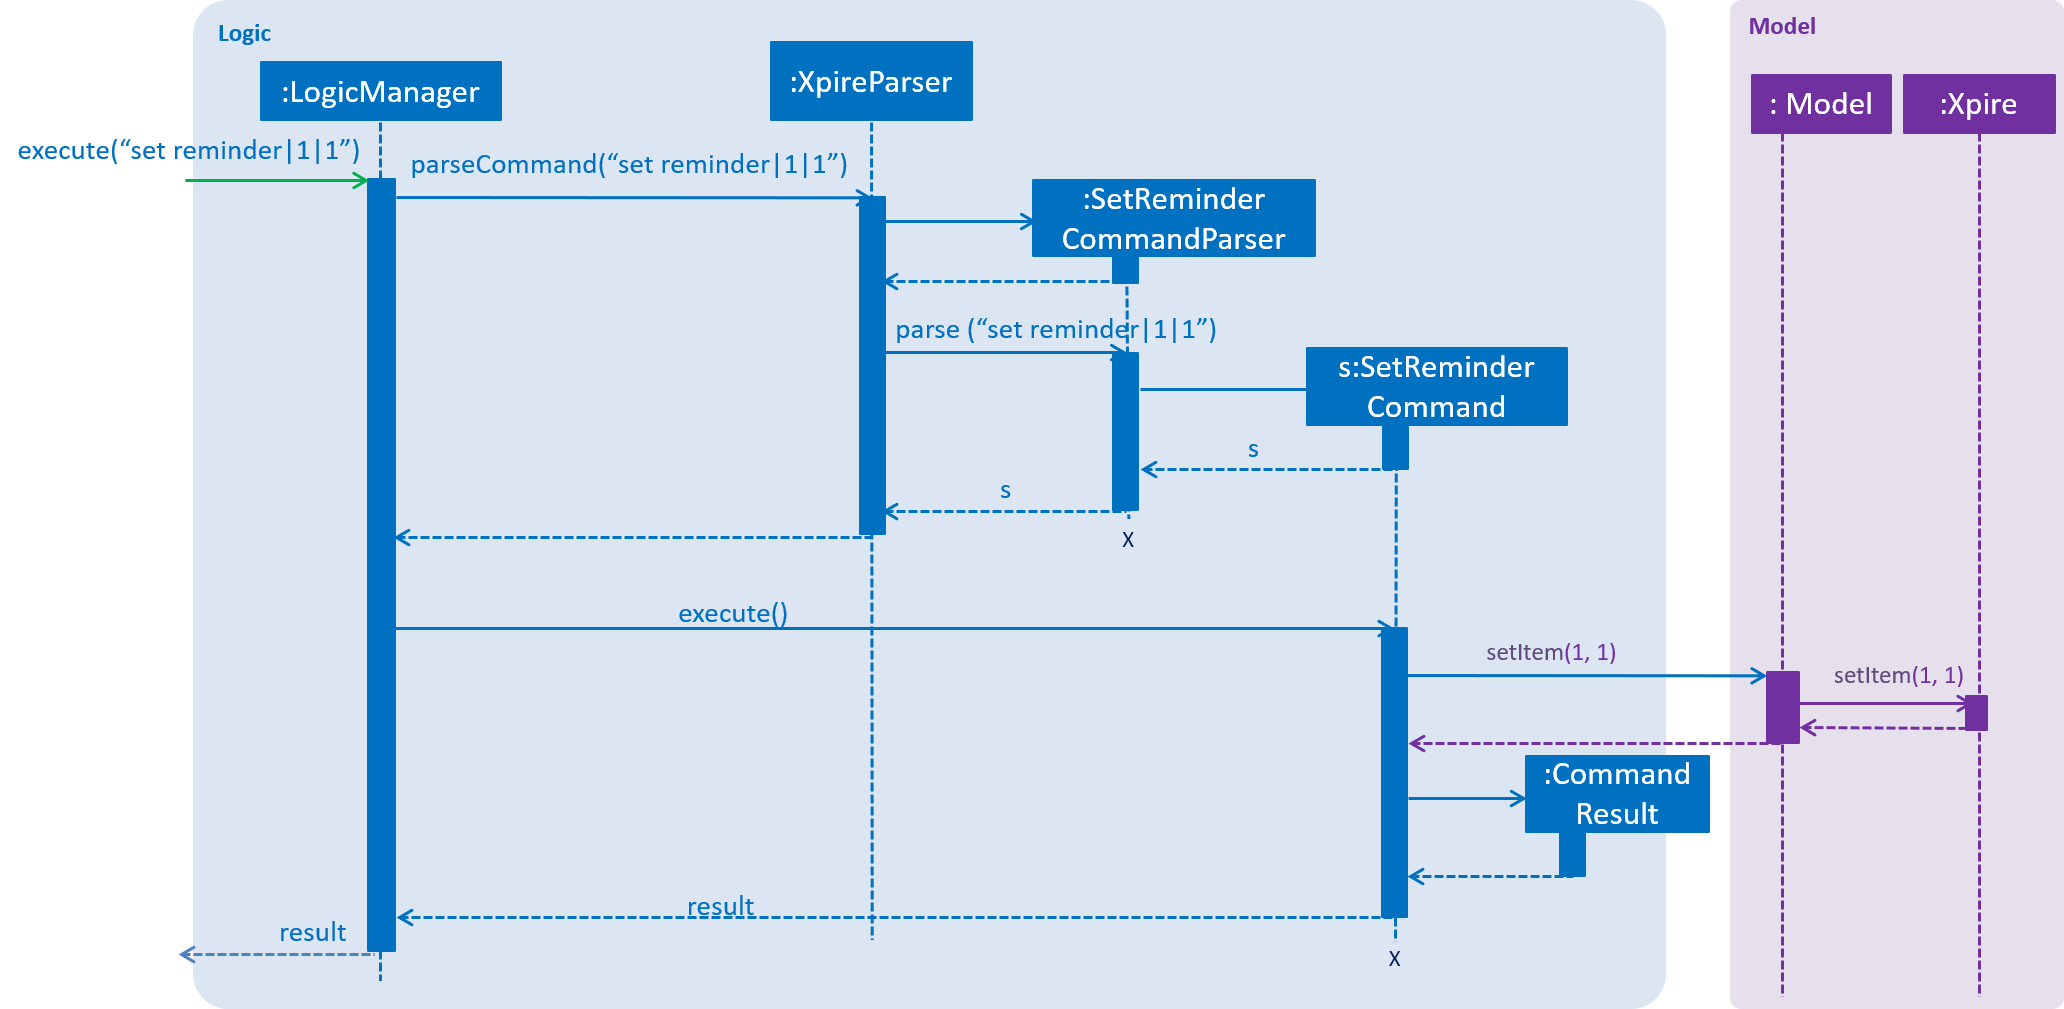
You can refer to the example usage scenario given below to see what happens at each stage of the execution.
Scenario: the user wants to set a reminder for an item with index 1 in the current view of the list 1 day before its expiry date.
Step 1: the user input is parsed by SetReminderCommandParser to check validity of the reminder threshold.
Step 2: the SetReminderCommandParser creates a SetReminderCommand object if the input is valid. The SetReminderCommand contains a
new ReminderThreshold object. The SetReminderCommand is returned to the LogicManager and executed.
Step 3: during the execution, a copy of the old item with the new ReminderThreshold will be created. The copy will replace the old one
in the Xpire by ModelManager.
Step 4: result of execution will be displayed.
The following sequence diagram shows how the operation works:
3.3.1.2. Check
The basic check function uses the updateFilteredItemList method provided by model to filter items whose reminder has been activated.
The predicate used by the filtering method is named ReminderThresholdExceededPredicate.
The ReminderThresholdExceededPredicate will check whether the number of days to an item’s expiry date is smaller than or equal to its reminder
threshold.
You can see how the Check operation works in the following sequence diagram.
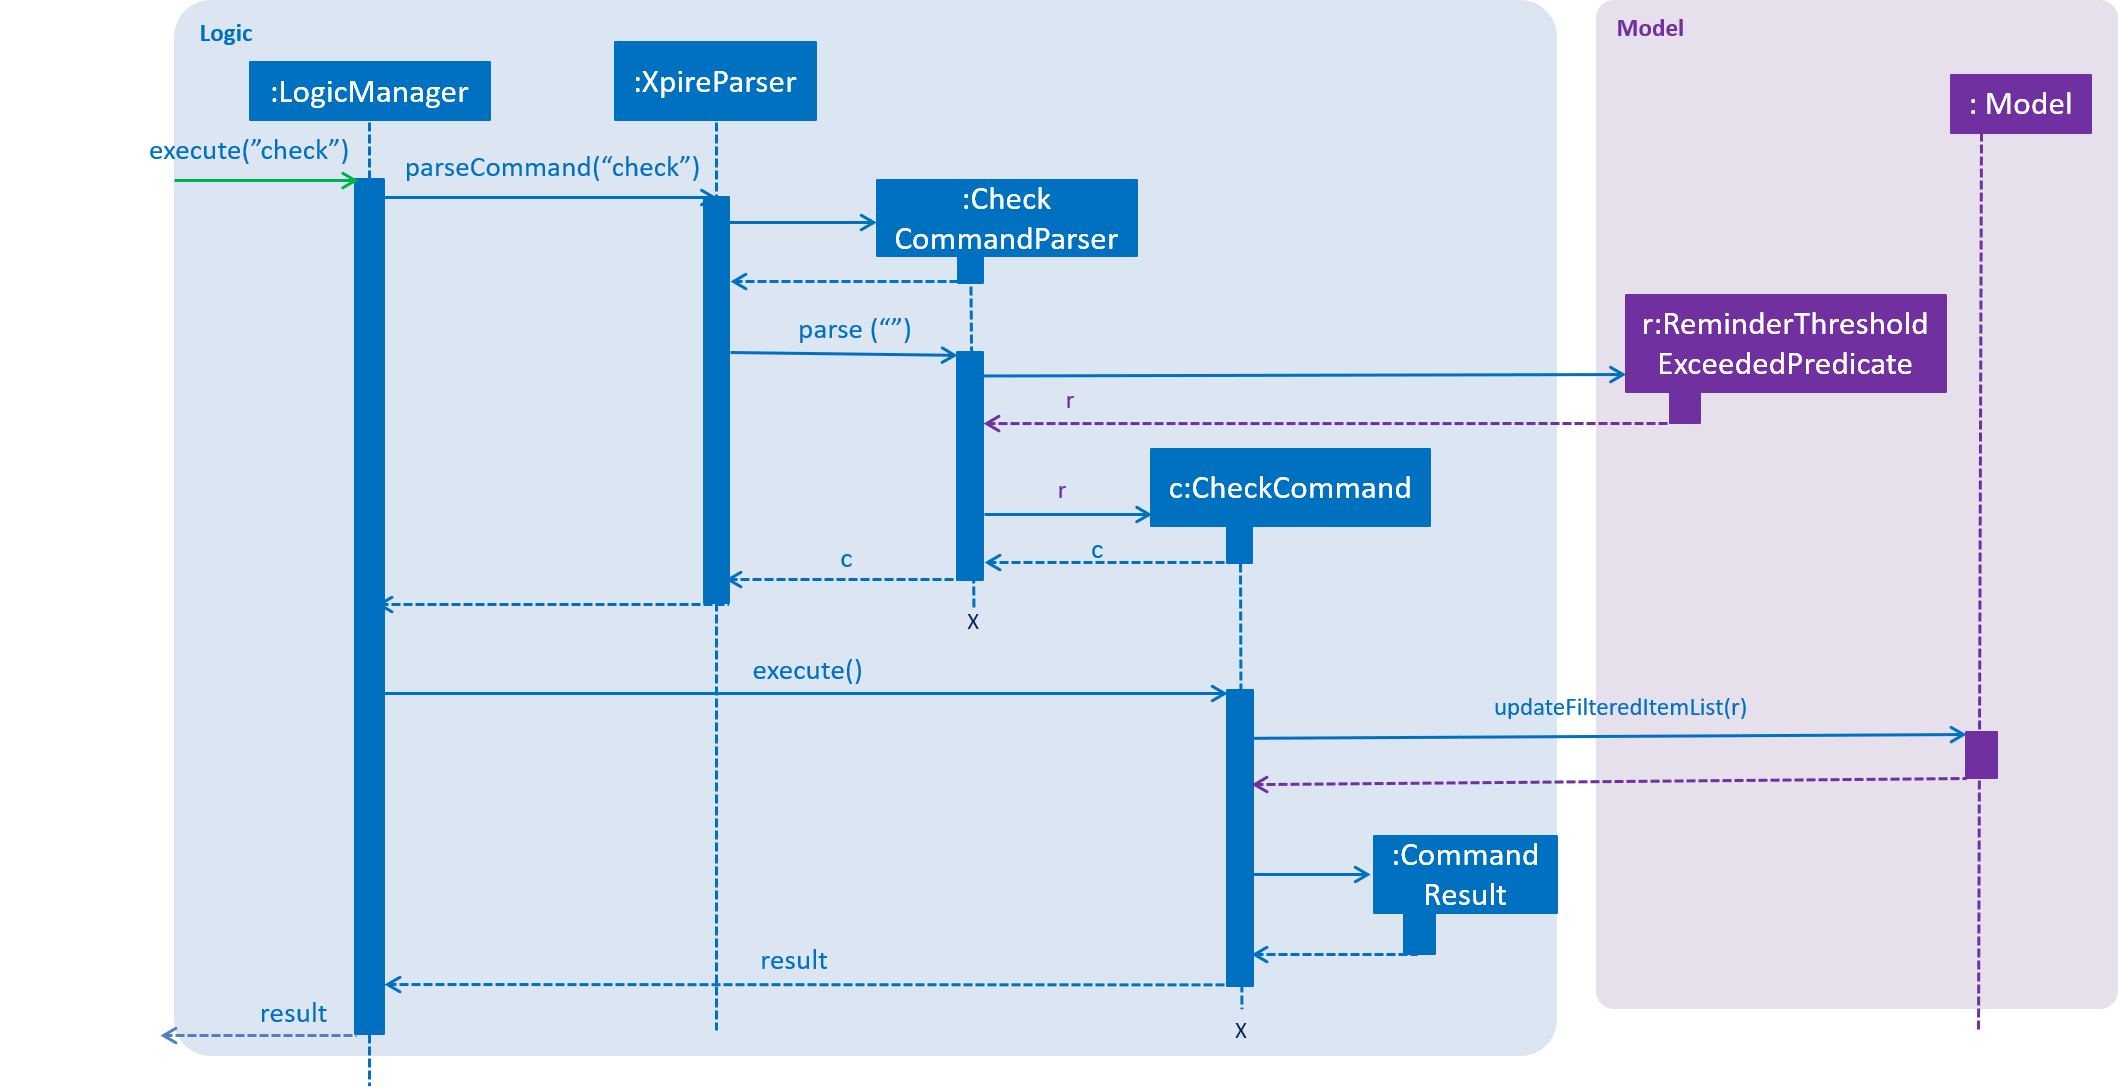
A successful check will lists all items marked as yellow and red int he ViewPanel of the UI component.
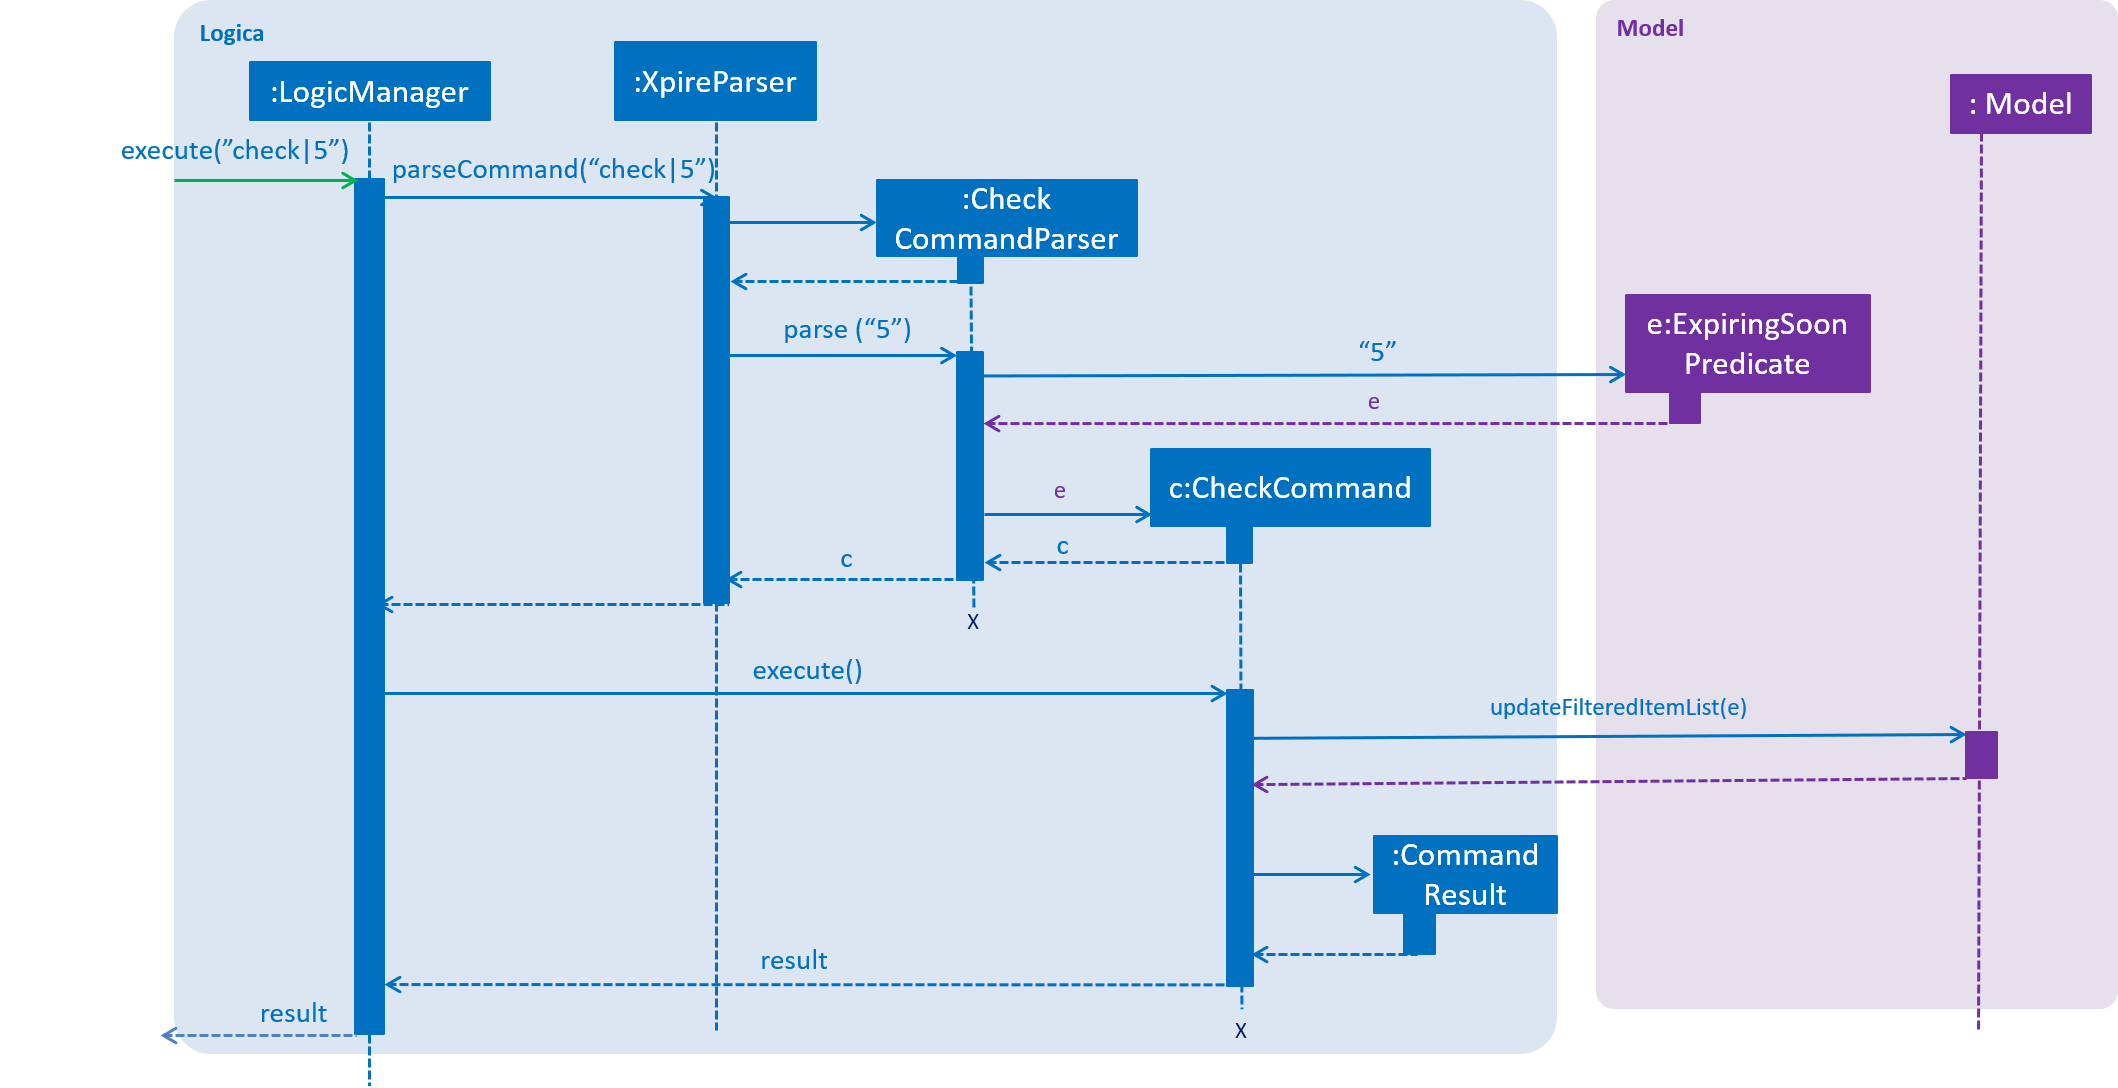
3.3.1.3. Check with days
The enhanced check function also uses the updateFilteredItemList method provided by model to filter items. The condition
for filtering is that the user input number of days is smaller than or equal to the number of days to an item’s expiry date. This is
done by the predicate named ExpiringSoonPredicate.
You can see how the Check|<days> operation works in the following sequence diagram.
3.3.2. Design Considerations
3.3.2.1. Aspect: How set reminder executes
-
Alternative 1 (current choice): Set new item to replace the original one in
Xpire-
Pros: removes unwanted dependency as modifying the item directly in
SetReminderCommandclass requires the originalXpireItemListto be passed to the class and could possibly result in unwanted modification. Using aObservableListinstead prevents any changes to the item by theSetReminderCommandclass. -
Cons: Time complexity is O(nlogn). Despite setting a reminder will not result in change in name or expiry date of the item, and thus requires no change to the sorted list, the list will still be sorted as a new item is considered added to the list.
-
-
Alternative 2: Modify the original item
-
Pros: Time complexity is low: O(n) to locate the item.
-
Cons: This is dangerous as modifying items in a sorted list is prone to unwanted side effects and undesirable modifications.
-
3.4. Undo/Redo feature
3.4.1. Implementation
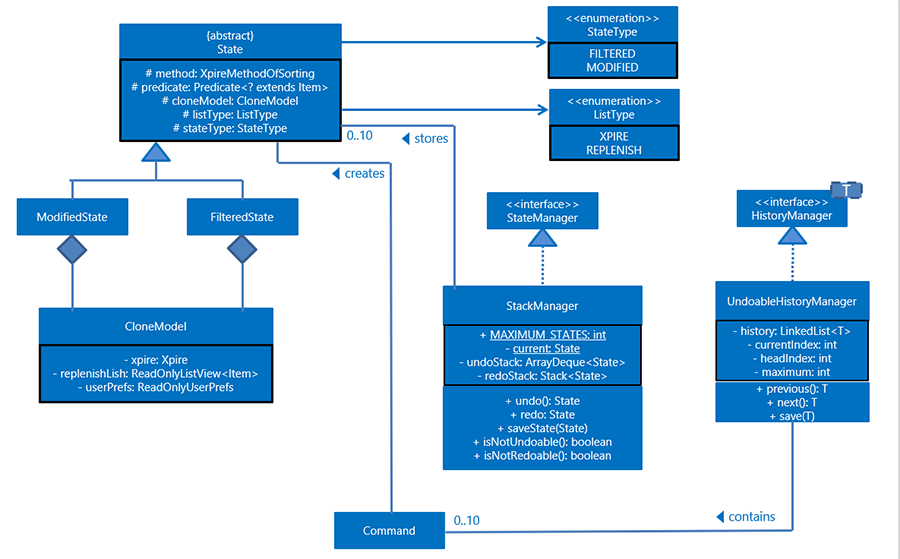
The undo/redo mechanism is facilitated by 4 different components: CloneModel, State, StackManager, and UndoableHistoryManager.
A CloneModel is a cloned version of the Model class and contains UserPrefs and the items in Xpire and ReplenishList.
A State represents the status of the application at that point in history and contains the corresponding CloneModel, an enum ListType which is the current view of the application, a XpireMethodOfSorting which determines how the items in Xpire are sorted, as well as a predicate that filters items in the current view.
The undo/redo mechanism is also supported by a StackManager which stores internally all the states and
decides when to pop or clear, depending on the command.
There are two stacks that are stored in StackManager internally, the UndoStack and the RedoStack.
The UndoStack is a ArrayDeque class, a double-ended queue which can simulate as a stack whilst the RedoStack is of the Stack class. Both classes are imported from java.util.
These stacks are initialised and cleared upon the beginning and ending of every session of the application.
| Currently, the undo/redo mechanism only supports up to 10 previous commands. This is enforced in order to save memory by not storing too many states in one session which may slow down the application. |
As the UndoStack can only contain a maximum of 10 states, the UndoStack has to drop the first state from the front if there are already 10 states stored, thus influencing the design of the two stacks.
Therefore, an double-ended queue was used to replicate a Stack as it supports O(1) deleting operations from the front.
The UndoableHistoryManager is a generic class that stores inputs as well as Commands so that Undo/Redo commands are able to feedback to the user what commands have been undone or redid.
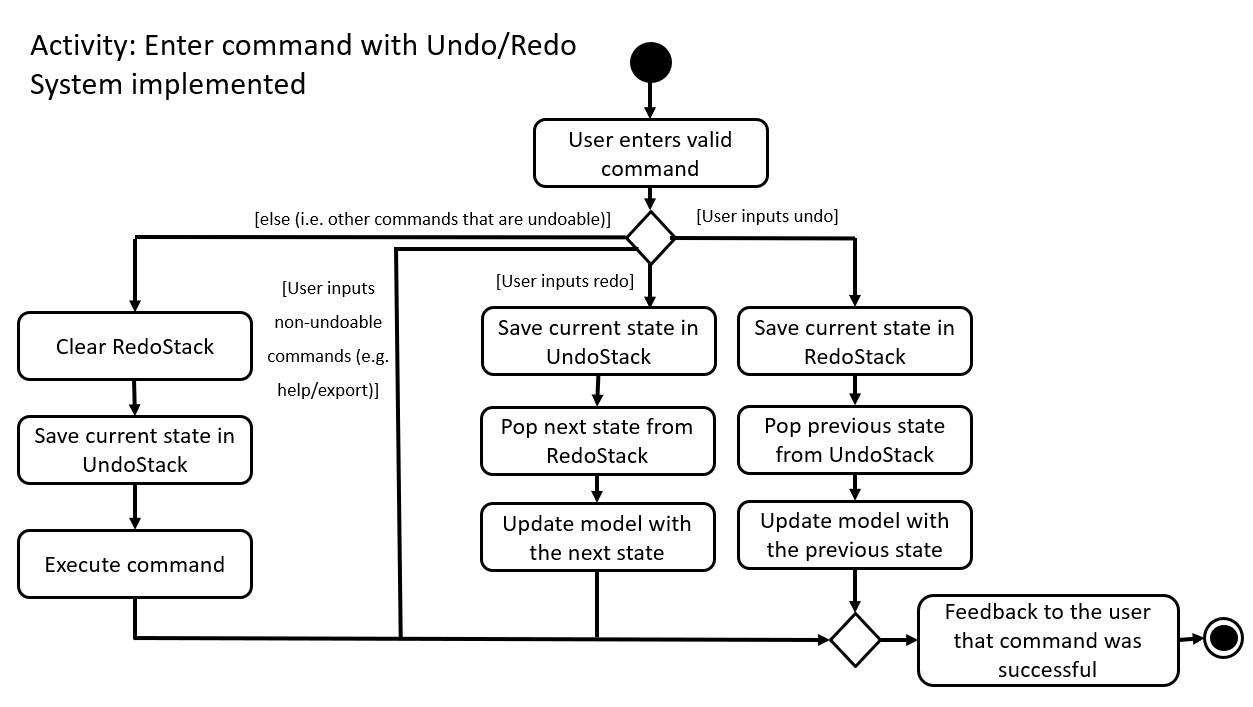
At every command (besides undo/redo/help/exit/export/tag (show), the state is stored internally.
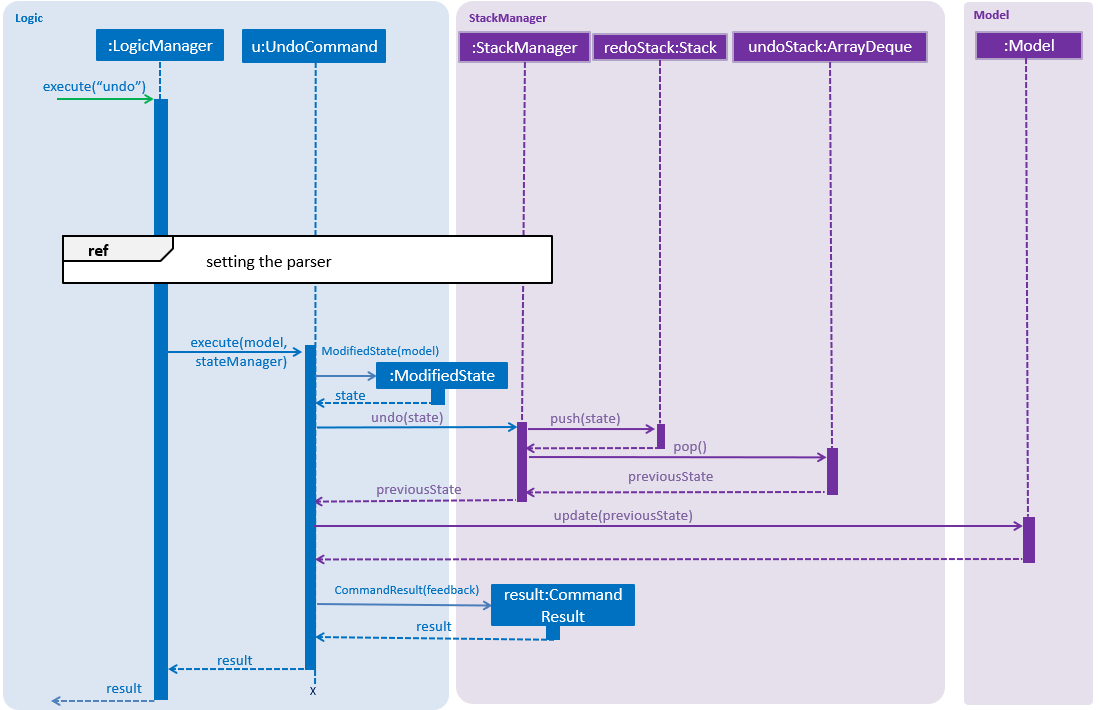
When an undo command is executed, it will pop the previous state and update the model via update.
The state that was undid will then be pushed into the RedoStack, should the user types in a redo command.
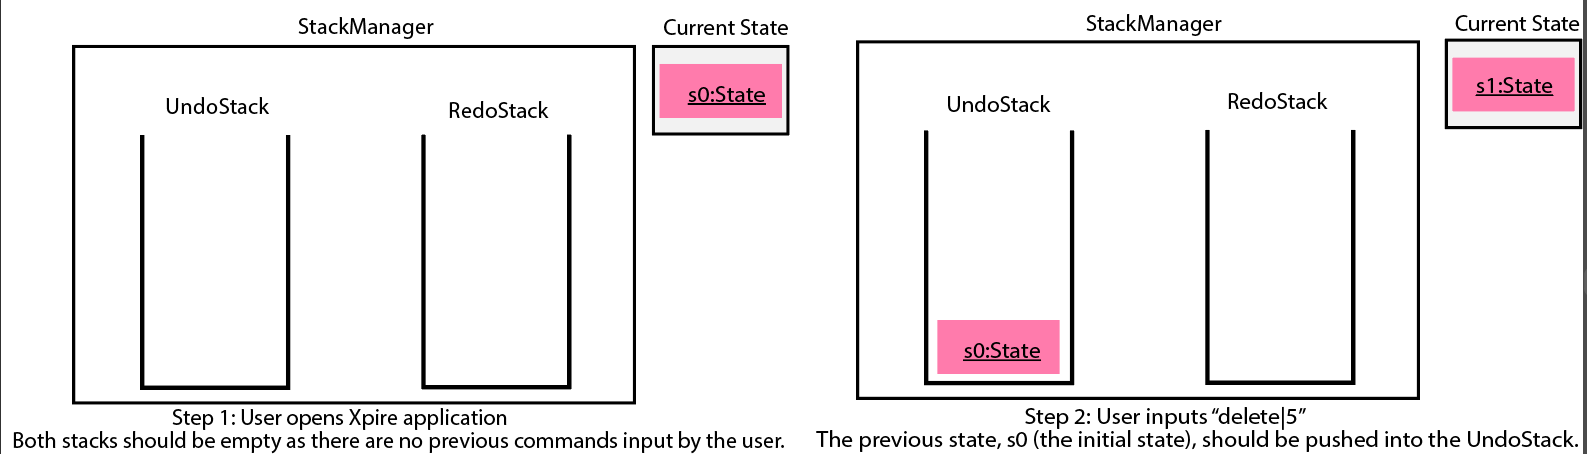
Given below is an example usage scenario and how the undo/redo mechanism behaves at each step.
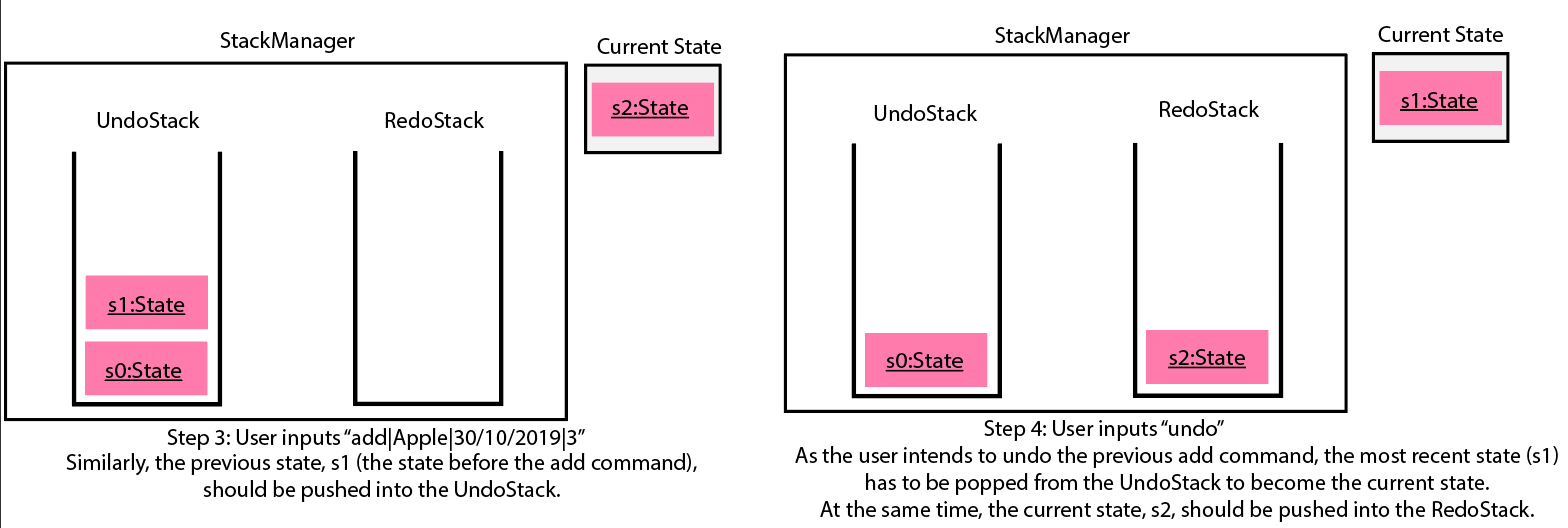
Step 1. The user launches the application for the first time. The two internal stacks in StackManager will be initialised. Both stacks should be empty as there are no previous commands by the user. The current state is s0, the initial state of the application.
Step 2. The user executes delete|5 command to delete the 5th item in Xpire. The delete will then save the previous state, s0, by pushing it into the Undo Stack. The current state will be the new state s1 that has the 5th item in Xpire deleted.
Step 3. The user executes add|Apple|30/10/2019|3 to add a new item. Similar to Step 2, The AddCommand will then save the previous state, s1, by pushing it into the UndoStack. The current state will be the new state s2 with the item Apple added.
| If a command fails its execution, it will not save the previous state, thus the state will not be pushed into the UndoStack. |
Step 4. The user now decides that adding the Apple item earlier on was a mistake, and decides to undo that action by executing the undo command. The undo command will then update the current model with the model in the previous state.
Internally within StackManager, the most recent state, s1, will be popped from the UndoStack to become the current state. At the same time, s2, the new state with the added item, will be pushed into the RedoStack.
| If there are no commands to undo (e.g. at the start of a new Xpire session), undo will return an Error to the user instead. This is done by checking whether the UndoStack is empty. |
The following sequence diagram shows how the undo operation works:
The redo command does the opposite — It will pop the latest state from the Redo Stack and set it as the current state whilst pushing the current state into the UndoStack.
Similarly, if there are no commands to redo, redo will return an Error to the user. This is done by checking if the RedoStack is empty.
|
From Step 4, there are 3 scenarios which showcases the behaviour of StackManager after an Undo command has been executed.
Step 5a. The user suddenly decides that he should not have undid the previous Add command, thus he wants to redo the action. This is done by inputting 'redo' in Xpire.
Within StackManager, the current state will be the popped state, s2, from the RedoStack. The current state, s1, will then be pushed back into the UndoStack. The current states and their locations should be the same as after the execution of the AddCommand in Step 3.
Step 5b. The user decides to further undo his actions, which now includes the first DeleteCommand. The initial state, s0, will then be popped from the UndoStack and set as the current state. The current state, s1, will then be pushed into the RedoStack.
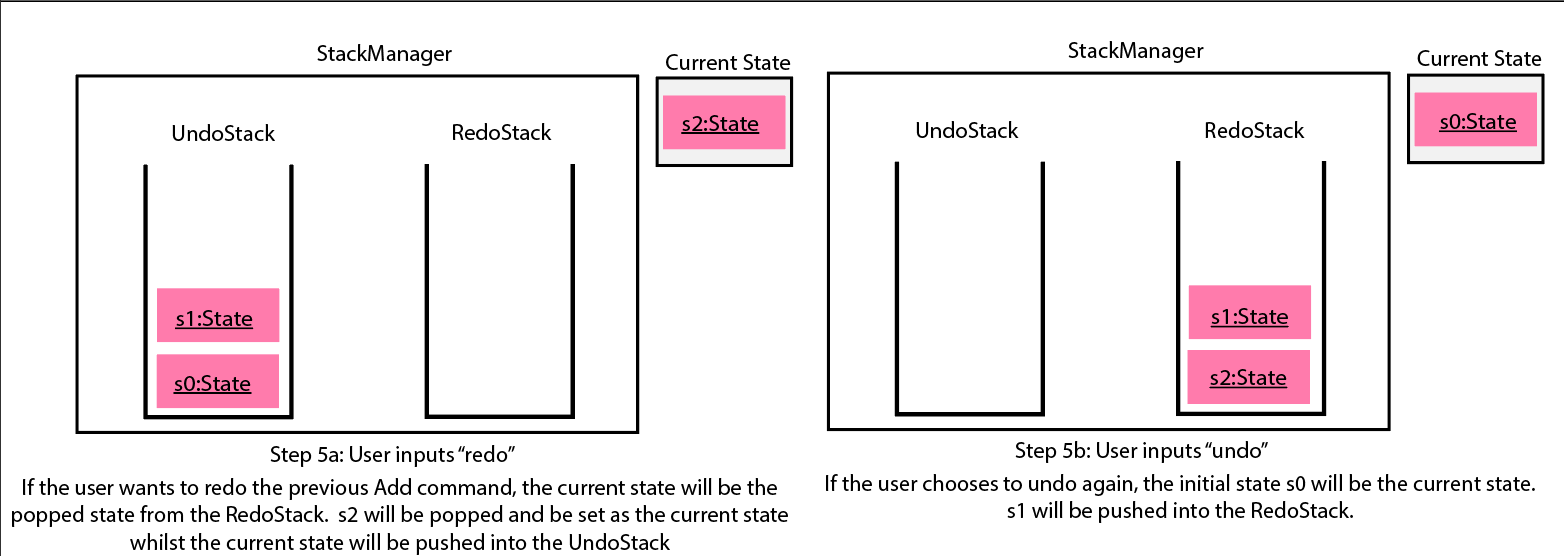
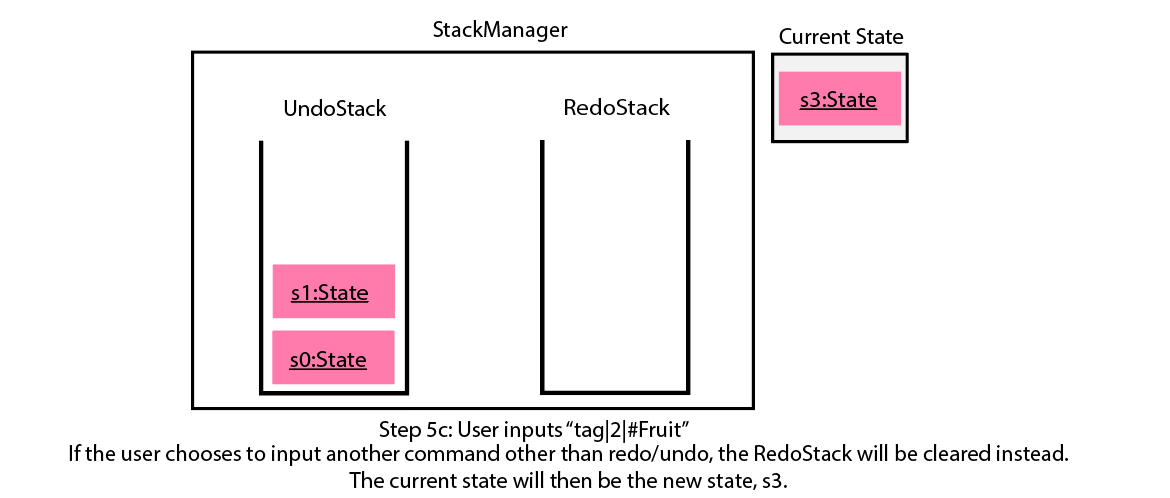
Step 5c. The user may also decide to execute some other command (which is the most likely scenario) other than Undo/Redo. For instance, the user inputs tag|2|#Fruit.
When this happens, the existing states in the RedoStack will be cleared. The state s1, will then be pushed into the UndoStack whilst the current state will be the new state s3 that includes the new TagCommand.
Not all commands will save states to StackManager. exit and help commands will not save states. UndoCommand and RedoCommand should only act on commands that update items or change the view of the list of items to the user.
|
The following activity diagram summarises what happens when a user executes a new command:
3.4.2. Design Considerations
There are two classes that inherit from the abstract class State which are FilteredState and ModifiedState.
The states that are stored at each valid and undoable command depends on the type of command itself as FilteredState only copies over the predicate and method of sorting but not the backend Xpire or ReplenishList data. Thus, commands that do not alter items such as SortCommand and CheckCommand commands instantiate a FilteredState.
On the other hand, ModifiedState is created with commands that alters the item of the data, thus new Xpire and ReplenishList objects will be stored within the state. Commands that instantiate a ModifiedState include AddCommand, TagCommand and DeleteCommand.
The following class diagram shows the entirety of the undo/redo mechanism and its associations.
3.4.2.1. Aspect: How undo & redo executes
-
Option 1 (current choice): Saves and clones the entire model.
-
Pros: Easy to implement.
-
Cons: May have performance issues in terms of memory usage, need to have a limit for the amount of states that we can save.
-
-
Option 2: Individual command knows how to undo/redo by itself.
-
Pros: Will use less memory (e.g. for
DeleteCommand, just save the item being deleted and apply the corresponding reverse command which is andAddCommand). -
Cons: Ensure that the implementation of each individual command are correct.
Hard to do when applying stackableSearchCommandandSortCommandas thepredicateand XpireMethodOfSorting needs to be updated properly.
-
3.4.2.2. Aspect: Data structure to support the undo/redo commands
-
Optional 1 (current choice): Use a stack to store the different commands and states.
-
Pros: Easy for new Computer Science student undergraduates to understand, who are likely to be the new incoming developers of our project.
-
Cons: Logic is duplicated twice. For example, when a new command is executed, we must remember to update the filtered list shown to the user and the backend
Xpire/ReplenishListdata.
-
-
Optional 2: Use
HistoryManagerfor undo/redo that stores previous versions of Item/XpireItem-
Pros: We do not need to maintain a separate list, and just reuse what is already in the codebase.
-
Cons: Requires
Item/XpireItemto have a history of its edits. Violates Single Responsibility Principle and Separation of Concerns as eachItemnow needs to do two different things which is to store data and know its previous edited versions.
-
3.5. Search by name or tag(s)
This feature allows users to filter out specific items either by name or by tag(s) through providing the relevant keyword(s). Items which contain any of the keywords will be shown on the view panel. For search by name, partial words can be matched. For search by tag, only exact words will be matched.
This implementation is under Logic and Model components.
3.5.1. Implementation
Below are the UML sequence diagrams and a step-by-step explanation of an example usage scenario.
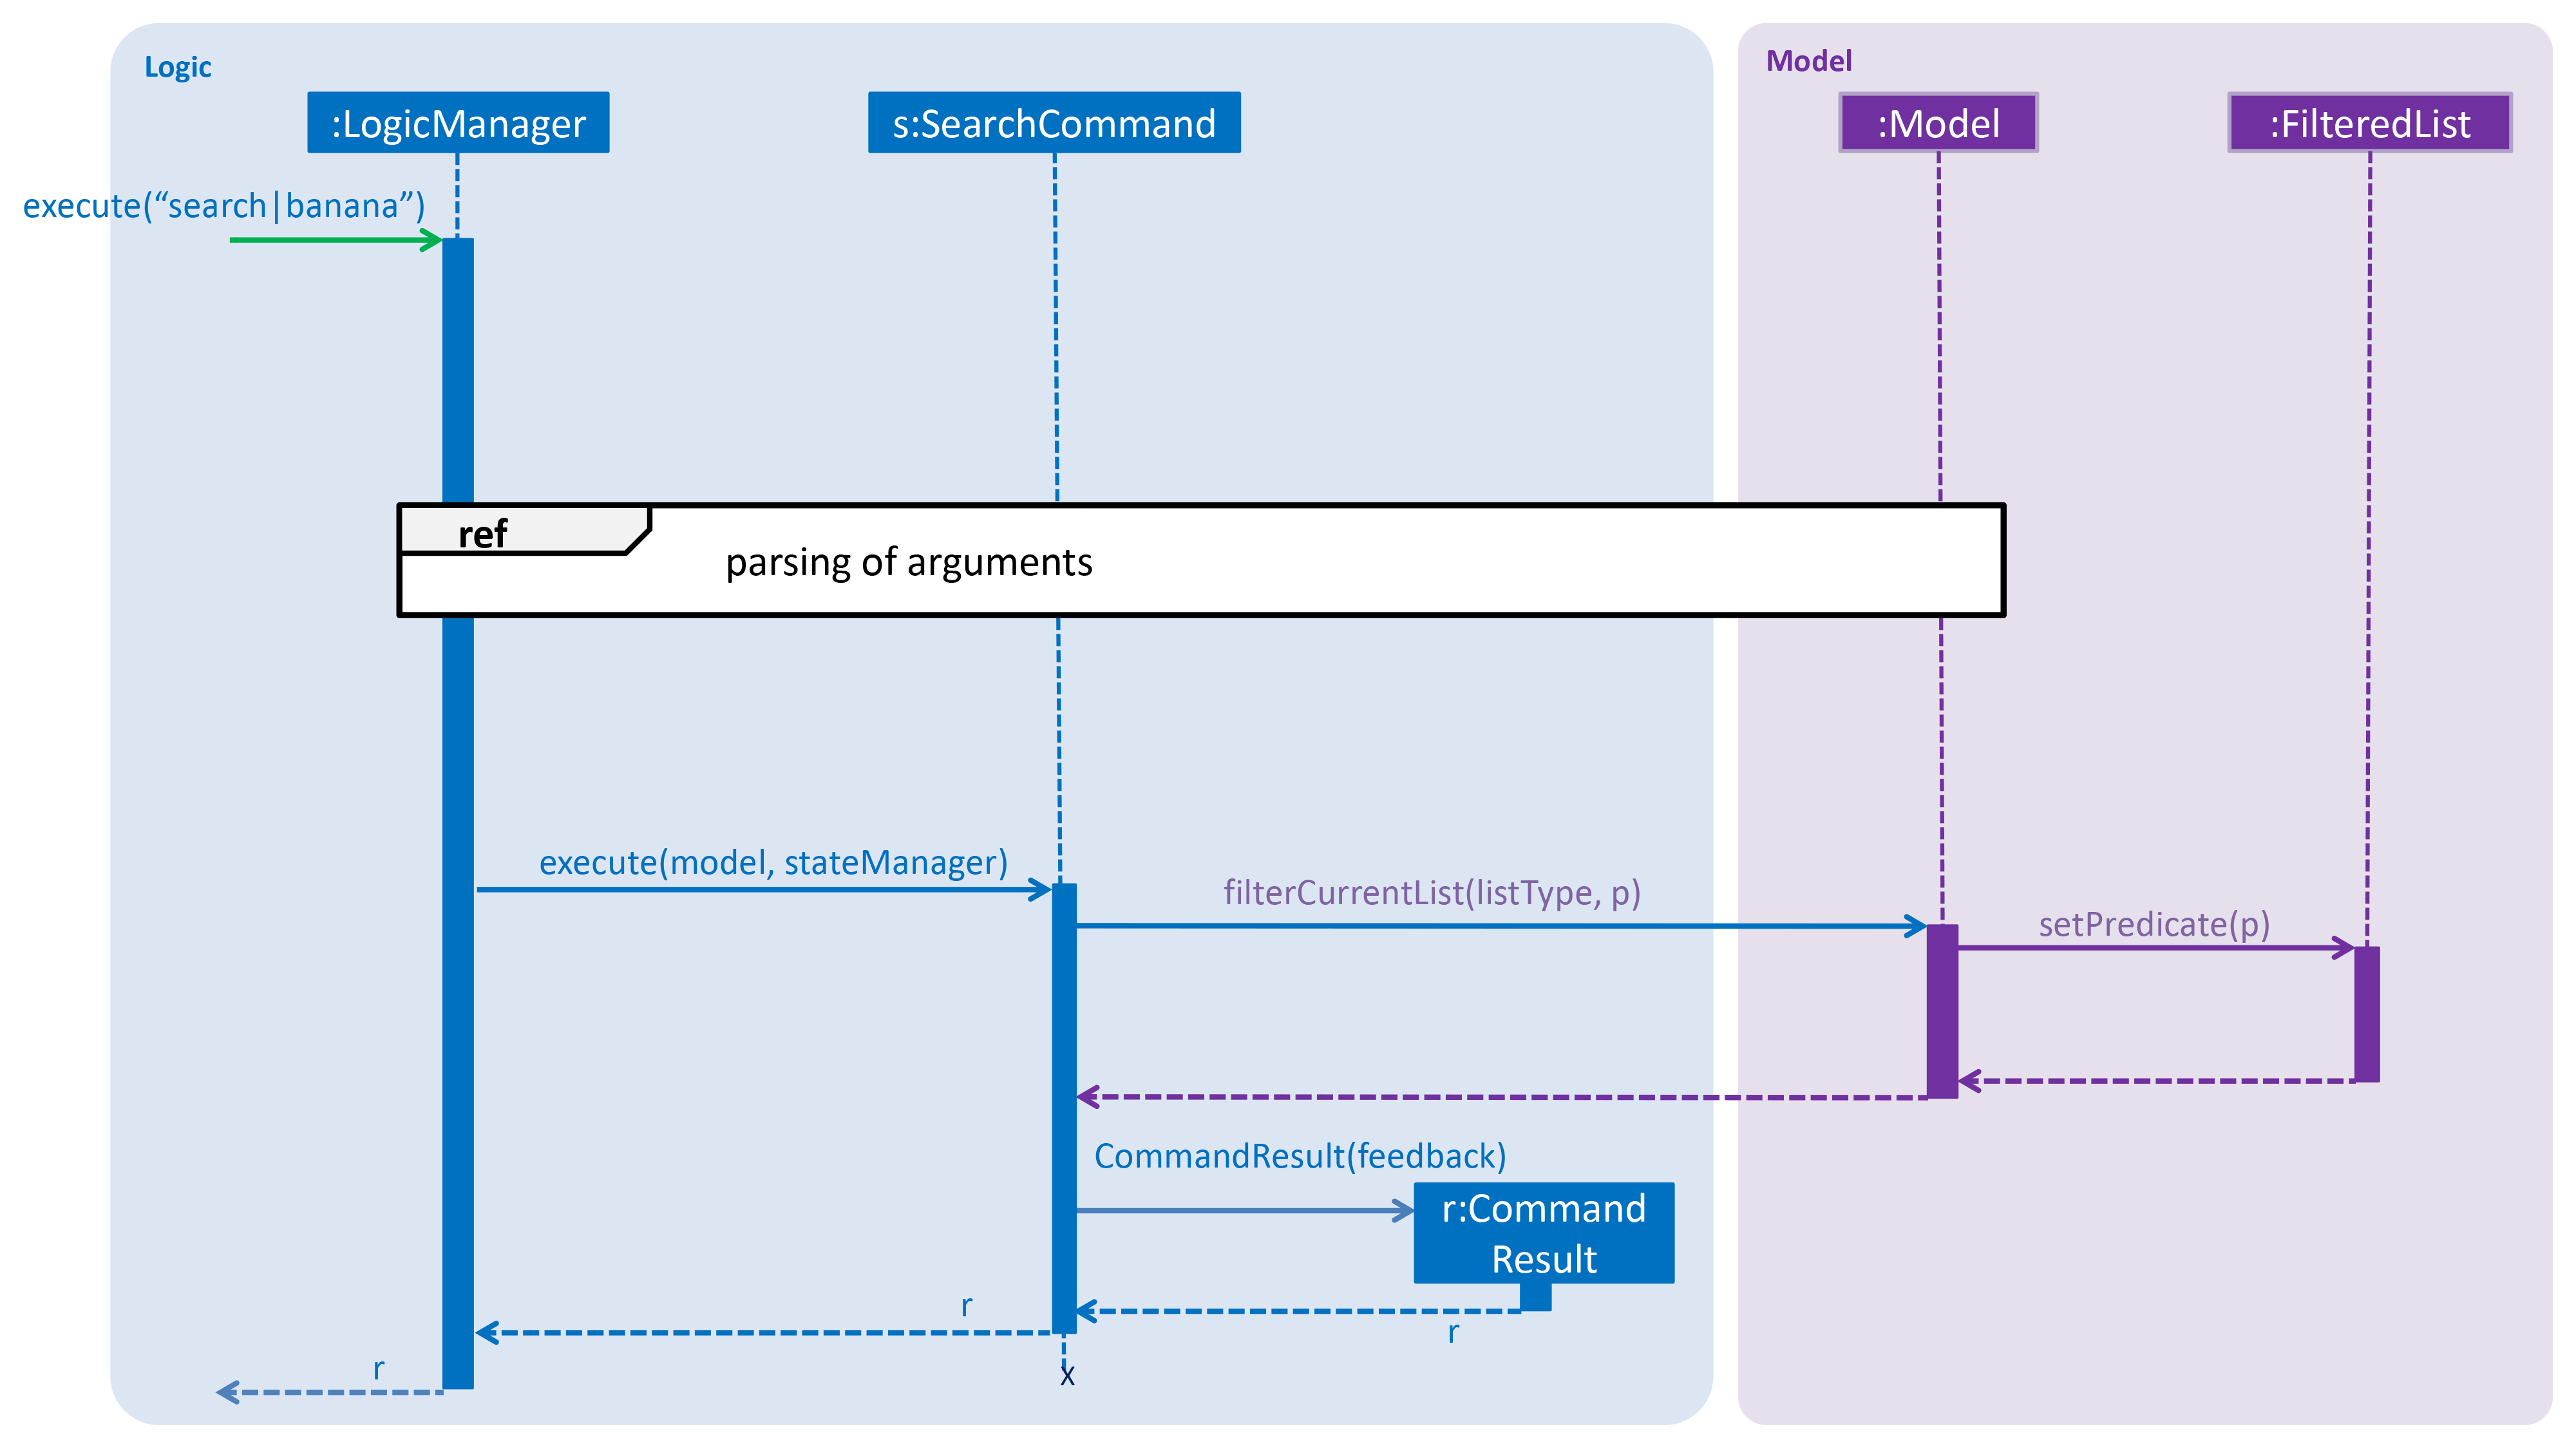
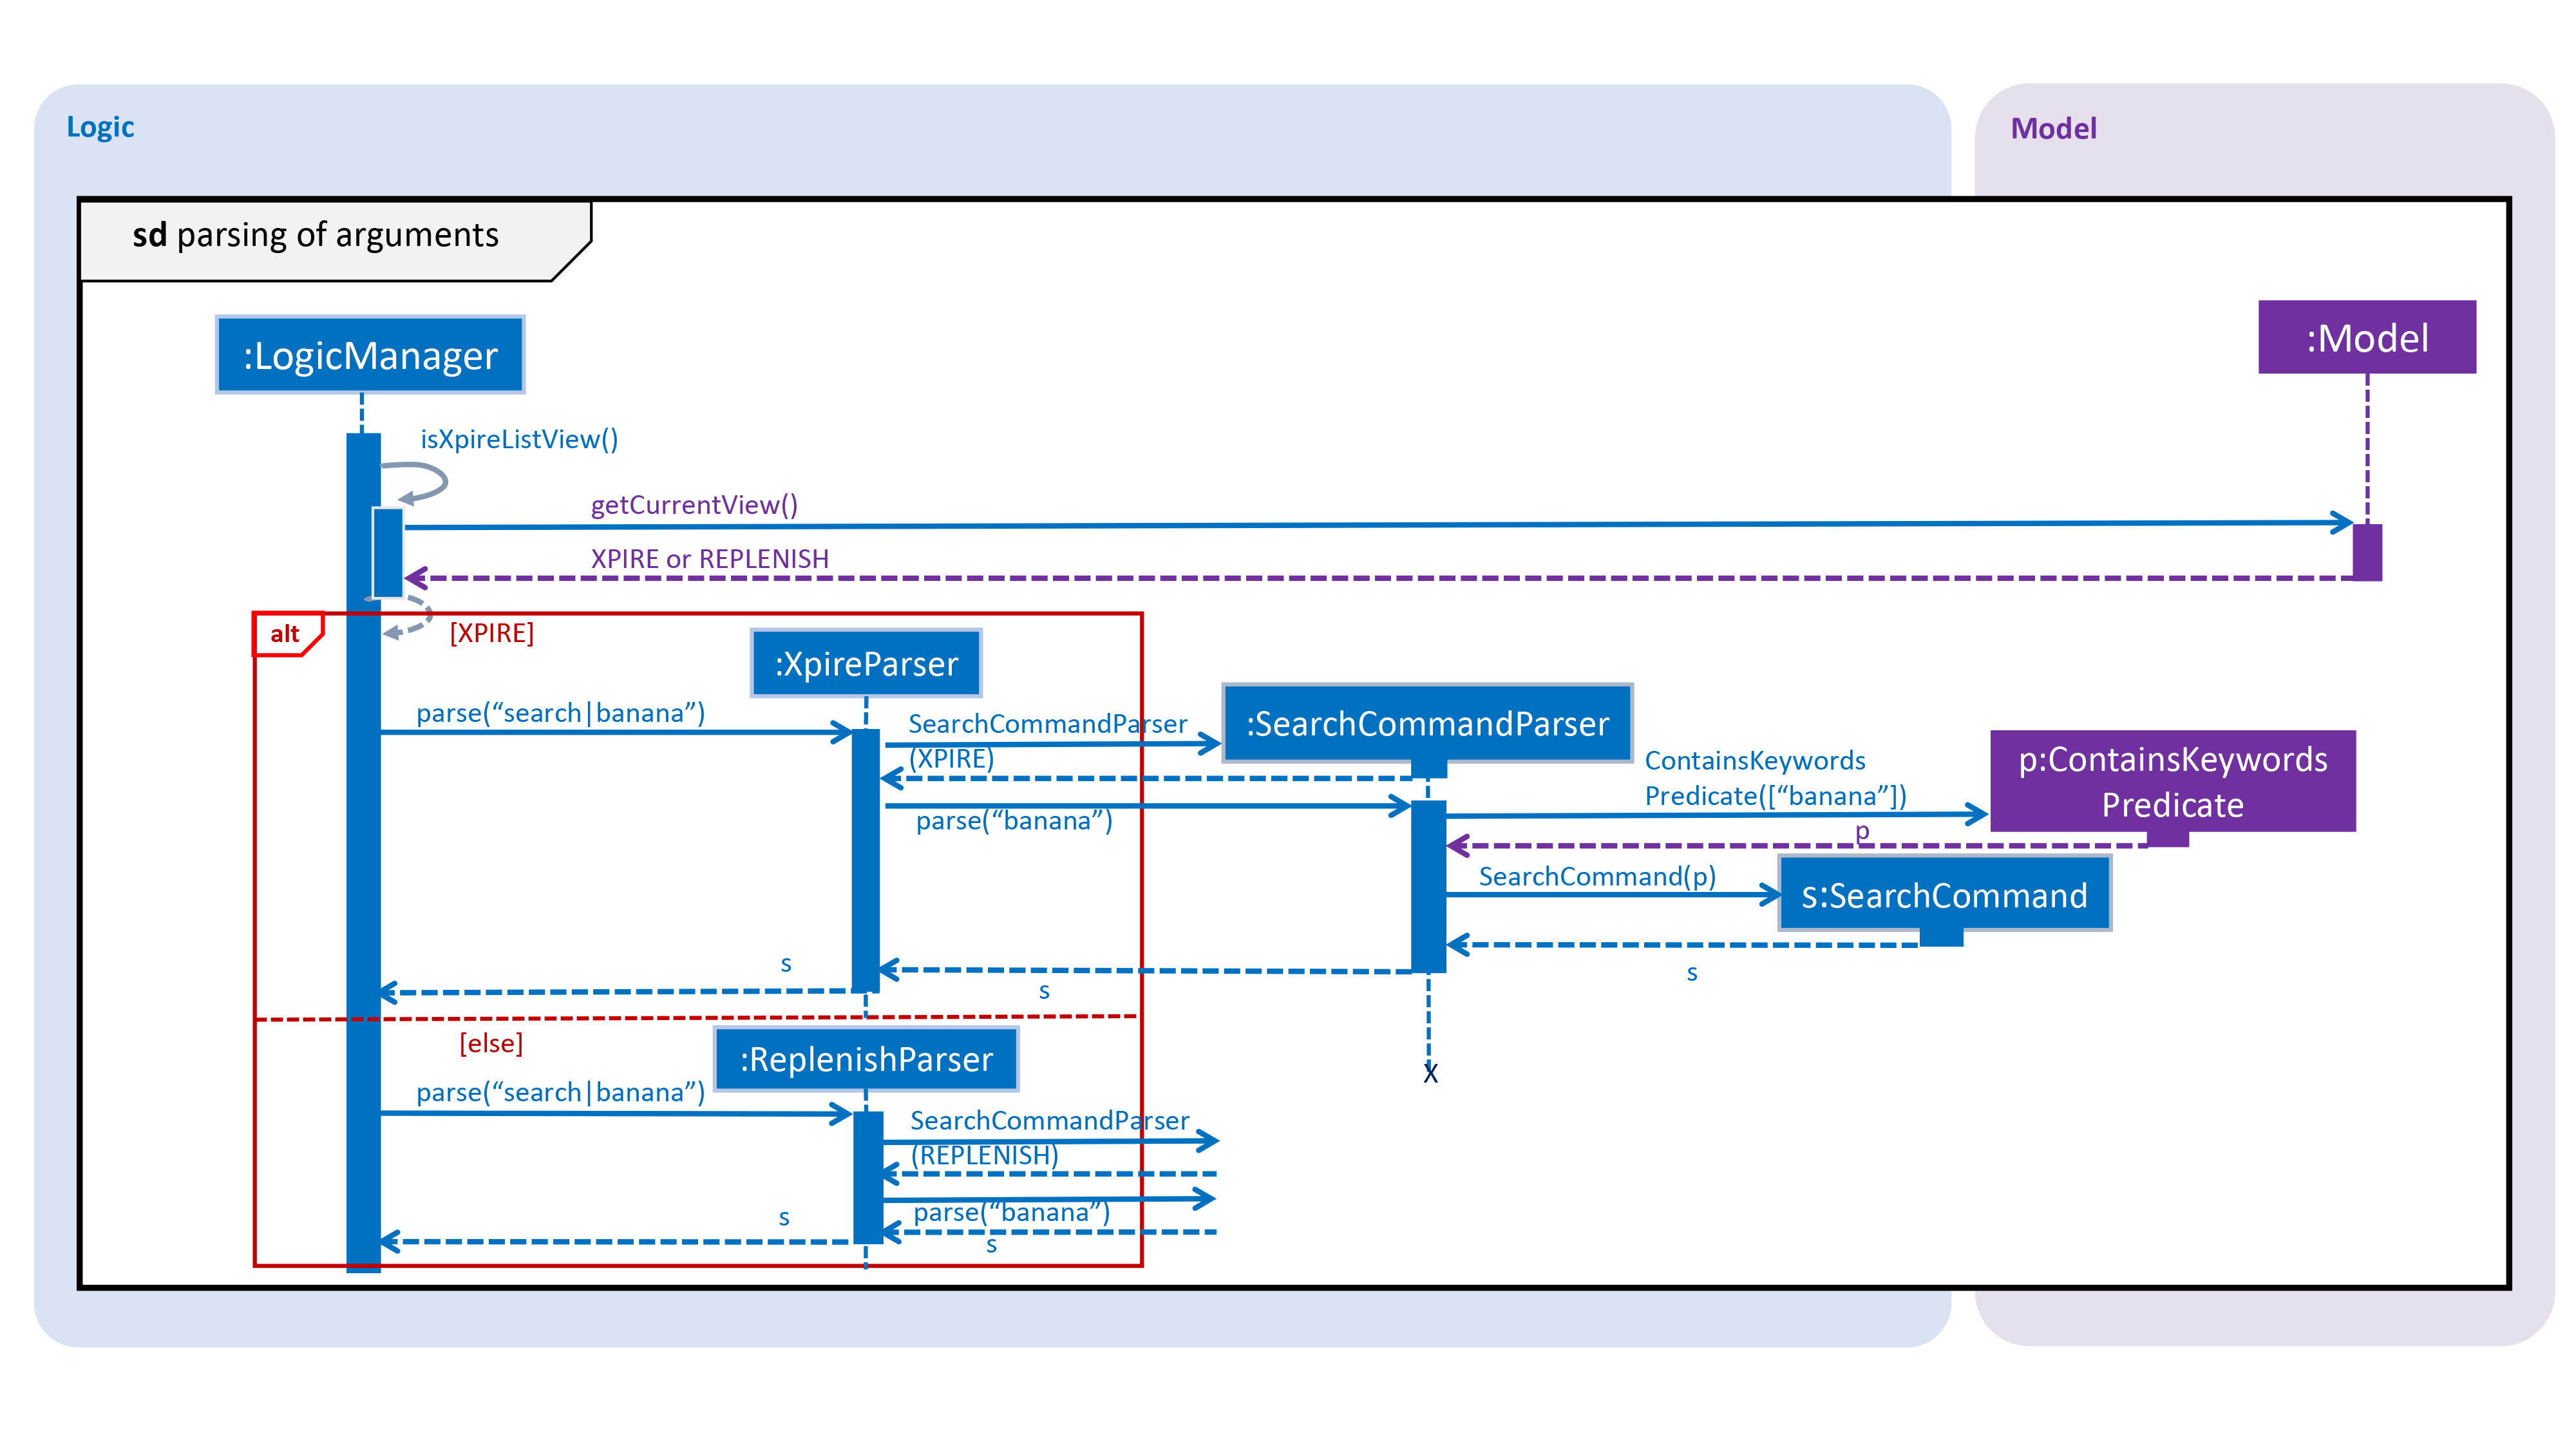
| Parsing of arguments is omitted from the diagram above to place greater emphasis on the filtering process. The diagram below further illustrates the parsing of arguments. |
Example usage scenario:
| Steps 1-3 and steps 4-5 describe what is shown in Figure 34 and Figure 33 respectively. |
Step 1. User enters command search|banana. The command is received by the LogicManager 's execute method which
then calls the getCurrentView method of Model to determine which item list is currently being displayed, XPIRE
or REPLENISH.
Step 2. Depending on which item list is currently being displayed, either XpireParser 's or ReplenishParser 's parse
method will be called to create a SearchCommandParser object.
Step 3. The parse method of the SearchCommandParser will be called to parse the keyword, "banana" in our case,
into a ContainsKeywordsPredicate object which will then be pass to the constructor of SearchCommand. Subsequently,
the SearchCommand object will be returned to the LogicManager.
Step 4. The LogicManager then calls the returned SearchCommand object’s execute method which calls the
filterCurrentList method of Model to update the current view list by invoking FilteredList 's setPredicate with
the ContainsKeywordsPredicate object, stored in the SearchCommand object, as the parameter.
Step 5. Upon successful updating of the current view list, a CommandResult object will be created by SearchCommand
to encapsulate a positive feedback message that will be shown to the user. The CommandResult will then be returned to the LogicManager.
To further demonstrate the high-level workflow of the search command, the following UML activity diagram is provided:
The selection of parser and the creation of SearchCommand object is omitted for brevity.
|
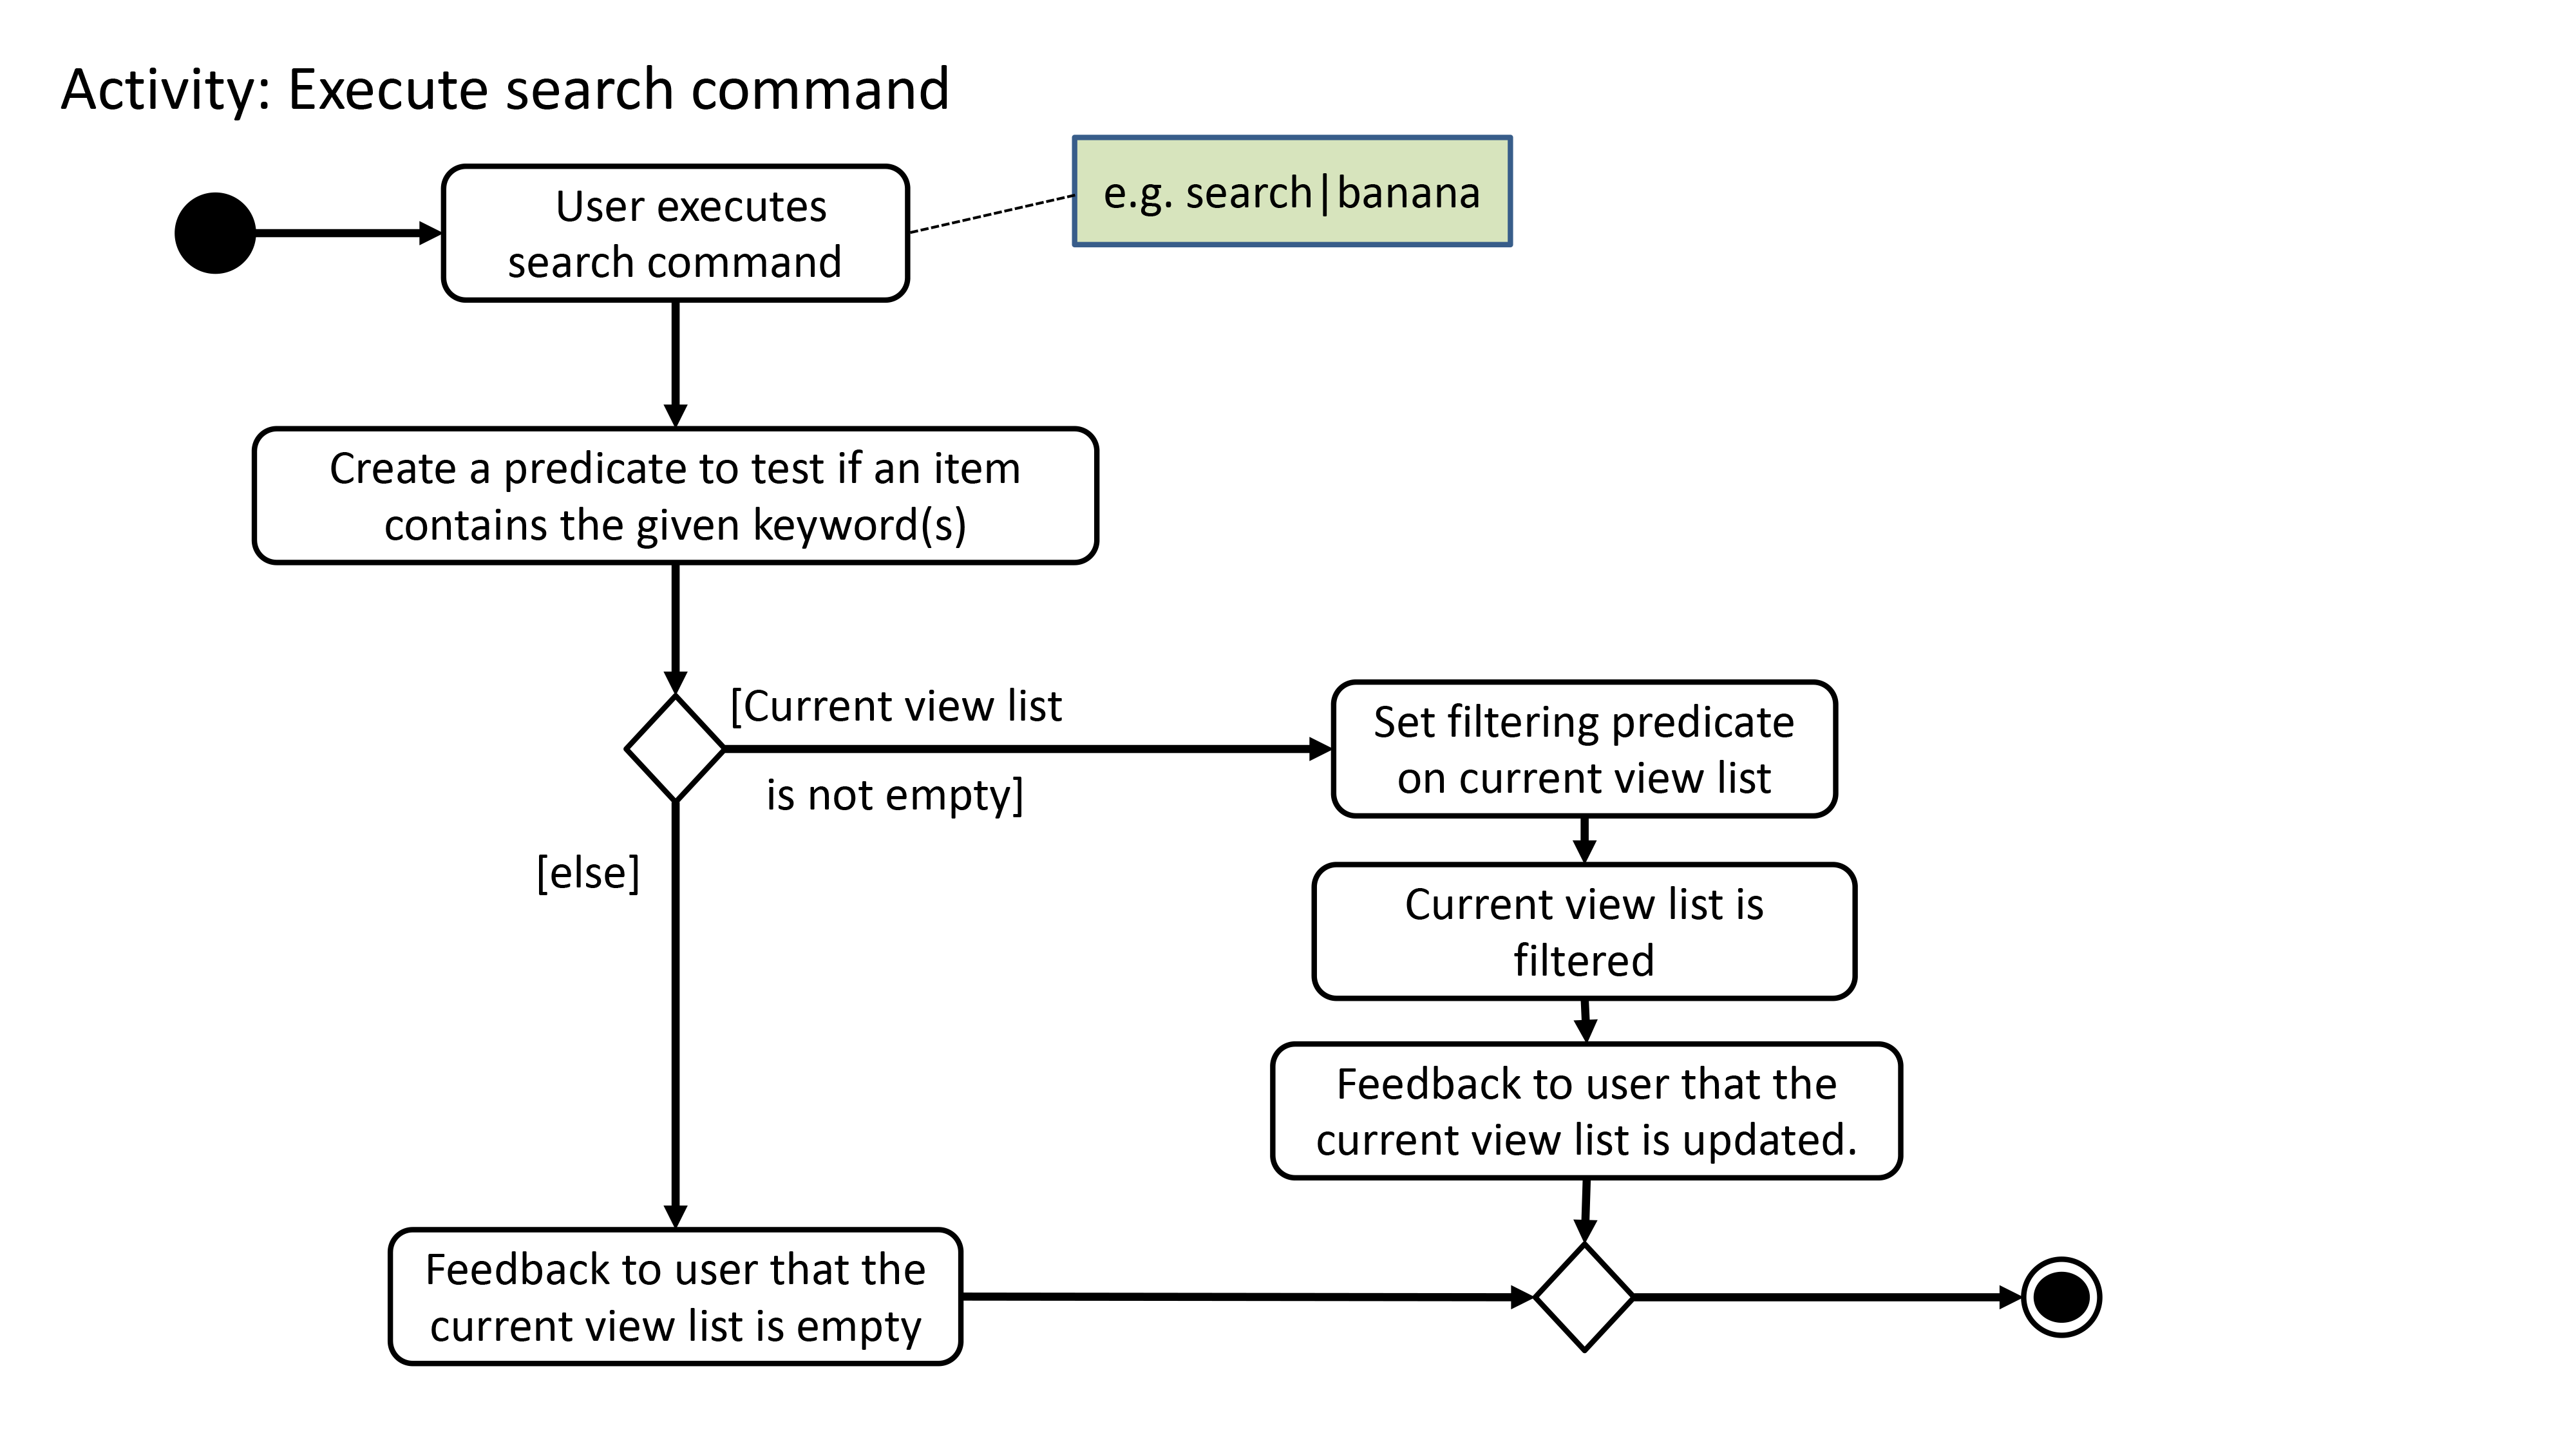
As illustrated in Figure 35, the search functionality also considers the case where the current view list
is empty and there will be a feedback to the user to inform him/her that the search command is not executed
successfully.
3.5.2. Design Considerations
Below highlights the different considerations while implementing this feature.
3.5.2.1. Aspect: How to implement AND search?
-
Option 1 (initial choice): Modify the input command format to include "&" as a separator. The "&" separator will be placed between 2 keywords to signify an AND condition between the them.
-
Pros:
-
Requires only a single
searchcommand to do both AND and OR search. -
There is no need to change the original architecture for
Model.
-
-
Cons:
-
Complicates the input command format (since it has both "|" and "&" separators) and makes it not user-friendly.
-
Could be confusing to the user when they want to a mix of AND and OR conditions in a single
searchcommand. -
Could be difficult to parse correctly since there are 2 different separators.
-
Extra work has to be done to change the ContainsKeywordsPredicate to accept AND condition.
-
-
-
Option 2 (current choice): Make the
searchcommand "stackable". Everysearchcommand will now only execute on the current view list. e.g. the result of asearchcommand can be further filtered with anothersearchcommand.-
Pros:
-
Users can intuitively make an AND search of 2 or more keywords by first searching with 1 keyword and then search again with another keyword, and repeat again for more keywords.
-
There is no change to the input command format.
-
-
Cons:
-
Requires multiple
searchcommands to be executed for AND search. -
Have to figure out how to implement "stackable" commands.
-
-
3.5.2.2. Aspect: How to implement "stackable" commands?
-
Option 1 (current choice): Modify the
ModelManager.-
Pros:
-
Uses the separation of concerns principle. The commands do not need to know how the item list will behave when they are executed. They simply need to make the relevant Application Programming Interface (API) calls and the
ModelManagerwill handle the behaviour of the list. -
Adheres to the open-closed principle. The commands do not need to make any changes to its architecture and other commands can also be made "stackable" through using the API.
-
-
Cons:
-
Have to modify the
ModelManager's architecture to support the API that modifies the current view list.
-
-
-
Option 2: Modify the commands.
-
Pros:
-
Do not need to modify the API.
-
-
Cons:
-
Violates single responsibility principle. The commands will now handle both the execution algorithm and the behaviour of the item list.
-
Violates open-closed principle. The
Command's architecture will have to be modified to be "stackable".
-
-
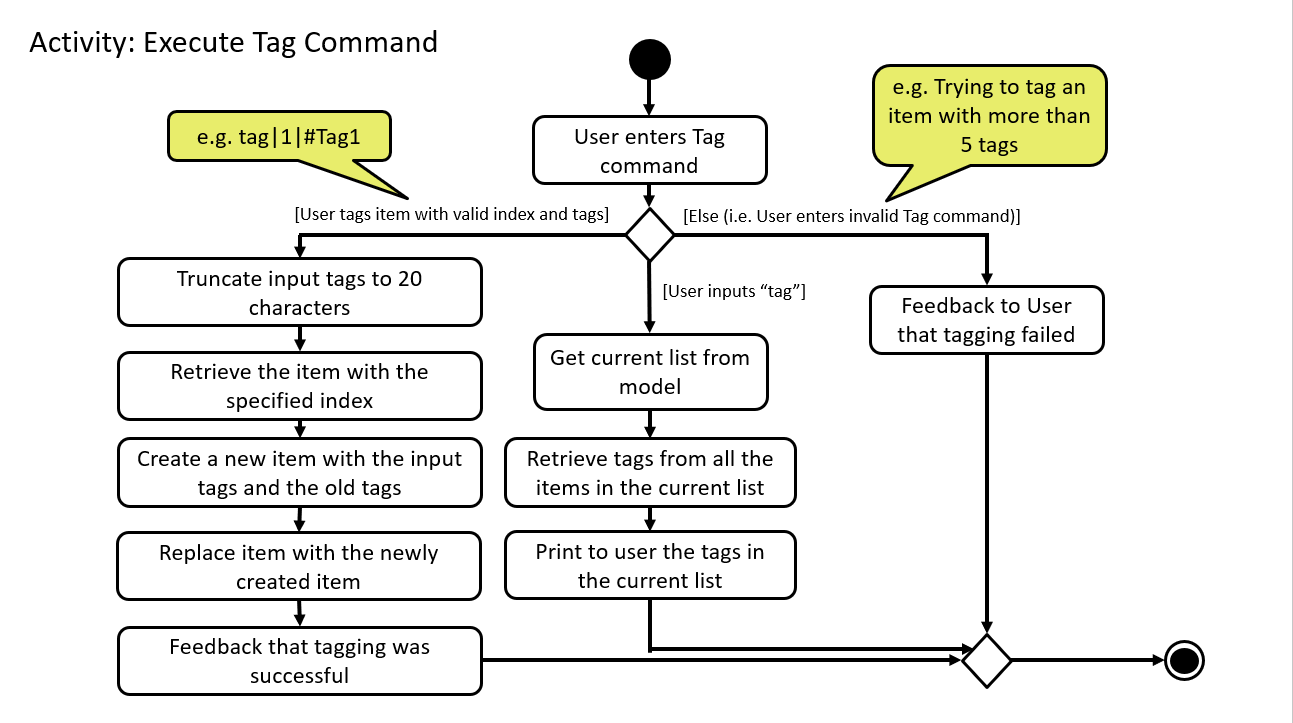
3.6. Tag Feature
This feature allows users to tag specific items in the list. Items can only have a maximum of 5 tags and all tags are parsed in Sentence-Case and must not be more than 20 characters long each. If the user enters tag, all the tags in the current list view will be collected and displayed to the user.
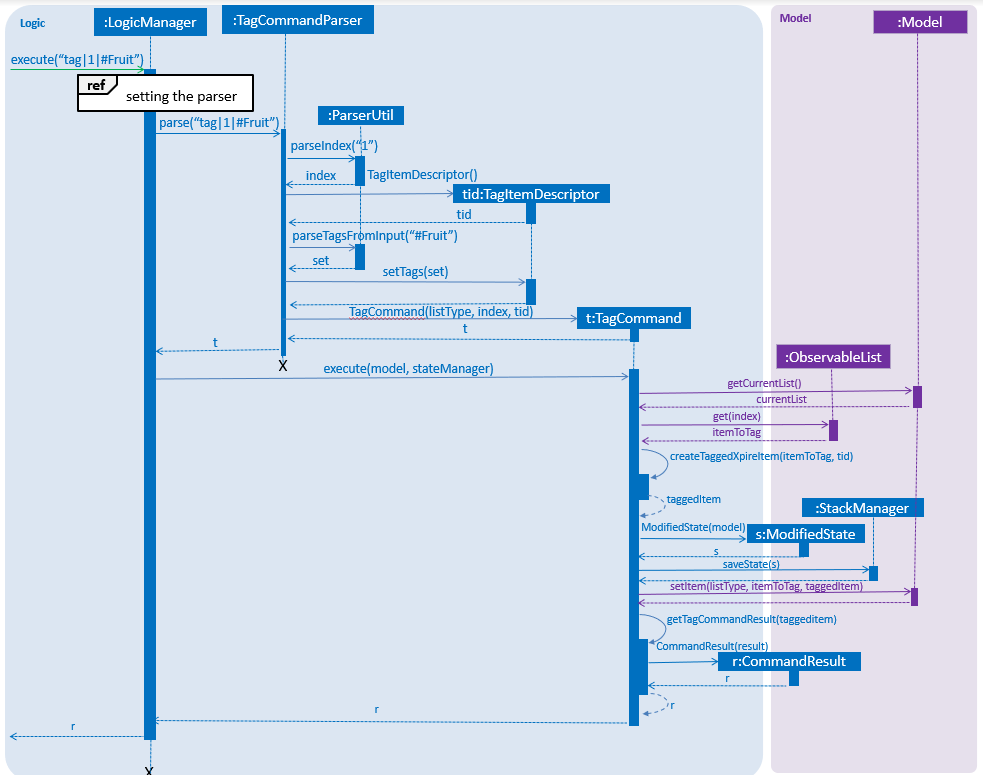
3.6.1. Implementation
Below are diagrams of what happens when a user keys in a Tag Command in Xpire as current list.
3.7. Export
This feature allows users to export the items in the current view list to other devices through a QR code. Any device with a QR code reader will be able to download the list of items.
This implementation is under Logic and Model components, and it uses a helper method from StringUtil.
3.7.1. Implementation
Below is the UML sequence diagram and a step-by-step explanation of an example usage scenario.
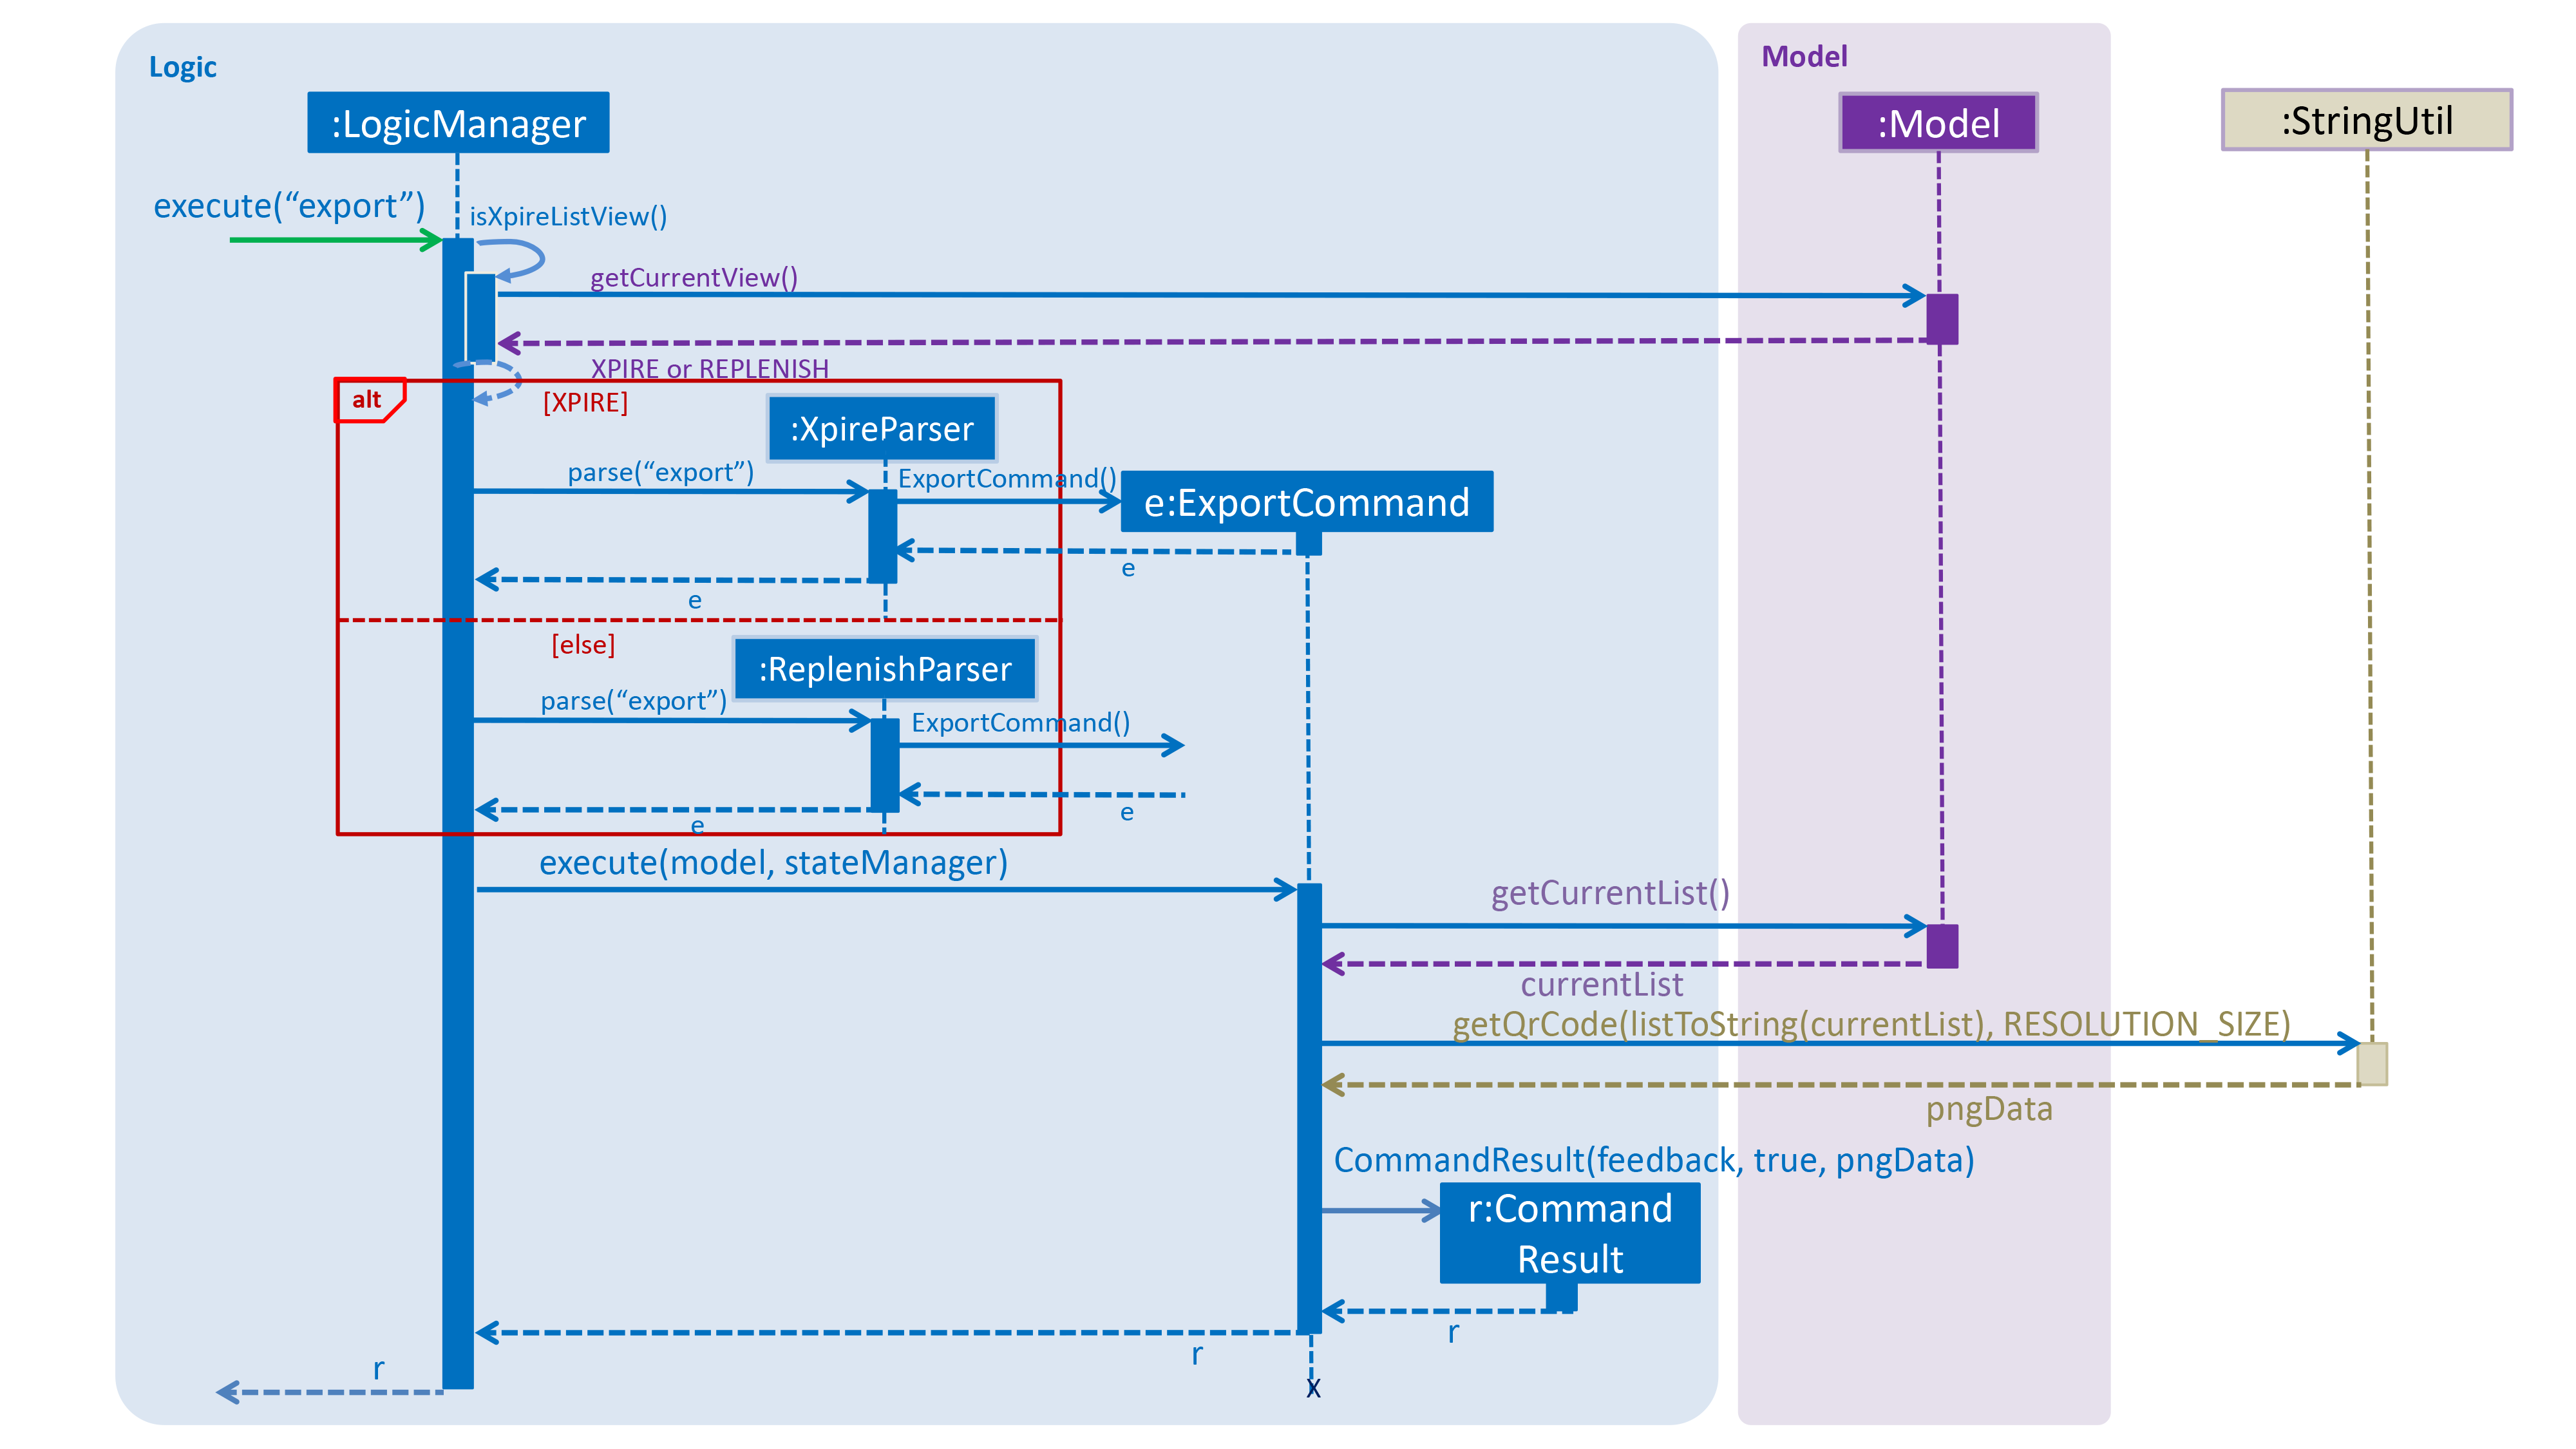
Example usage scenario:
Step 1. User enters command export. The command is received by the LogicManager’s `execute method which
then calls the getCurrentView method of Model to determine which item list is currently being displayed, XPIRE
or REPLENISH.
Step 2. Depending on which item list is currently being displayed, either XpireParser 's or ReplenishParser 's parse
method will be called to create a ExportCommand object. The ExportCommand object will be returned to the LogicManager.
Step 3. The LogicManager then calls the returned ExportCommand object’s execute method which calls the
getCurrentList method of Model to retrieve the list of items in the current view list.
Step 4. The items in the current view list is then converted to its string representation and then passed into the getQrCode
method in StringUtil.
Step 5. The getQrCode method uses Google ZXing library to process the input string
into a QR code and this QR code is subsequently converted to a byte array (pngData) so that it can be passed around easily.
Step 6. Upon successful creation of the QR code data, a CommandResult object will be created by ExportCommand to encapsulate
a feedback message and the QR code data, which will be rendered and shown to the user. The CommandResult will then be returned to the LogicManager.
The following UML activity diagram will further demonstrate the high-level workflow of the export command.
The selection of parser and the creation of ExportCommand object is omitted for brevity.
|
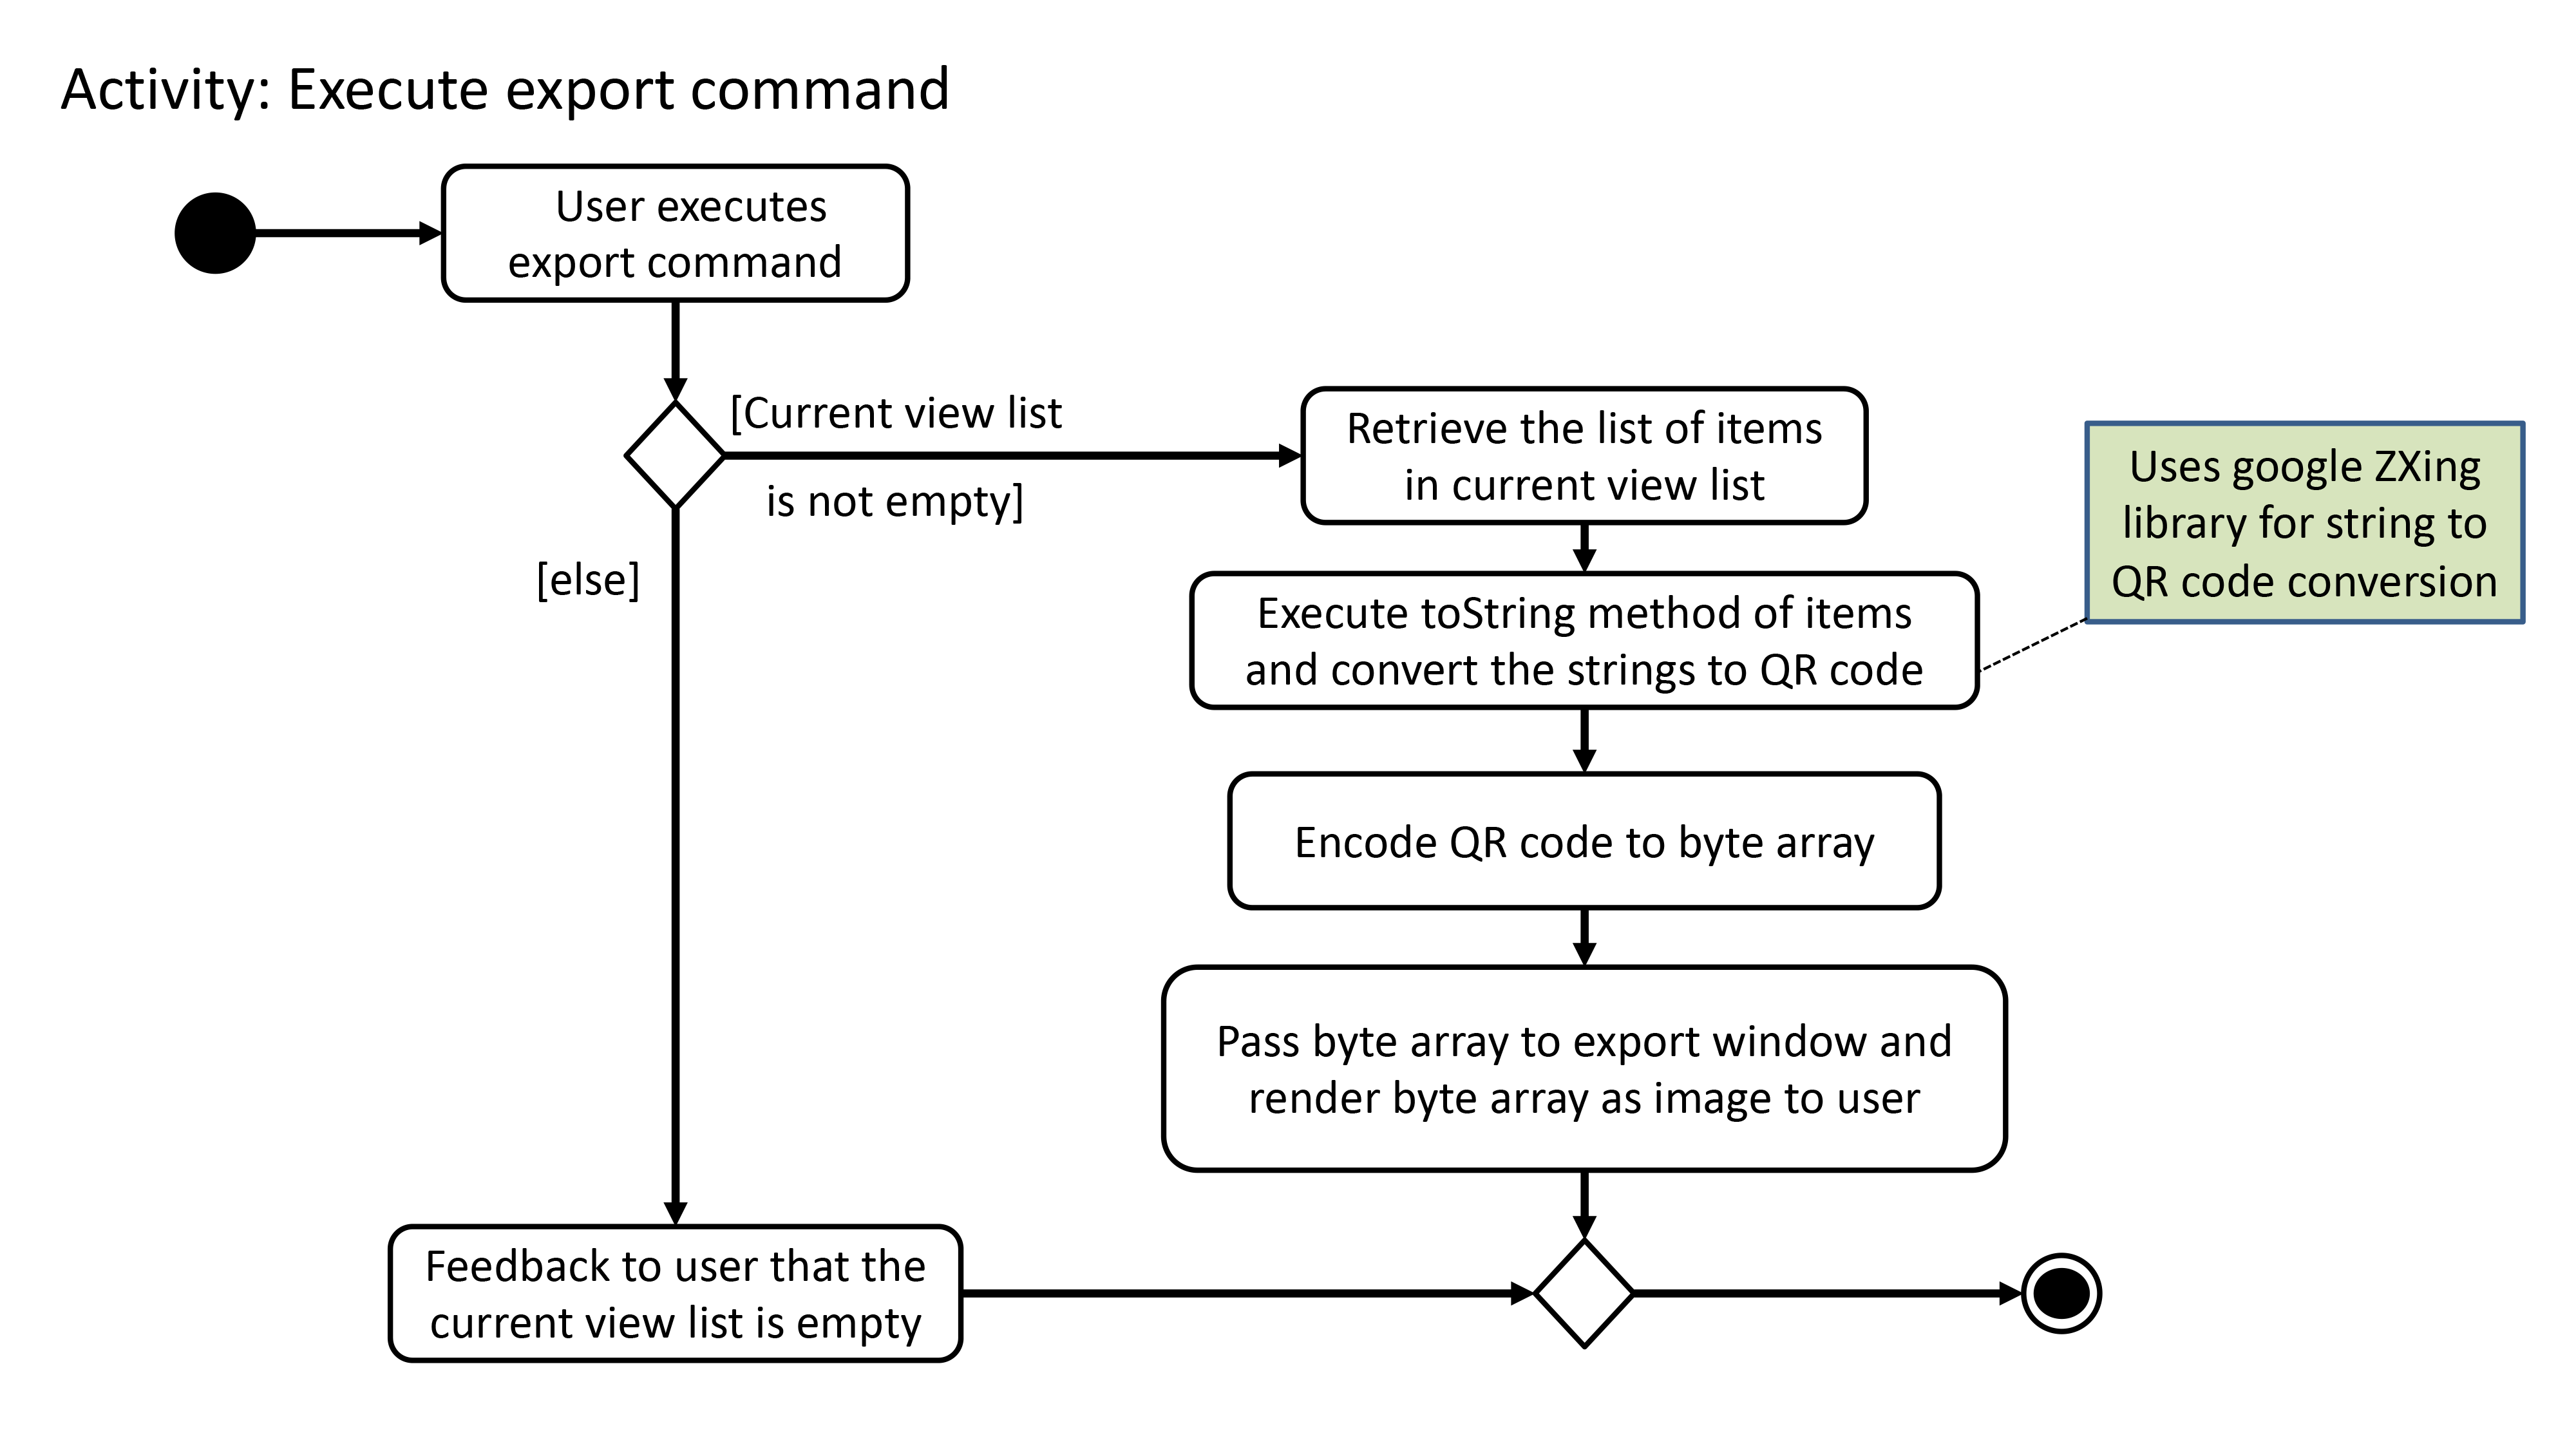
As illustrated in Figure 39, the export functionality also considers the case where the current view list
is empty and there will be a feedback to the user to inform him/her that the export command is not executed
successfully.
3.7.2. Design Consideration
Below highlights the essential design consideration while implementing this feature.
3.7.2.1. Aspect: What is the most suitable type of export functionality required for this application?
-
Option 1: Export to a csv file.
-
Pros:
-
Easily transferable and shared to other computers.
-
Easily allows user to edit the exported data.
-
-
Cons:
-
Does not work well on other platforms such as mobile phones and iPads.
-
Slow to transfer the data to other computers. Have manually transfer the csv file through email, thumb drive or cloud drive.
-
-
-
Option 2 (current choice): Export through QR code.
-
Pros:
-
Allows data to be easily transferred to any device with QR code scanner.
-
Instantaneous data transfer upon scanning the QR code.
-
-
Cons:
-
Hard to be shared to other computers since computers generally do not have QR code scanner.
-
Focuses more on ready-only rather than editing the data.
-
-
Since Xpire is an application that helps users keep track of items' expiry dates as well as maintain a list of to-buy items for users' reference, its exported data should focus more on conveniently showing users the items' information rather than emphasise on editing the data.
As such, due to the nature of this application, option 2 was chosen since it can precisely meet the needs of the users, which is to be able to easily view the exported data anywhere and anytime through their mobile phones.
3.8. Spelling correction with alternative recommendations
3.8.1. Implementation
Invalid commands are checked for spelling mistakes.
The spelling correction mechanism is based primarily on the Damerau–Levenshtein distance algorithm, which computes the edit distance between two strings.
This distance is based on the number of substitutions, deletions, insertions or transpositions of characters, needed to convert the source string into the target string.
Relevant functions supporting this operation are implemented in StringUtil.
| Only keywords with edit distance of less than 2 are recommended, to filter away less similar word recommendations. |
The diagram below is a simplified illustration of how the feature works.
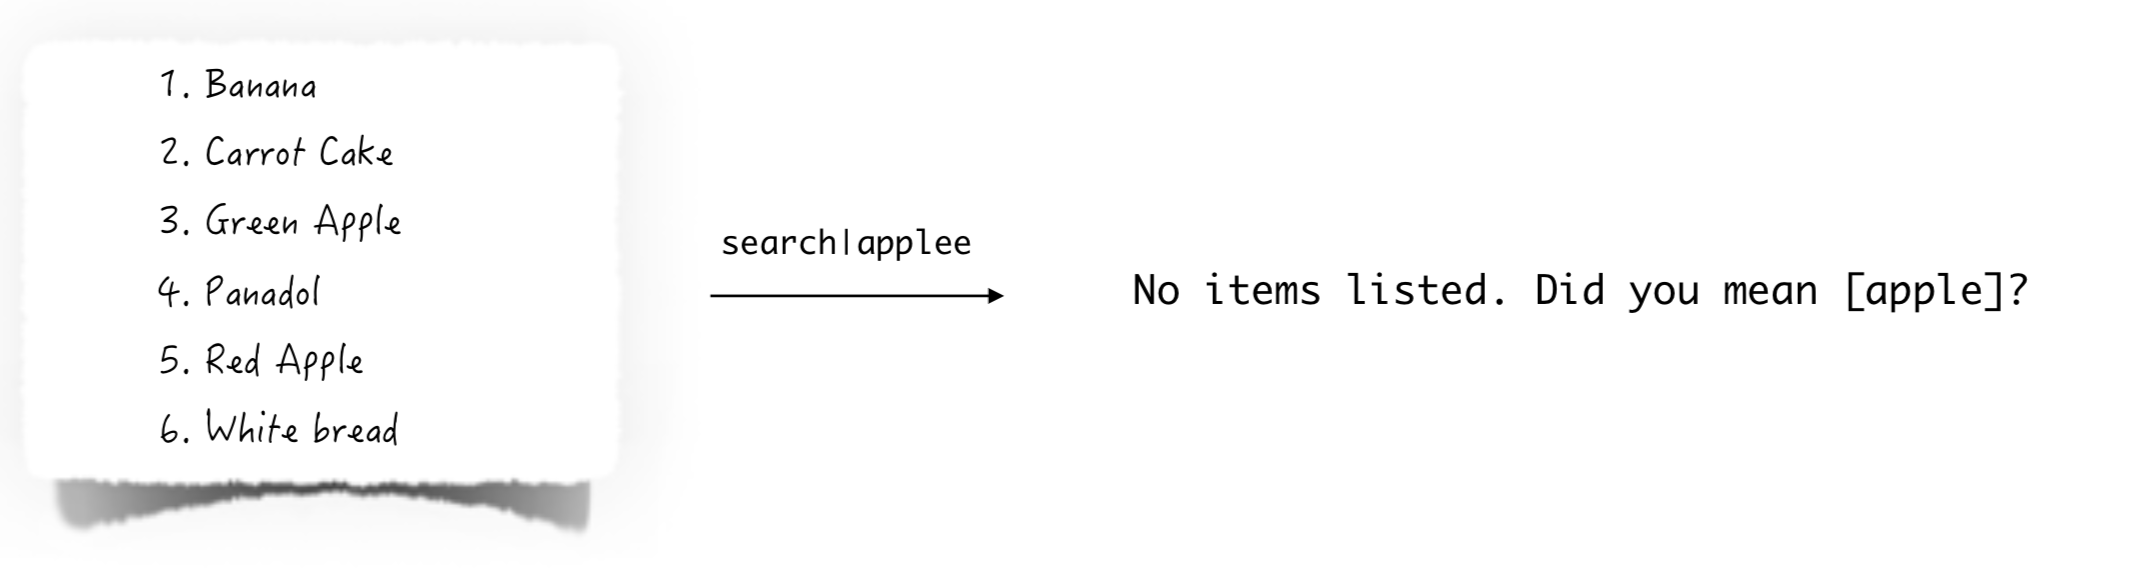
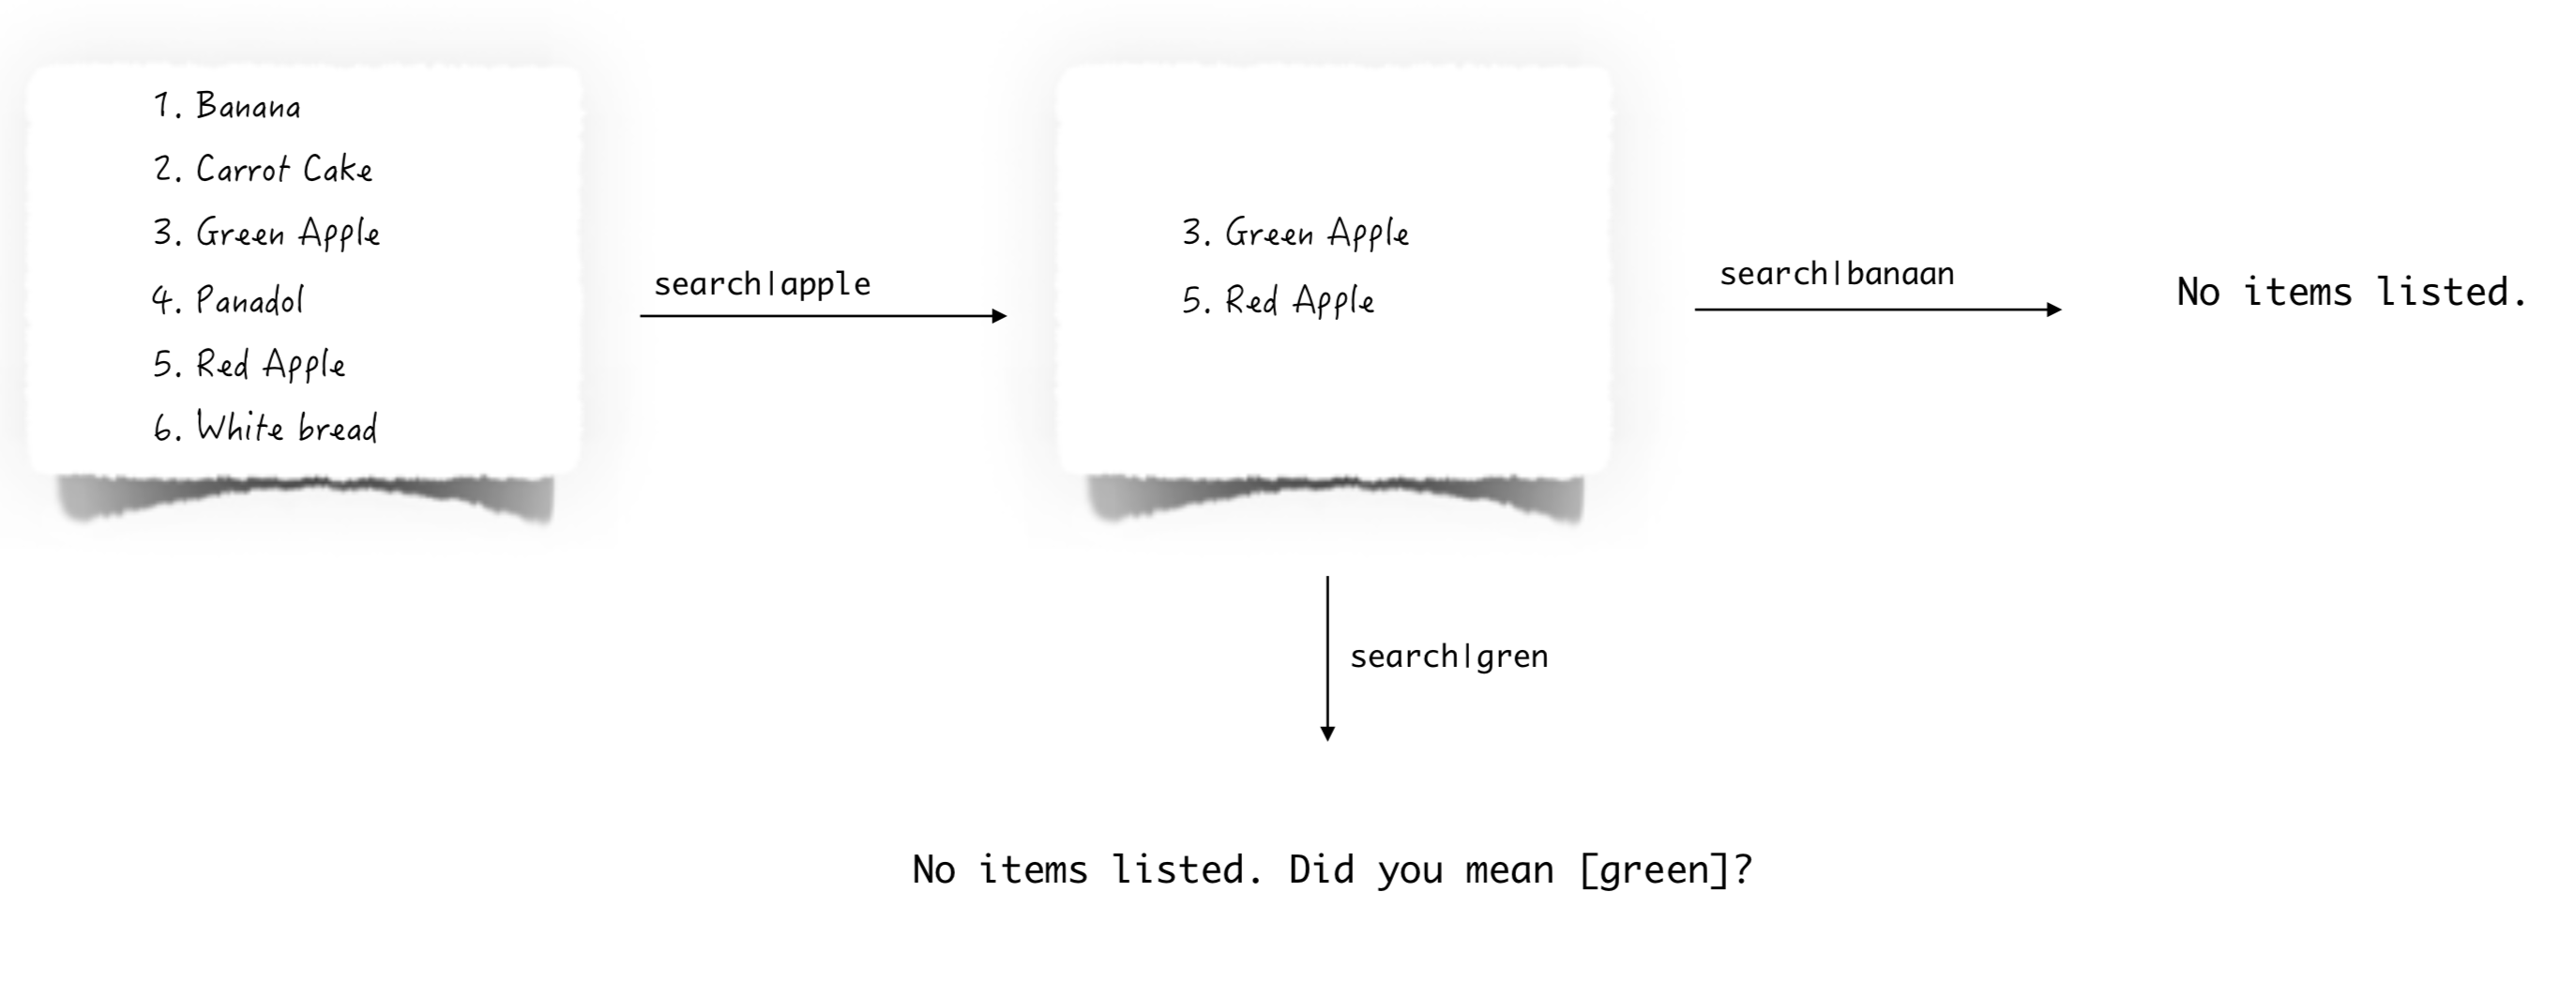
| The recommendations will be made solely based on the list of items previously displayed rather than all items currently in the list. |
As shown in the diagram below, Banana was not recommended even though it exists in the original list. This is because it had been filtered from the previous list prior to when the second search command was executed.
On the other hand, if green was misspelled as gren, the algorithm will be able to identify green as the closest match, as Green Apple is present in the previous list.
The figure below depicts the flow of events that check for spelling errors when a user executes an unknown command.
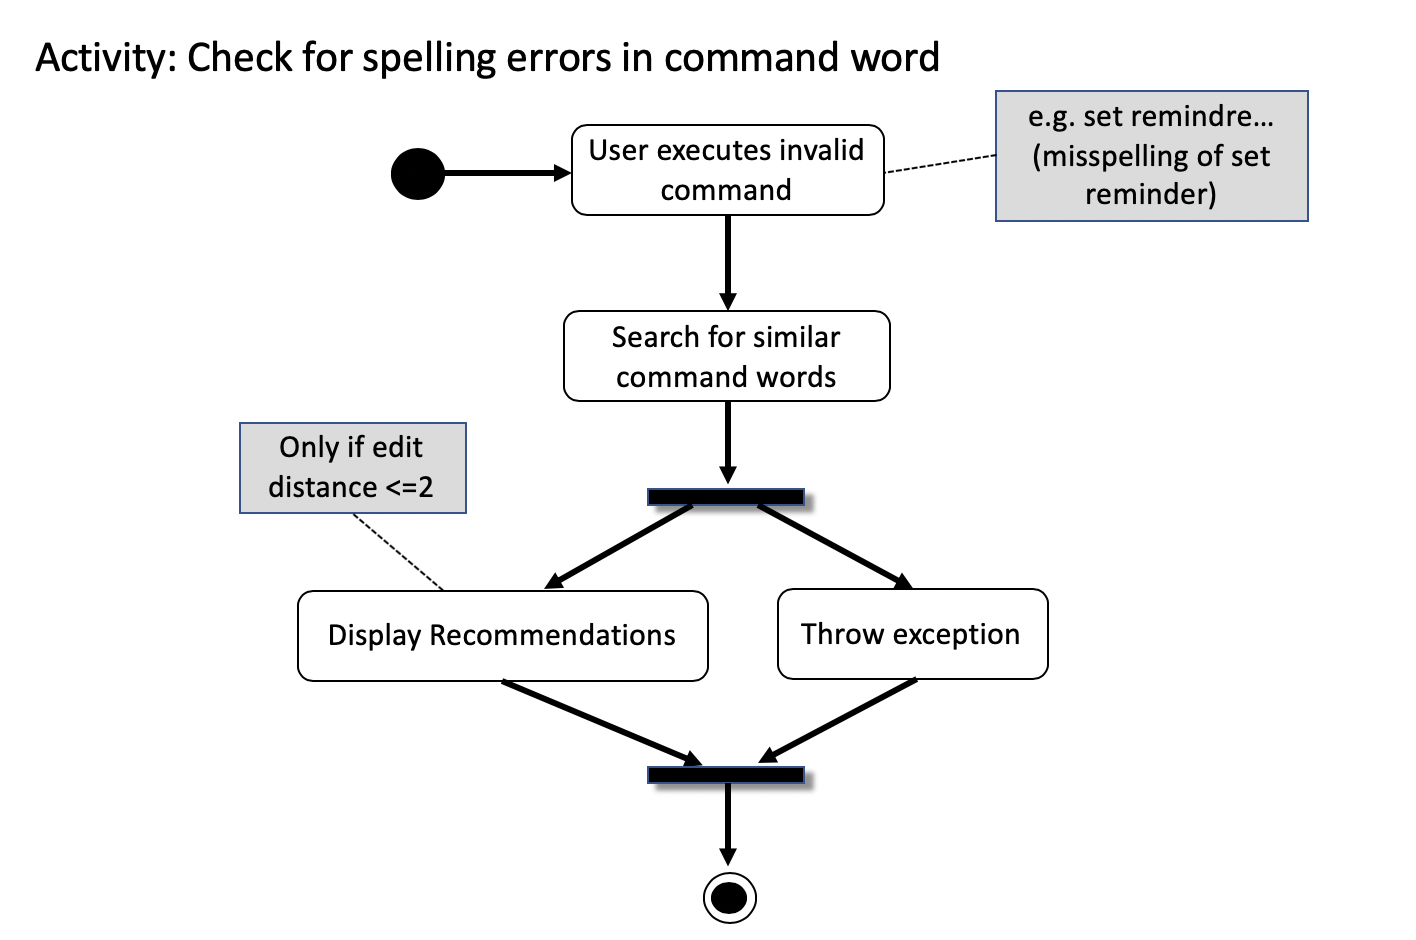
For example, if set reminder was input incorrectly as set remindre, it will be flagged as an invalid command.
It is then compared with an collection of all possible command words in the existing list. set reminder will be established
as its closest match and wrapped as a recommendation in a ParseException object to be thrown and displayed to the user.
The figure below presents what happens when a user executes a command with invalid arguments.

| Only search and sort commands support this operation. |
In the example below encapsulated in a sequence diagram, the user has misspelled "date" as "dat" in a sort command.
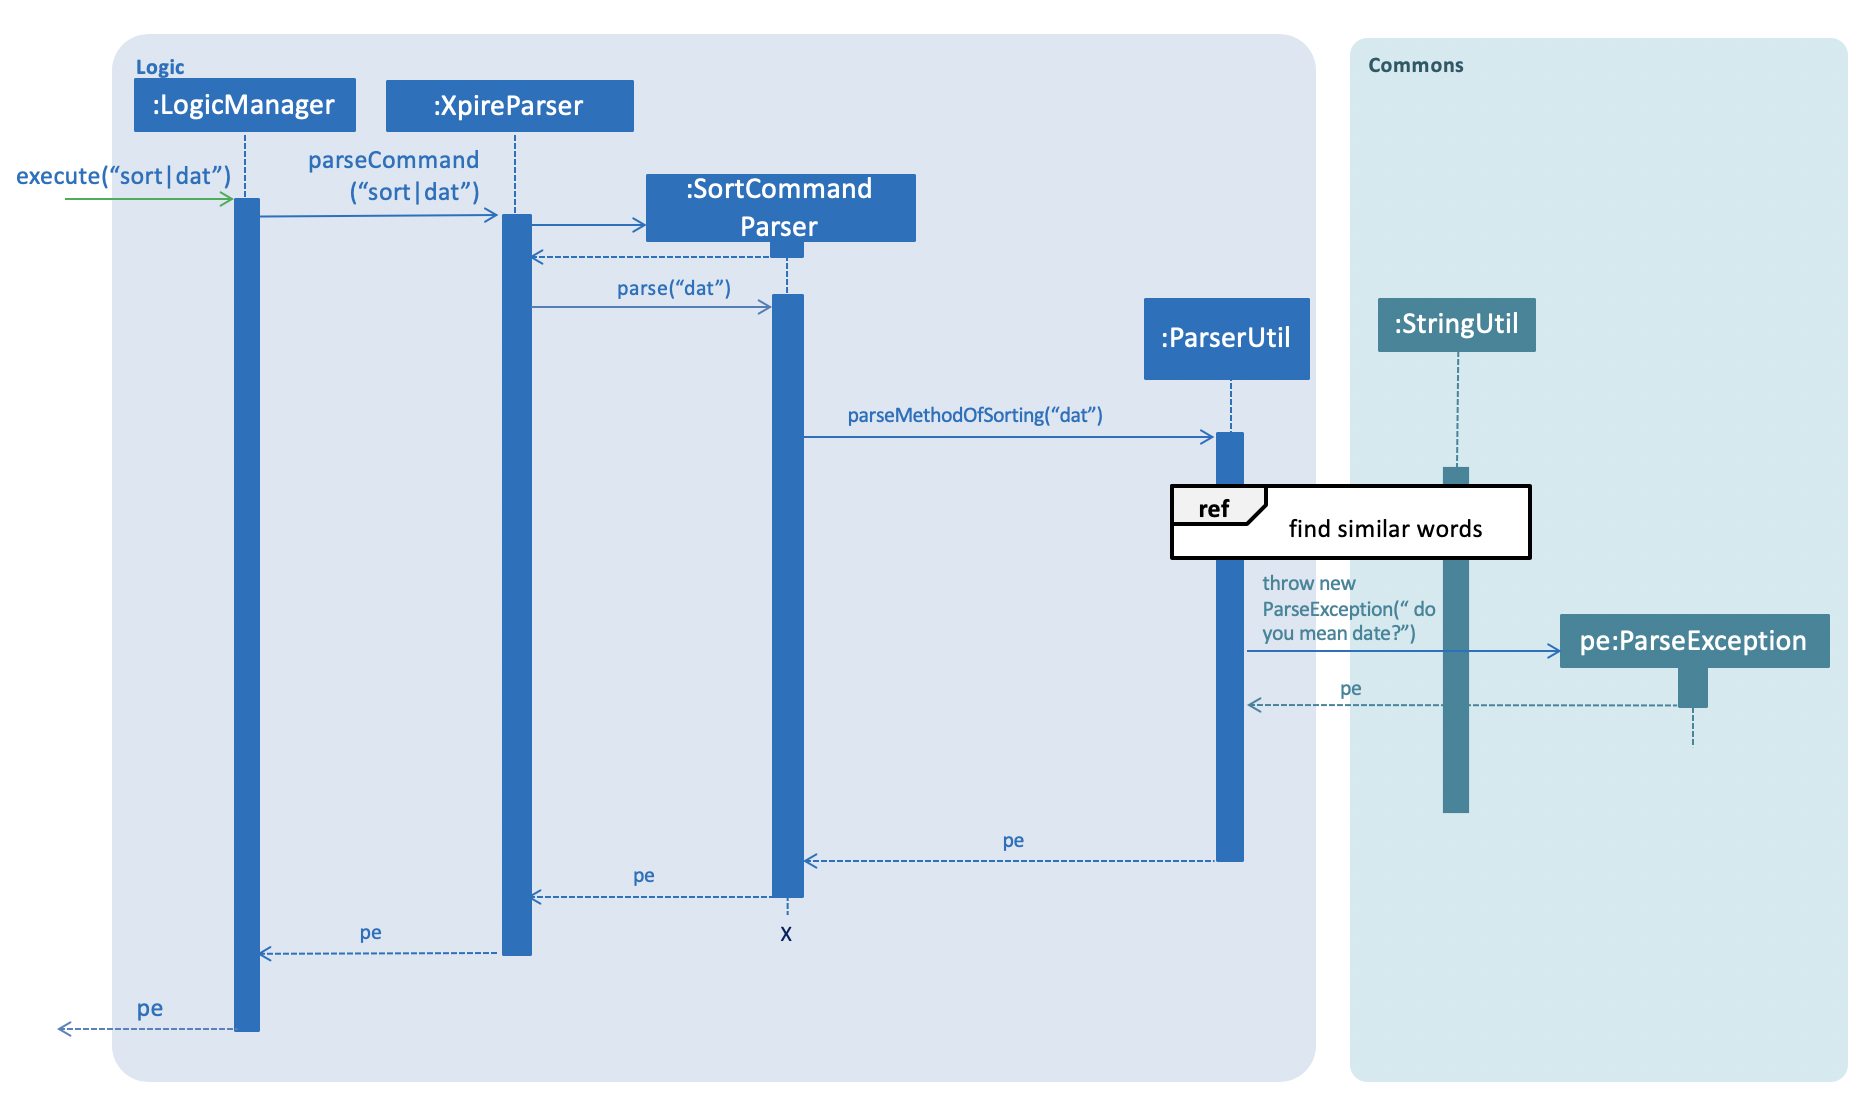
sort|datThe sequence diagram titled find similar words below expands on the process omitted above.
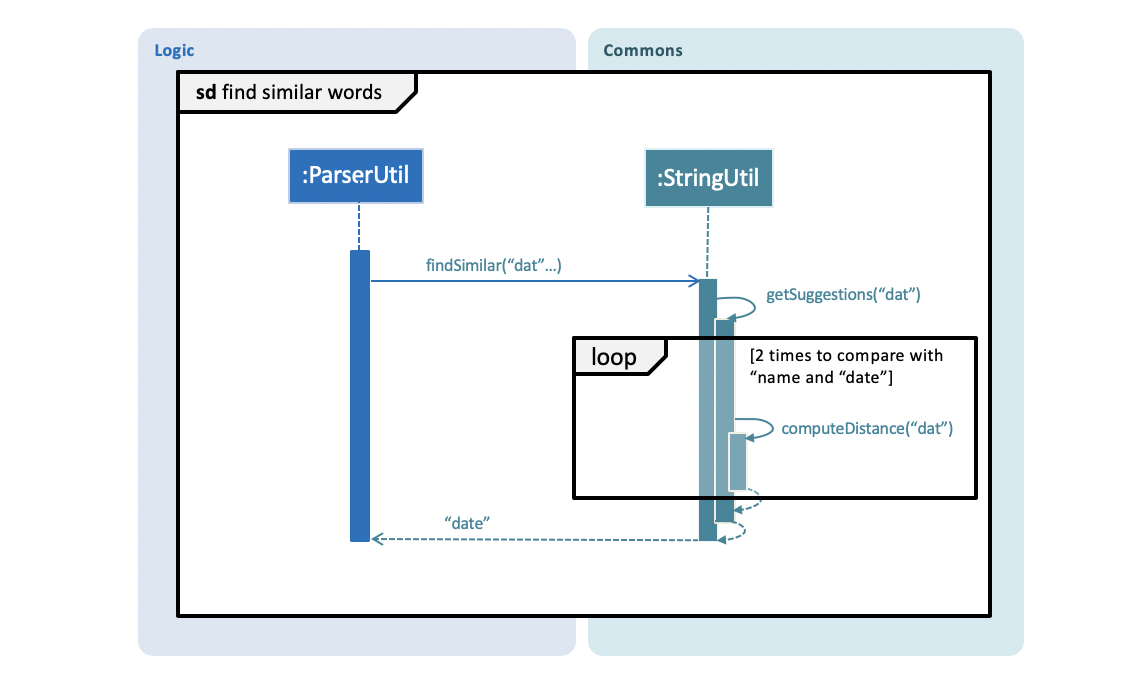
"date" is found to be the most similar word to "dat"The function findSimilar in StringUtil is called upon to return a set containing strings that are most similar to the misspelled argument, "dat".
In this process, "dat" is compared with a set of valid inputs, i.e. both "name" and "date", and the corresponding edit distances are stored.
getSuggestions("dat") then filters the results and finds "date" to be the best match.
At last, a ParseException which contains the recommendation "date"
is then thrown to the user as feedback.
3.8.2. Design Considerations
When tasked to implement this feature, I had to decide on what was the best way to display any form of recommendations to the user. I also evaluated multiple options to derive an optimal data structure to store the recommendations. The following is a brief summary of my analysis and decisions.
3.8.2.1. Aspect: How recommendations execute
-
Alternative 1 (current choice): Displays recommendations after the user inputs a command that fails to produce results.
-
Pros: Simpler and straightforward implementation.
-
Cons: May be less intuitive to the user as opposed to auto-completed commands.
-
-
Alternative 2: Auto-completion of commands.
-
Pros: Lowers likelihood of spelling mistakes in user input.
-
Cons: We must ensure that the structure of every single command and their variations are taken into consideration.
-
3.8.2.2. Aspect: Data structure to store the recommendations
-
Alternative 1 (current choice): Use a TreeMap to store entries that comprise a set of recommendations and their corresponding edit distance.
-
Pros: Entries are automatically sorted by their edit distance, thus words with a smaller edit distance will be recommended first. Duplicate entries are also prohibited.
-
Cons: May have performance issues in terms of memory usage.
-
-
Alternative 2: Store all possible recommendations in a long list.
-
Pros: Simpler implementation.
-
Cons: Not closely related words may also be recommended to the user.
-
3.9. Retrieval of Previous Commands
The retrieval of previous commands and later commands are achieved through the InputHistoryManager class which implements HistoryManager interface.
The CommandBox listens to the keyboard event ↑ and ↓ when user types in the CommandBox.
Every user input that is non-blank will be saved as a String before execution by the save(String) method of InputHistoryManager. You can refer to the following
steps for the retrieval of a previous command.
-
Step 1:
CommandBoxlistens to the KeyPressed event and makes a call tohandleUpKey()when an up key is pressed. -
Step 2:
handleUpKey()checks whether the current input is successfully executed or rejected as an invalid command. This makes a difference because successful commands are erased after execution while invalid commands remain in theCommandBox. -
Step 3: If the command is valid and erased,
InputHistoryManagerwill try to retrieve the previous command by callingprevious(). -
Step 4:
CommandBoxwill set its text to be the returned String.
If the current input has not been executed or has already been successfully executed, calling the previous command will return the command
entered before the current input. If the current input is a rejected invalid command, it means that the command has already been
saved. In this case, calling previous() once will retrieve back that invalid command which to user means that the command in the CommandBox
has not been changed despite the up key pressed. Hence, two calls to previous() will be made to retrieve the command before the current invalid command.
|
You can refer to the activity diagram here:

3.10. User Interface
The UI contains two panels that change according to the items in the XpireItemList and ReplenishList. However, these
UI components are not able to update by listening to changes in these ObservableLists. This is because both lists are
sorted and thus all items in the lists will be modified each time a sort, add, delete, tag or other commands that modify the lists
are executed, causing the listener in the API to catch unwanted changes. Instead, the lists are passed as parameters to the
UI classes through MainWindow and rendered each time a command is executed.
As as an example of how the UI were implemented, we will examine the implementation of ViewPanel.
3.10.1. The View Panel
ViewPanel is a container for many ItemCards, each carrying information about the items.
Given below are the steps of an example scenario of how ViewPanel is constructed and updated:
-
The User launches the application and the
MainWindowcreates a newViewPanelPlaceholdercontainer that hosts theViewPanel. -
MainWindowcallsLogicwhich in turn callsModelto obtain a current active list throughgetCurrentFilteredItemList(). Depending on the user’s current list in view, it will either be anXpireItemListorReplenishList. -
On starting of the GUI,
MainWindowmakes a call tofillInnerParts(), where theMainWindowpasses the list as parameters to the constructor of theViewPanel. -
ViewPanelmakes a call todisplayItems(ObservableList)and constructs a Collection ofItemCardby mapping eachXpireItemorItemto anItemCard. .ItemCardtakes as parameters the item and its index in the list. It renders all fields of anXpireItemandItemand also dose an additional check on the condition of theXpireItemand assign it to different colours respectively throughsetColour(). -
The app then starts.
Let’s now see what happens when a command is executed.
If the command is a help, exit of export, the ViewPanel will not be updated and refreshed.
|
-
In
MainWindow, a call toexecuteCommand(String)is made, whereLogicwill executes the command. -
Upon a successful execution, a call to
updateViewPanel()is made. In this method theViewPanelthen callsdisplayItems(ObservableList)again to rerender the items. -
displayItemswill first have to clear all child Nodes that theViewPanelcontains before adding a new Collection ofItemCard. -
ViewPanelPlaceholderwill then have to remove theViewPanelchild and add the new one to allow the changes to be reflected in the GUI.
You can refer to the activity diagram below for reference.

If the execution by Logic is not successful, an error will be thrown and the ViewPanel will not be updated and refreshed.
|
3.10.2. Design Considerations
3.10.2.1. Aspect: How ViewPanel and AllItemsPanel updates
-
Alternative 1 (current choice): Updates taking in the lists as parameters.
-
Pros: Straightforward implementation that grantees correct result if the list is correct.
-
Cons: It breaks the "Model View Controller" structure because the UI is not listening to the
ObservableListanymore. Whenever a command is executed, a function call has to be made to update theViewPaneland theAllItemsPanel.
-
-
Alternative 2: Updates using event listeners
-
Pros: It follows the MVC structure where the panels listen to the
ObservableListfor changes. -
Cons: As mentioned earlier, it is difficult to use event listeners on the
SortedUniqueListbecause the listener will catch the sorting as modification to the items. In the future, alternative 2 can be considered with changes to how the listener and sorting works.
-
3.10.2.2. Aspect: Layout of ResultDisplay
-
Alternative 1 (current choice): Directly on top of the CommandBox with resizablility.
-
Pros: Long messages can be viewed and referred to when typing the next comment.
-
Cons: It takes up a fixed space on the GUI which could be used to display more items.
-
-
Alternative 2 (initial implementation): Use a pop up window to display the messages which disappears when any key is pressed and the user can continue.
-
Pros: It saves spaces on the GUI and success and error message can be dismissed so that user do not have to see it all the time.
-
Cons: User is not able to type while referring to the message.
-
3.10.2.3. Aspect: Layout of ItemCard
The original design does not fit the vertical list as seen below:
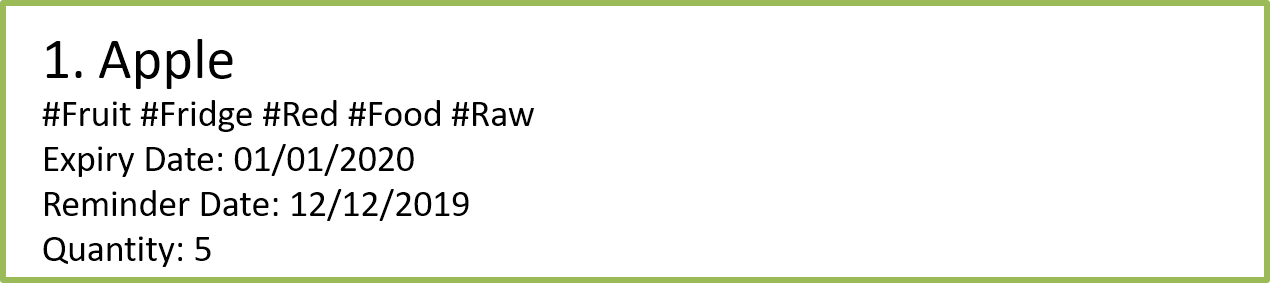
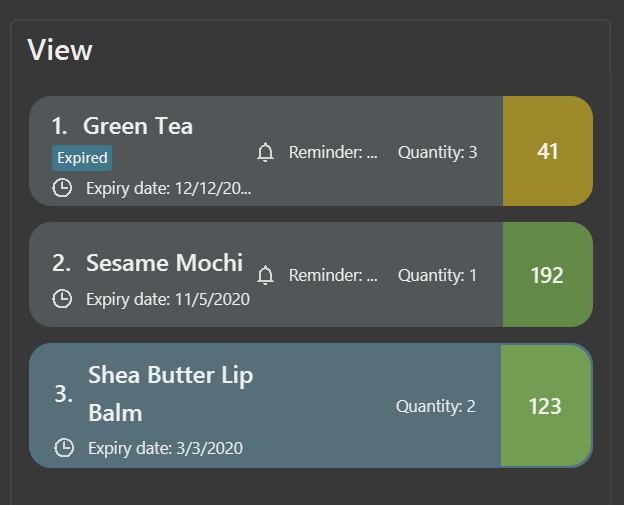
The following changes have been made to the layout of the item card for a better view of the items.
-
Display the number of days left before the item expires in an obvious manner for user to see.
-
Move the position of the reminder and quantity to the left so that the right is not crowede.
-
Dynamically Change the colour of the card depending on the status of the item. Red for expired, yellow for alerting, green for healthy.
-
Expand the card on clicking and collapse it when not in focus to save space for more items to be displayed.
Here is the redesigned ItemCard:
3.11. Logging
We are using java.util.logging package for logging. The LogsCenter class is used to manage the logging levels and logging destinations.
-
The logging level can be controlled using the
logLevelsetting in the configuration file (See Section 3.12, “Configuration”) -
The
Loggerfor a class can be obtained usingLogsCenter.getLogger(Class)which will log messages according to the specified logging level -
Currently log messages are output through:
Consoleand to a.logfile.
Logging Levels
-
SEVERE: Critical problem detected which may possibly cause the termination of the application -
WARNING: Can continue, but with caution -
INFO: Information showing the noteworthy actions by the App -
FINE: Details that is not usually noteworthy but may be useful in debugging e.g. print the actual list instead of just its size
3.12. Configuration
Certain properties of the application can be controlled (e.g user prefs file location, logging level) through the configuration file (default: config.json).
4. Documentation
Refer to the guide here.
5. Testing
Refer to the guide here.
6. Dev Ops
6.1. Build Automation
We use Gradle for build automation. See here for more details.
6.4. Making a Release
Follow the steps below to make a new release:
-
Update the version number in
MainApp.java. -
Generate a JAR file using Gradle.
-
Tag the repo with the version number. e.g.
v1.4 -
Create a new release using GitHub and upload the JAR file you have created.
6.5. Managing Dependencies
Xpire often depends on third-party libraries. For instance, the Jackson library is being used for JSON parsing in Xpire. Below are 2 ways to manage these dependencies:
-
Use Gradle to manage and automatically download dependencies (Recommended).
-
Manually download and include those libraries in the repo (this requires extra work and bloats the repo size).
Appendix A: Product Scope
Target user profile:
-
Has a preference for command-line interfaces (CLI)
-
Able to type fast
-
Has a need to track the expiry dates of numerous items
-
Prefers desktop applications over other forms
-
Prefers typing over mouse input
-
Wants to be able to search up an item’s expiry date quickly
-
Has a need for items to be tagged appropriately
-
Needs items to be organised into what has not expired and what to buy/replenish
-
Wants to be notified of items that are soon expiring or has expired
-
Tech-savvy and familiar with CLI
-
Requires an app to check what items are about to expire for a particular recipe [v2.0]
-
Wants to save recipes in a convenient format [v2.0]
Value proposition: manage tracking of items' expiry dates faster than a typical mouse/GUI driven app
Appendix B: User Stories
Priorities: High (must have) - * * *, Medium (nice to have) - * *, Low (unlikely to have) - *
| Priority | As a … | I want to … | So that I … |
|---|---|---|---|
|
new user |
see usage instructions |
can refer to instructions when I forget how to use the application |
|
user |
input the names of items |
|
|
user |
input the expiry dates of items |
|
|
user |
save the list of items I am tracking |
can come back to it after closing the application |
|
user |
view the list of things I am tracking |
know which items are expiring soon |
|
user |
add items to the tracking list |
am able to track new items |
|
user |
delete items from the tracking list |
can remove items that I do not need to track anymore |
|
user |
exit from the application |
do not have to be on the application all the time |
|
user |
be reminded of items that are expiring soon |
can use them before they expire or prepare to replenish them |
|
user |
view the list of expired things that are to be replenished |
know what to replenish |
|
user |
sort my items according to name or date |
can find my items more easily |
|
user |
search up my items by their tags or names |
can find my items more easily |
|
user |
set quantity of my items |
can take note of items that are soon running out or need using before the expiry date |
|
user |
input description of items |
can write small notes or annotate about the item |
|
user |
search items and delete |
can delete an item easily without having to remember their ID |
|
user |
undo my previous command |
can return to the previous state/list if I have accidentally executed a command I do not want |
|
user |
tag items |
categorise and organise them better |
|
user |
edit items |
can update their details easily when I need to |
|
user |
filter items by expiry date |
can check what items are expiring before a certain date |
|
user |
view a summary of items |
can quickly scan through all items (tracked and to-buy) to see what have been added to each list |
|
user |
import tracking list into phone via QR Code |
can remind my other friends when their items are expiring |
|
user |
track items and their quantity |
know what items have run out and need replenishing |
Appendix C: Use Cases
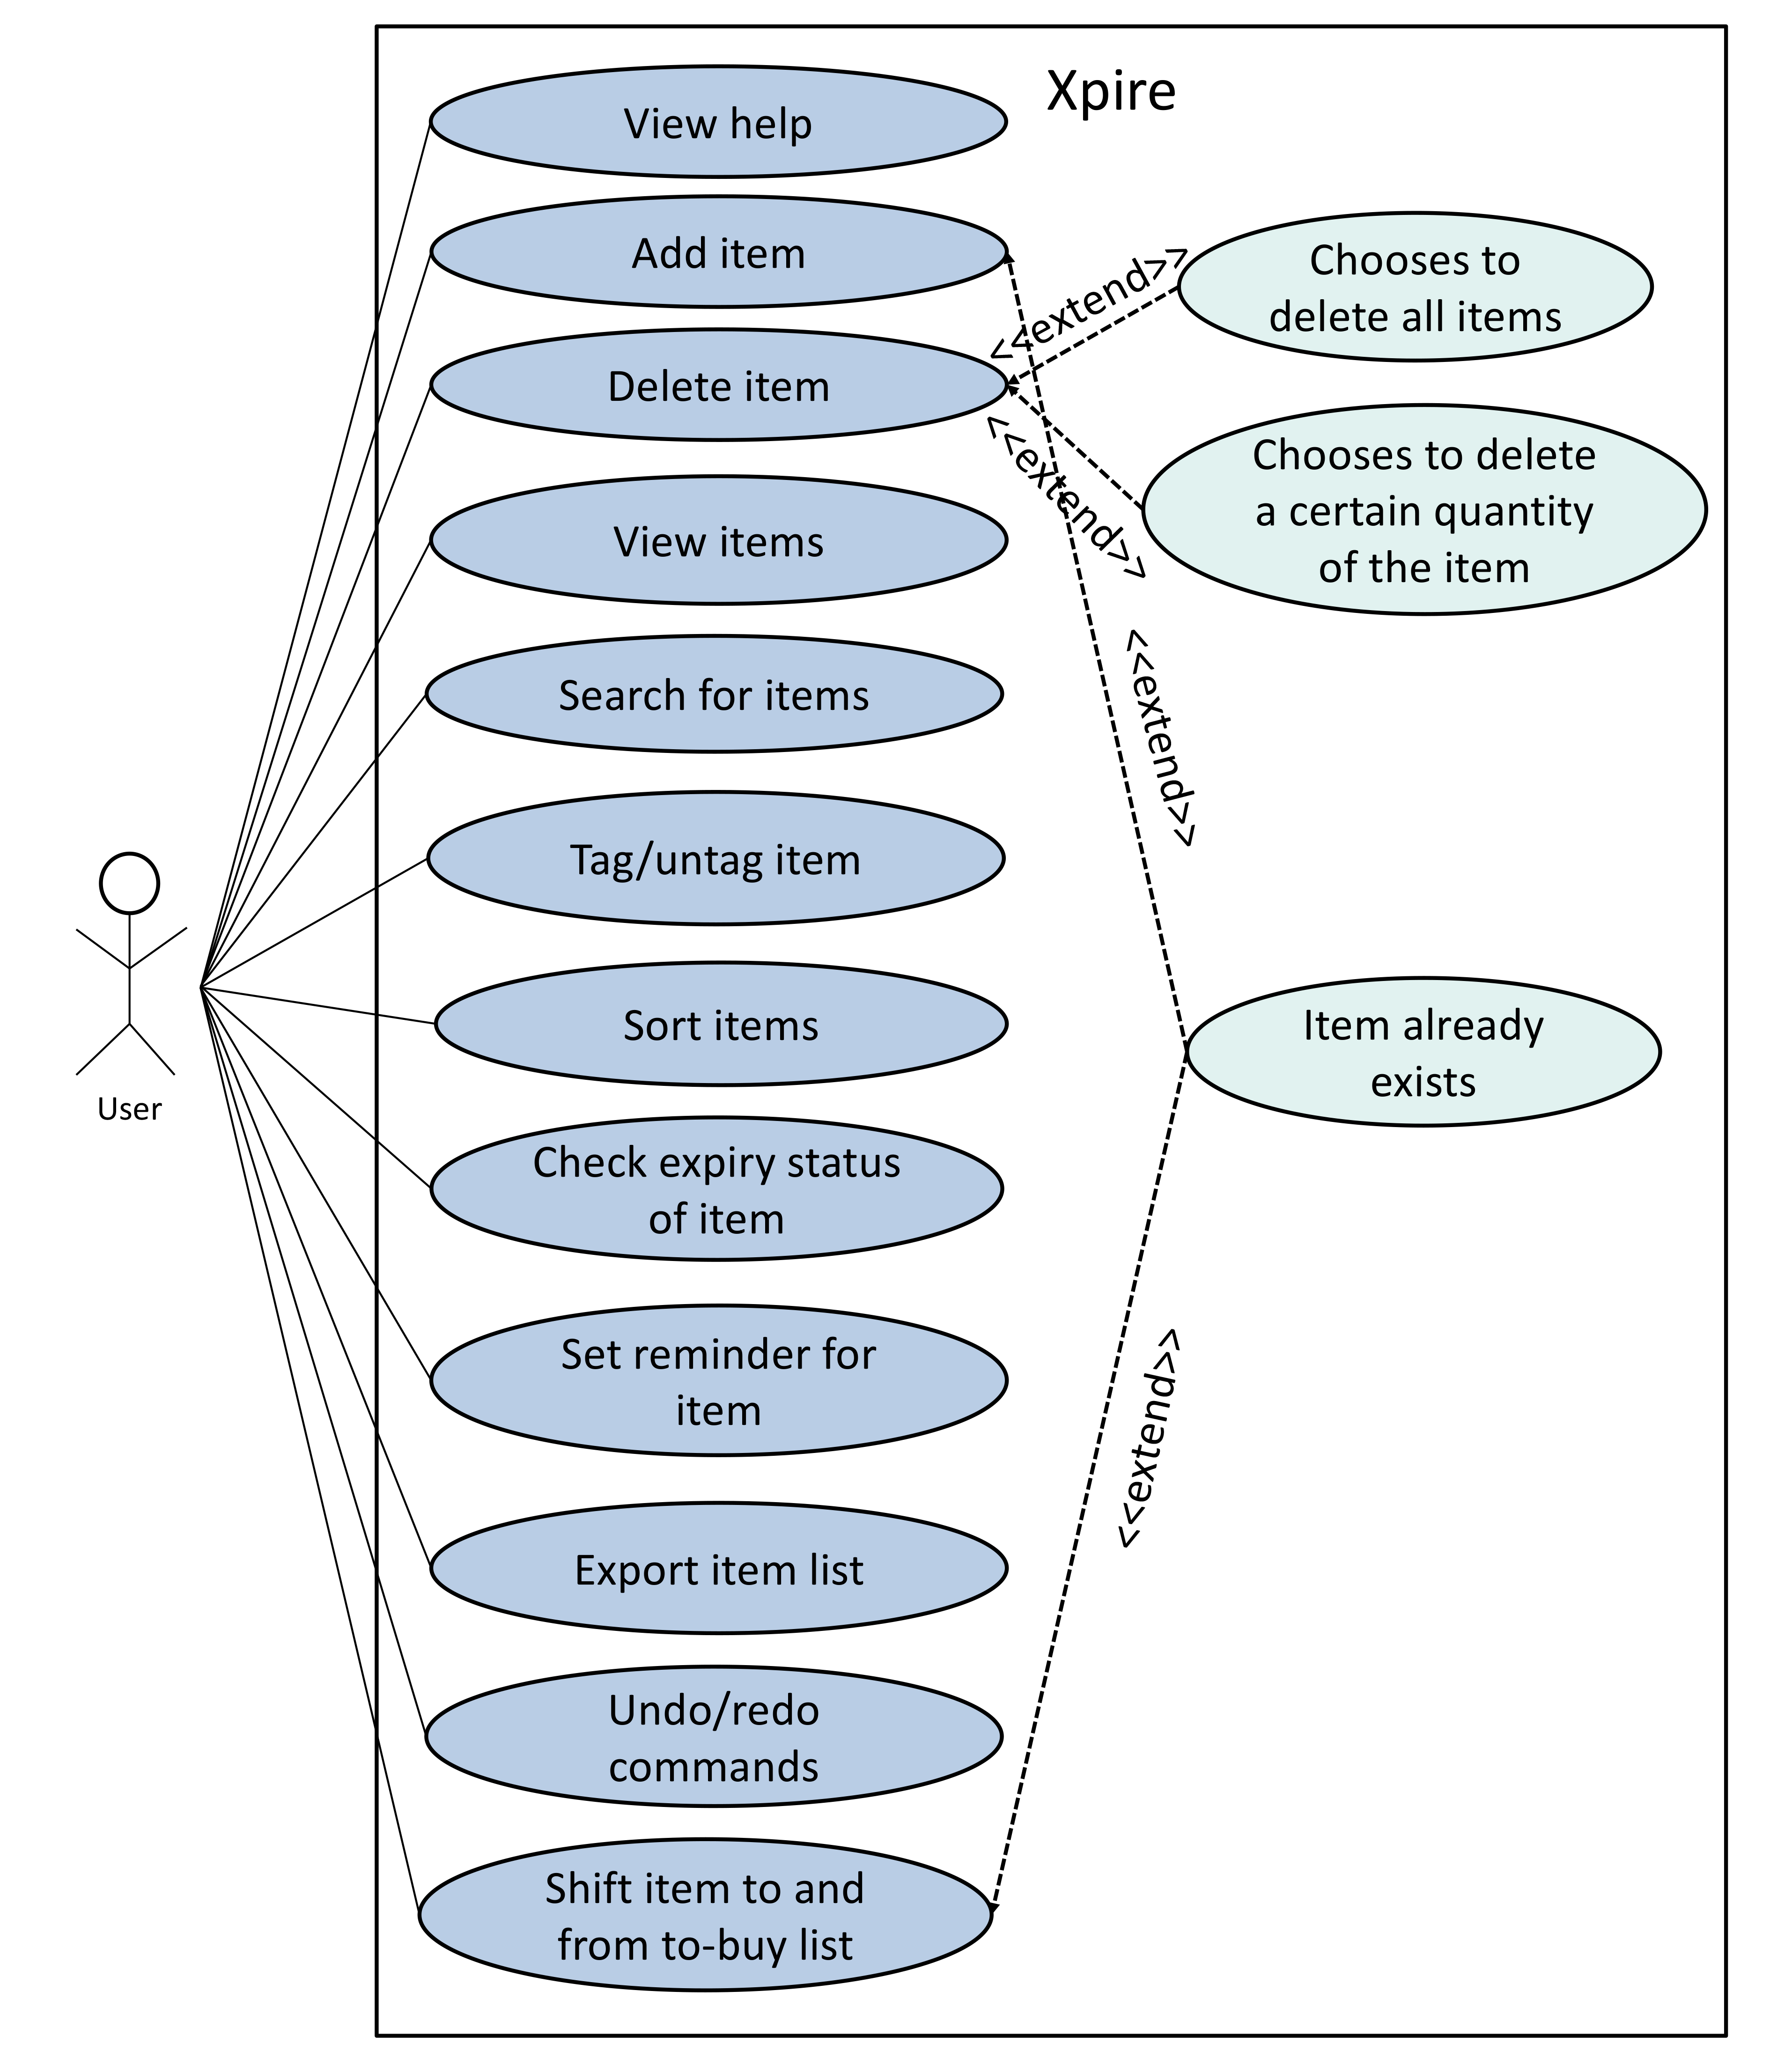
The above use case diagram helps to summarise the use cases for Xpire.
(For all use cases below, the System is Xpire and the Actor is the user, unless specified otherwise. Additionally, any references made to the list refers to the tracking list, unless specific otherwise.)
Use case: UC01 - Add item
MSS
-
User requests to add an item to the list.
-
Xpire adds the item.
Use case ends.
Extensions
-
1a. Xpire detects an error in the input.
-
1a1. Xpire shows an error message.
Use case ends.
-
Use case: UC02 - Delete item
Precondition: Display board is showing a list of items.
MSS
-
User requests to delete a specific item in the list.
-
Xpire deletes the item.
Use case ends.
Extensions
-
1a. The given index is invalid.
-
1a1. Xpire shows an error message.
Use case resumes at step 1.
-
Use case: UC03 - Search item(s)
Precondition: Display board is showing a list of items.
MSS
-
User requests to search for specific item(s) in the list.
-
Xpire shows the searched item(s).
Use case ends.
Extensions
-
1a. The given keyword(s) has no matching results.
-
1a1. Xpire shows an empty list.
Use case ends.
-
Use case: UC04 - Clear list
MSS
-
User views all items in the list (UC05).
-
User requests to clear the list.
-
Xpire removes all items from the list.
Use case ends.
Use case: UC05 - View all items
MSS
-
User requests to view all items in the list.
-
Xpire shows the full list of items.
Use case ends.
Use case: UC06 - View help
MSS
-
User requests for help.
-
Xpire shows the help messages.
Use case ends.
Use case: UC07 - Terminate Xpire
MSS
-
User requests to exit the program.
-
Xpire closes.
Use case ends.
Use case: UC08 - Check for expiring items
MSS
-
User requests to view list of expiring items.
-
Xpire shows list of expiring items.
Use case ends.
Extensions
-
1a. The list is empty
-
1a1. Xpire shows an empty list.
Use case ends.
-
Use case: UC09 - Tag item
Precondition: Display board is showing a list of items.
MSS
-
User requests to tag an item in the list.
-
Xpire tags the item.
Use case ends.
Extensions
-
1a. The given index is invalid.
-
1a1. Xpire shows an error message.
Use case resumes at step 1.
-
Use case: UC10 - Sort items
Precondition: Display board is showing a list of items.
MSS
-
User requests to sort the items.
-
Xpire sorts the items in the list.
Use case ends.
Use case: UC11 - Export
MSS
-
User requests to export current list.
-
Xpire shows the QR code.
Use case ends.
Appendix D: Non Functional Requirements
Accessibility
-
The app shall be accessible by people who have downloaded the JAR file.
Availability
-
The app shall be available once it is started up and running.
-
Reminders shall only be available on the app.
-
Reminders shall only be available after the app is started.
Efficiency
-
The app should start up within 5 seconds.
-
The response to any user action should become visible within 5 seconds.
Performance
-
The app list should be able to hold up to 200 items without a noticeable sluggishness in performance for typical usage.
-
The app should be able to sort up to 200 items without any sags in performance.
Reliability
-
The app shall only accept and process user actions written in the correct format.
-
The app shall throw appropriate exceptions when any user action is in an invalid format.
-
The app shall throw appropriate exceptions when any user action fails to be processed.
Integrity
-
The precision of calculations with derived data shall be at the same degree of precision as the originating source data.
-
All dates entered will be parsed accurately as to the original date format.
Product Scope
-
The product is not required to handle items without expiry dates.
-
The product is not required to handle items without names.
-
The product is not required to produce reminders when the app is inactive.
-
The product is not required to handle intentionally corrupted JSON files.
Usability
-
A user with above average typing speed for regular English text (i.e. not code, not system admin commands) should be able to accomplish most of the tasks faster using commands than using the mouse.
-
The user interface should be self-explanatory and intuitive enough for first-time users or users who are not IT-savvy.
Maintainability
-
A development programmer who has at least one year of experience supporting this software application shall be able to add a new product feature, including source code modifications and testing, with no more than two days of labour.
-
The app code base shall be easy to read and interpret by a developer with at least one year of experience.
Modifiability
-
Function calls shall not be nested more than two levels deep.
Installability
-
The installation process shall be convenient. The application shall be downloaded as a JAR file from the newest tagged release.
-
The software shall be installed from Github, a popular portable medium.
Interoperability
-
Should work on any mainstream OS as long as it has Java
11or above installed.
{More to be added}
Appendix E: Glossary
Command |
Executes user input in the application |
CommandBox |
UI component that takes in user input |
ResultDisplay |
UI component that displays the feedback to the user |
FXML |
XML-based user interface markup language for defining user interface of a JaxaFX application |
ItemCard |
UI component that displays information on an item |
ViewPanel |
UI component that displays list of items |
AllItemsPanel |
UI component that displays list of all items in an expandable list |
JavaFX |
Software platform for creating and delivering desktop applications and rich Internet applications |
JSON |
An open-standard file format that uses human-readable text to transmit data objects consisting of attribute–value pairs and array data types |
Logic |
Handles user input for the application and returns the application’s output |
MainWindow |
Provides the basic application layout containing a menu bar and space where other JavaFX elements can be placed |
Model |
Represents data in the expiry date tracker and exposes immutable items list |
Parser |
Converts user input into a Command object |
ReadOnlyListView |
Provides an unmodifiable view of a list |
ReminderThreshold |
Number of days user wants to be reminded before item expiry date |
ReplenishList |
List that contains items that are to be replenished |
SceneBuilder |
Visual layout tool that allows developers to design JavaFX application user interfaces |
SortedUniqueList |
List of items that enforces uniqueness between elements and disallows nulls |
Storage |
Manages data in the expiry date tracker in local storage |
Appendix F: Product Survey
Fridgely
Author: Justin Ehlert
Pros:
-
Able to sync with multiple devices.
-
Has barcode scanner to automatically add item.
Cons:
-
Cannot efficiently change the location tag of the item. To change the location tag, user has to manually recreate the same item with another tag and delete the current item.
Expiry Date Tracker Lite
Author: Lalit Kumar Verma
Pros:
-
Has the option to use it in multiple languages.
-
Provides a summary view of "expiring" and "expired" items.
Cons:
-
Forces user to take photo of every item while adding to the list.
Appendix G: Instructions for Manual Testing
Given below are instructions to test the app manually.
| These instructions only provide a starting point for testers to work on; testers are expected to do more exploratory testing. |
G.1. Launch and Shutdown
-
Initial launch
-
Download the jar file and copy into an empty folder
-
In the home folder for Xpire, launch the jar file using the
java -jar xpire.jarcommand on
Terminal (for macOs) or Command Prompt (for Windows) to start the app.
Expected: Shows the GUI with a set of sample items. The window size may not be optimum.
-
-
Saving window preferences
-
Resize the window to an optimum size. Move the window to a different location. Close the window.
-
Re-launch the app by using the
java -jar xpire.jarcommand.
Expected: The most recent window size and location is retained.
-
G.2. Command Box
-
Input length limit
-
Test case:
add|an item with a very long name that will be rejected|09/09/2020|100
Expected: Input is truncated toadd|an item with a very long name that will be rejected|09/0and turns red.
Feedback to user that the maximum length of input cannot exceed 60 characters.
-
-
Retrieving previous commands
-
Prerequisites: Some command have been entered by pressing enter, and the tester is not already at the least recent command.
-
Test case: ↑
Expected: Previously entered command is retrieved into the Command Box.
-
-
Retrieving later commands
-
Prerequisites: The tester has retrieved at least one previous commands and nothing has been entered since the retrieval.
-
Test case: ↓
Expected: A command that had been entered after the current retrieved command is retrieved into he Command Box.
-
G.3. All Items Panel
-
Updating the All Items Panel
-
Prerequisites: Current view is the main list.
-
Test case:
add|apple|09/09/2020
Expected: All Items Panel should be updated to display the item under "tracking items". -
Test case:
search|b
Expected: All Items Panel should not be updated. -
Test case:
shift|1
Expected: Item with index 1 is shifted from "tracking items" to "to-buy items".
-
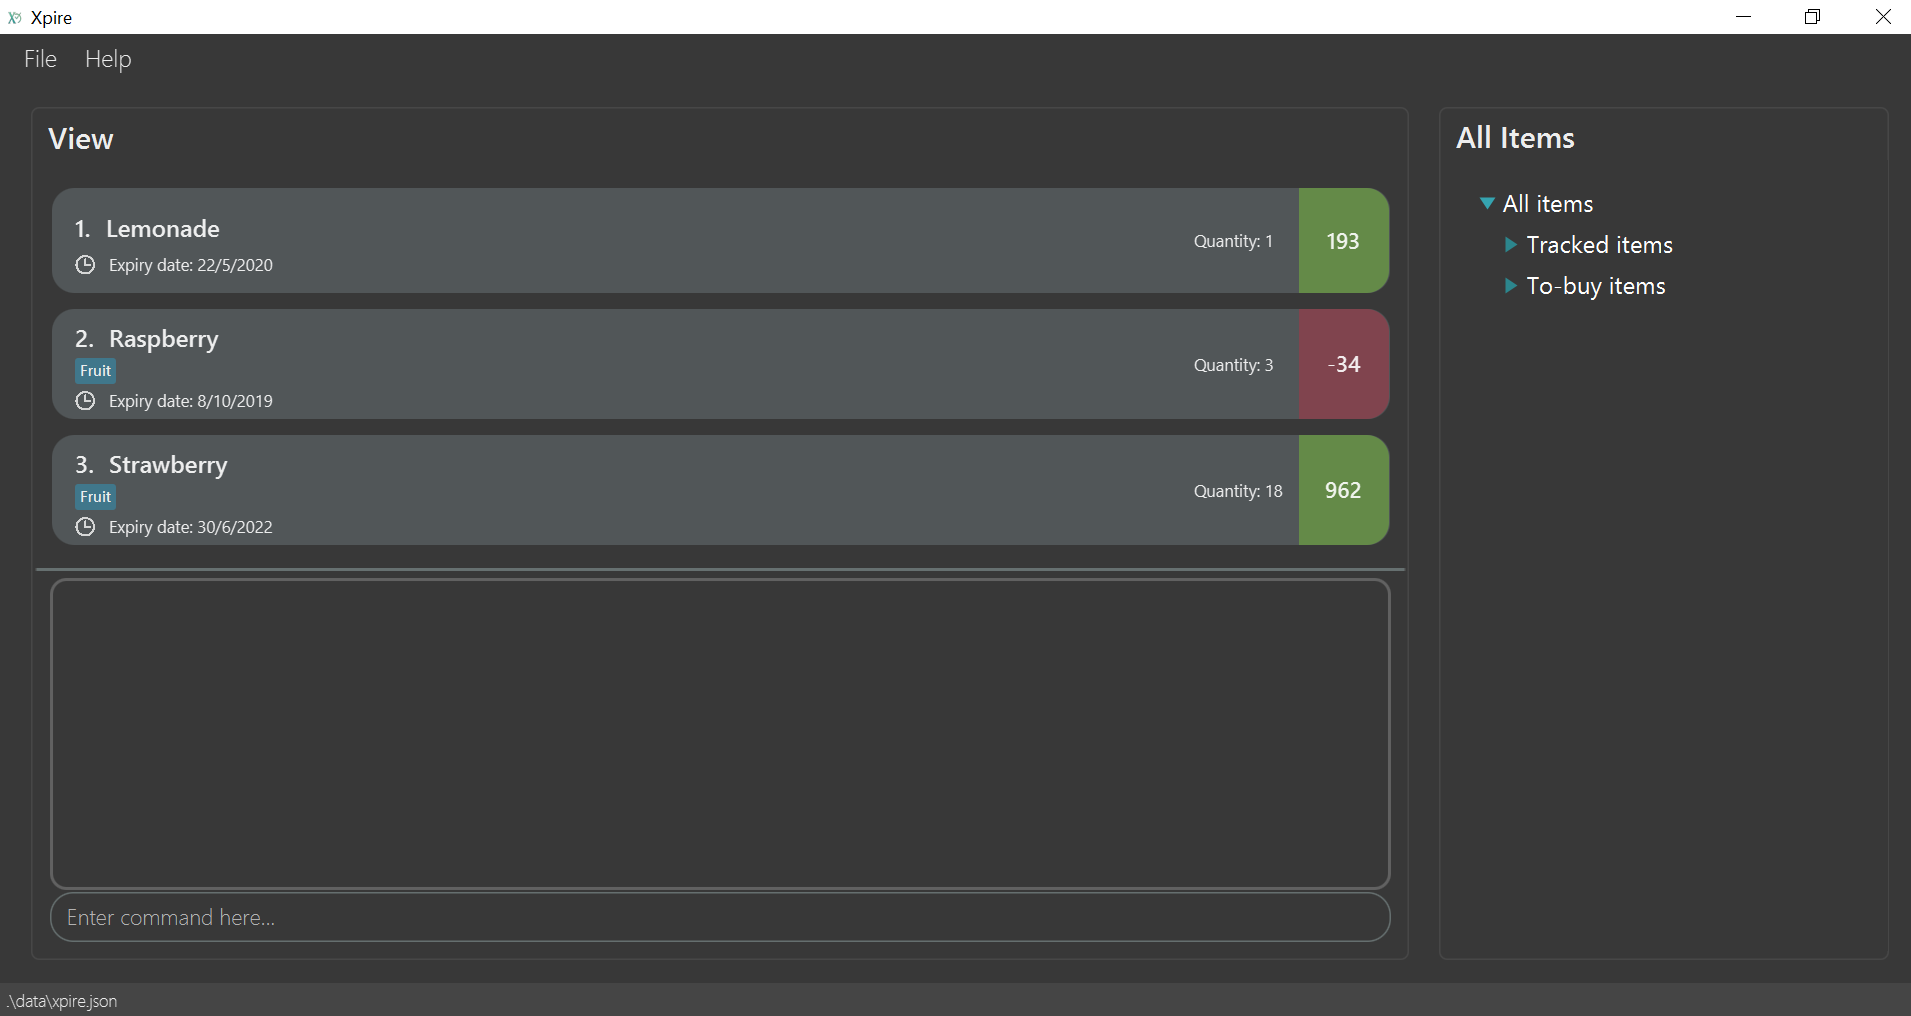
G.4. View Panel
-
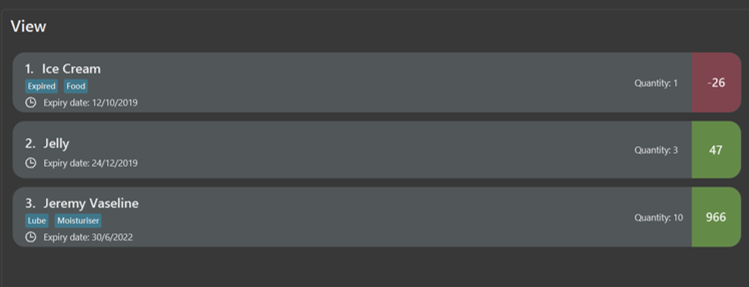
Updating the colour of
ItemCard-
Prerequisites: Current view in the main list and the first item in
Viewhas not expired. It should not have a reminder and should be expiring in less than 1000 days. -
Test case: Follow the instructions under Section G.6, “Adding expired items to the tracking list for testing” to add expired items to the Xpire. Do not add any reminder threshold.
Expected: The expired items are marked as red; not expired items are green. -
Test case:
set reminder|1|1000
Expected: the first item turns yellow.
-
G.5. Viewing items
-
Viewing items in the replenish list
-
Test case:
view|replenish
Expected: All items in the replenish list are displayed. -
Test case:
view|replenihs
Expected: No change in the display of items. The termreplenishis given as a suggestion in the error message. -
Test case:
view|REPLENISH
Expected: Similar to previous. -
Test case:
view|something
Expected: No change in the display of items. Error details shown in the status message. -
Other incorrect sort commands to try: ,
view|3000,view|xyz(where xyz is any garbage input)
Expected: Similar to previous.
-
-
Viewing items in the main tracking list
-
Test case:
view|main
Expected: All items in the main list are displayed. -
Test case:
view|mainn
Expected: No change in the display of items. The termmainis given as a suggestion in the error message. -
Test case:
view|something
Expected: No change in the order of items. Error details shown in the status message. -
Other incorrect view commands to try:
view|-1, view|xyz` (where xyz is any garbage input)
Expected: Similar to previous.
-
-
Viewing items in the current list
-
Test case:
view
Expected: All items in the current list are displayed. -
Test case:
viwe
Expected:viewis given as a recommendation in the error message.
-
G.6. Adding expired items to the tracking list for testing
By design, our app does not accept items that have expired unless the JSON file is tampered with.
-
To add an expired item to the tracking list, open the xpire.json file in an editor. Under
"xpireItems", add a new JSON object with values forname,expiryDate,quantity,reminderThresholdandtags. -
Note that this expiry date has to be after 1/10/2019.
-
The expiry date should be a date that is before the current date of testing. The reminder threshold should be a non-negative integer and quantity should be a positive integer.
-
Compute the reminder date by subtracting the reminder threshold from the expiry date. The reminder date should not be before 1/10/2019.
-
The format to follow for adding an item can be seen within the box outline:
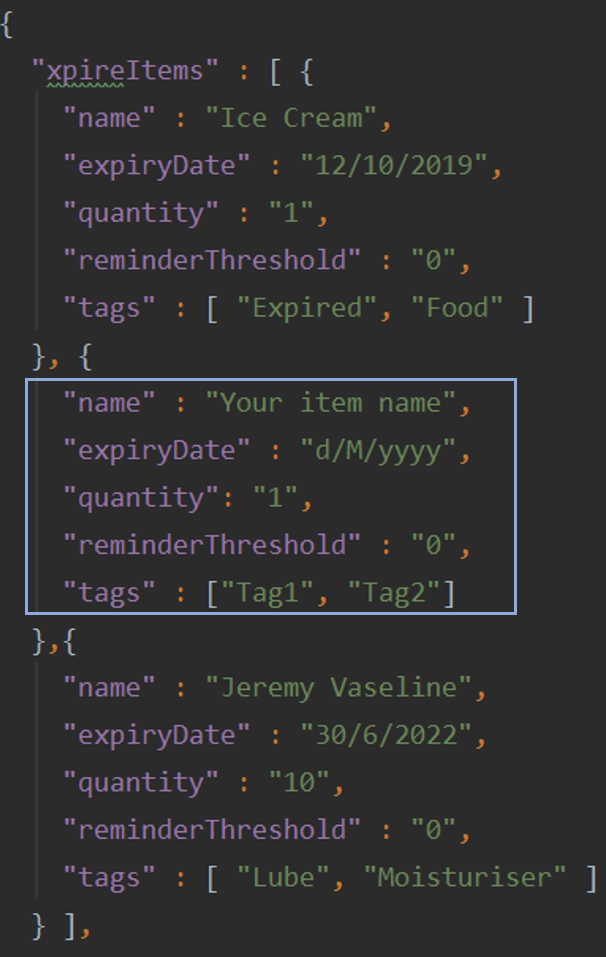
Example:
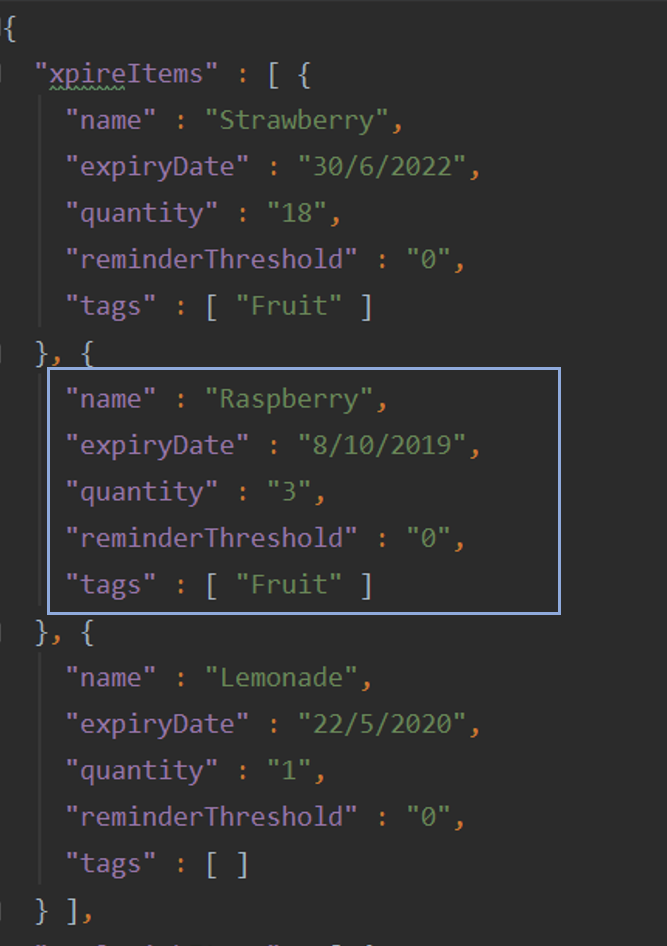
An item with name Raspberry and expiryDate 8/10/2019 (which has passed) is now added to the JSON file for your testing.
Remember to enclose these name-value items with { and }.
Do note that if you manually tamper with the xpire.json file, the data file might be corrupted.
See Section G.18, “Saving data” on details for corrupted files.
For more information about JSON objects, please refer to this tutorial.
|
G.7. Adding an item
-
Adding an item to the main list
The examples given below act according to the following list:
-
Prerequisites: Current view is the main list.
-
Test case:
add|Chocolate|28/6/2020
Expected: Chocolate is added to the main list. Details of the added item is shown in feedback. -
Test case:
add|Strawberry|30/6/2022|999
Expected: Strawberry’s quantity is increased by 999. Details of the quantity increase is shown in feedback. -
Test case:
add|Strawberry|30/6/2022|100000
Expected: Error message shown in feedback.
G.8. Deleting an item
-
Deleting an item in either list while all items are listed
-
Prerequisites: List all items using the
viewcommand. Multiple items in the list. The item to be deleted must exist in the list. -
Test case:
delete|1
Expected: First item is deleted from the list. Details of the deleted item shown in the status message. -
Test case:
delete|0
Expected: No item is deleted. Error details shown in the status message. -
Other incorrect delete commands to try:
delete,delete|x(where x is larger than the list size)
Expected: Similar to previous.
-
-
Deleting an item quantity in the main tracking list while all items are listed
The examples given below act according to the following list:
-
Prerequisites: Current view is the main list. Input quantity to be deleted must be less than or equals to the item quantity.
-
Test case
delete|2|1
Expected: Second item from the list has quantity reduced by 1. The new updated quantity is reflected in the item card. Details of the item with reduced quantity is reflected in the status message. -
Test case
delete|2|3
Expected: Second item from the list has quantity reduced by 3. The item is shifted to the replenish list. Details of this shift is reflected in the status message. -
Test case
delete|2|0
Expected: Quantity is not reduced. Error details showed in the status message. -
Other incorrect delete commands to try:
delete,delete|x(where x is larger than the item’s quantity)
Expected: Similar to previous.-
Deleting an item quantity in the replenish list while all items are listed
-
-
Prerequisites: Input quantity to be deleted must be less than or equals to the item quantity.
-
Test case
delete|2|1
Expected: Second item from the list has quantity reduced by 1. The new updated quantity is reflected in the item card. Details of the item with reduced quantity is reflected in the status message. -
Test case
delete|2|3
Expected: Second item from the list has quantity reduced by 3. The item is shifted to the replenish list. Details of this shift is reflected in the status message. -
Test case
delete|2|0
Expected: Quantity is not reduced. Error details showed in the status message. -
Other incorrect delete commands to try:
delete,delete|x(where x is larger than the item’s quantity)
Expected: Similar to previous.
G.9. Shifting an item to the replenish list
-
Shifting an item to the replenish list
-
Prerequisites: Current view is the main list. Current list contains at least one valid item.
-
Test case
shift|1
Expected: First item in the main list is shifted into the replenish list. Feedback is shown.
-
G.10. Shifting an item to the main list
-
Shifting an item to the main list
-
Prerequisites: Current view is the replenish list. Current list contains at least one valid item. Item with the same expiry date specified and name as the item of the given index does not exist on the main list.
-
Test case
shift|1|25/6/2020
Expected: First item is moved to the main list. Feedback is shown.
-
G.11. Tagging an item
-
Tagging items in either list while all items are listed
-
Prerequisites: List all items using the
viewcommand. Multiple items in the list. The item to be tagged must have less than 5 existing tags. -
Test case:
tag|1|#fruit
Expected: The first item in the list will be tagged with #Fruit. -
Other incorrect tagging commands to try:
tag|0,tag|x
Expected: No item is tagged. Error details shown in the status message.
-
G.12. Setting a reminder for an item
-
Setting a reminder for an item
-
Prerequisites: Current view is the main list. The target item should have at least 6 days before its expiry date.
-
Test case
set reminder|1|5
Expected: First item from the list shows a reminder date which is 5 days before its expiry date.
Feedback shows reminder is set successfully. -
Test case
set reminder|1|-5
Expected: Reminder not set. Feedback shows error details. -
Test case
set reminder|1|365000
Expected: Reminder not set. Feedback shows error details. -
Other incorrect set reminder commands to try:
set reminder|,set reminder|0
Expected: Similar to previous.
-
-
Removing a reminder for an item
-
Prerequisites: Current view is the main list. The target item should not be expired and has a reminder.
-
Test case
set reminder|1|0
Expected: First item’s reminder date is removed from its item card.
Feedback shows reminder is removed successfully.
-
G.13. Filtering items based on its expiry date and status
-
Find items expiring in a specific number of days
-
Prerequisites: Current view is the main list. The list contains at least one expired item. The items you wish to check also must have either already expired or have reminders set for them previously.
-
Test case:
check
Expected: Items that are expiring soon or have already expired are listed. -
Test case
check|0
Expected: Expired items are displayed in theView(items in red).
Feedback shows listing of items expiring in 0 day. -
Test case
check|20
Expected: Items expiring in 20 days are displayed in theView.
Feedback shows listing of items expiring in 20 days. -
Other incorrect set reminder commands to try:
check|2000000
Expected: No change in the display of items. Error details shown in the status message.
-
-
Find all expired items and items whose reminder date has been reached (items in yellow)
-
Prerequisites: Current view is the main list. The list contains at least one expired item or item with active reminder.
-
Test case
check
Expected: Expired items and items with active reminder in theView(items in red or yellow).
Feedback shows listing of expired items and items whose reminder has been activated.
-
G.14. Undo/Redo commands
-
Undo an earlier command or redo a previously done command.
-
Prerequisites: No commands have been entered yet and the current view is the main list. There is at least one item in the main list that is expiring within 50 days, and one item in the replenish list.
-
Test case:
undo
Expected: Feedback stating that there are no commands to undo. -
Test case:
redo
Expected: Feedback stating that there are no commands to redo. -
Test case:
add|Apple|12/03/2025|3followed byundoand thenredo
Expected: The item with name Apple, expiry date 12/03/2025 and with quantity 3 will be added. Undo command will proceed to remove the item whilst the Redo command will proceed to add the same item back. -
Test case:
check|50followed byundoand thenredo
Expected: The items with 50 days before expiry date or less will be filtered out to you. Undo command will revert the current view to show all items. Redo command will then filter out those same items again. -
Test case:
shift|1followed byundoand thenredo
Expected: The item on the first index will be shifted to the ReplenishList. Undo command will shift the item back to the main list. Redo command will shift the item back to the replenish list. -
Test case:
view|replenishfollowed byshift|1|12/03/2025followed byundoand lastlyredo
Expected: The view changes to the replenish list and the first item on the list gets shifted to the main list with expiry date 12/03/2025. Undo command will shift the item back to the main list. Redo command will shift the item back to the replenish list.
-
G.15. Sorting items
-
Sorting items by their name
-
Prerequisites: List all items using the
viewcommand. Multiple items in the list. -
Test case:
sort|name
Expected: The current item list is sorted with respect to their names in lexicographical order. -
Test case:
sort|naem
Expected: No change in the order of items. The termnameis given as a suggestion in the error message. -
Test case:
sort|NAME
Expected: Similar to previous. -
Test case:
sort|something
Expected: No change in the order of items. Error details shown in the status message. -
Other incorrect sort commands to try:
sort|0,sort|xyz(where xyz is any garbage input)
Expected: Similar to previous.
-
-
Sorting items by their date
-
Prerequisites: List all items using the
viewcommand. Multiple items in the list. -
Test case:
sort|date
Expected: The current item list is sorted with respect to their dates in chronological order. -
Test case:
sort|datee
Expected: No change in the order of items. The termdateis given as a suggestion in the error message. -
Test case:
sort|DATE
Expected: Similar to previous. -
Test case:
sort|something
Expected: No change in the order of items. Error details shown in the status message. -
Other incorrect sort commands to try:
sort|,sort|xyz(where xyz is any garbage input)
Expected: Similar to previous.
-
G.16. Searching items
-
Non empty current list
-
Prerequisites: current list contains "apple" tagged with "#Fruit", "pear" tagged with "#Fruit" and "banana" tagged with "#Yellow". Note:
viewis executed after everysearchcommand to reset the current list. -
Test case:
search|apple
Expected: "apple" will be in the new current list. -
Test case:
search|a
Expected: "apple", "pear" and "banana" will be in the new current list. -
Test case:
search|e
Expected: "apple" and "pear" will be in the new current list. -
Test case:
search|x
Expected: New current list will be empty. -
Test case:
search|ethensearch|r
Expected: "pear" will be in the new current list. -
Test case:
search|#Fruit
Expected: "apple" and "pear" will be in the new current list. -
Test case:
search|#fruit
Expected: "apple" and "pear" will be in the new current list. -
Test case:
search|#Frui
Expected: New current list will be empty. -
Test case:
search|#yellow|app
Expected: "apple" and "banana" will be in the new current list.
-
-
Empty current list
-
Test case:
search|random stringExpected: Error message indicating that current list is empty.
-
G.17. Export data
-
Non empty current list
-
Test case:
export
Expected: QR code containing item data.
-
-
Empty current list
-
Test case:
export
Expected: Error message indicating that current list is empty.
-
G.18. Saving data
-
Dealing with missing/corrupted data files
-
Corrupted data files will be deleted. A new JSON file without any items will be used.
-