
Overview
My team of 5, including myself and 4 other software engineering teammates, were tasked to enhance an existing address book application. We chose to morph the address book into an expiry date tracker, Xpire. Xpire contains both a replenish list containing items that need to be stocked up on and an expiry date tracker containing the list of expiring items. With this and our implemented features, Xpire makes management of items fuss-free for users.
Summary of contributions
-
Major enhancement: Added
ShiftCommandthat allows the user to transfer items to and fro the replenish list.-
What it does: Enables the user to transfer an item from the tracking list into the replenish list.
-
Justification: Instead of keying in an item’s details again, users simply need to key in the given item index to transfer an existing item to the replenish list. This makes the overall user experience more fuss-free.
-
Highlights: The implementation of this enhancement required a refactor of the
Modelcomponent using important concepts such as polymorphism and inheritance. The implementation was also challenging as it required an in-depth understanding of generics to avoid repeated code and a huge overhaul of the existing implementation. Additionally, the implementation also familiarised me with JSON serialization using the Jackson Library.
-
-
Major enhancement: Added the ability to automatically add an item to the replenish list once an item in the tracking list runs out.
-
What it does: Automatically transfers an item that has depleted to the replenish list.
-
Justification: Instead of having the user delete an item on the tracking list and add it into the replenish list manually when it runs out, this enhancement collapses this two-step process into a one-step process.
-
Highlights: The implementation required an in-depth analysis of user needs and comprehensive testing to ensure that edge cases will also be factored in.
-
-
Minor enhancement: Added the ability to input item quantity. The parsing of the
Quantityfield familiarised me with Regex. This makes tracking multiple items of the same type easier as users only need to key the item’s details once. -
Minor enhancement: Added the ability to reduce item quantity in the tracking list. This allows users to better keep track of their items as users can simply update their items when a certain amount of the item is used up.
-
Minor enhancement: Added the ability to input similar items into the tracking list. This is useful as it provides users with an option to add to existing items in cases where they bought the same item on separate occasions.
-
Code contributed: [RepoSense]
-
Other contributions:
-
Enhancements to existing features:
-
Add functionality to input items into the tracking list (Pull request [#13])
-
Add quantity field for items (Pull request [#56])
-
Add functionality to reduce item quantity in the tracking list (Pull request [#58])
-
Refactor model and storage to contain both tracking list and replenish list (Pull request [#122])
-
Add shift command to transfer items to and fro replenish list (Pull request [#122])
-
Wrote additional tests for existing features (Pull requests [#78], [#99], [#227])
-
-
Documentation:
-
Contributions to the User Guide
Given below are sections I contributed to the User Guide. They showcase my ability to write documentation targeting end-users. |
Shifting an item from one list to another: shift
Let’s say one of your items has expired and you want to stock up on this particular item.
Simply use the shift command to transfer this item to the replenish list so that you will know which items you need to replenish.
Once you have stocked up on your expired items, you can similarly use the shift command again
to keep track of the item’s new expiry date.
Shifting an item from the main list to the replenish list
If you would like to view the list of expired items, simply type check|0.
From this list of expired items, you can use the shift command to move any item into the replenish list.
|
Format: shift|<index>
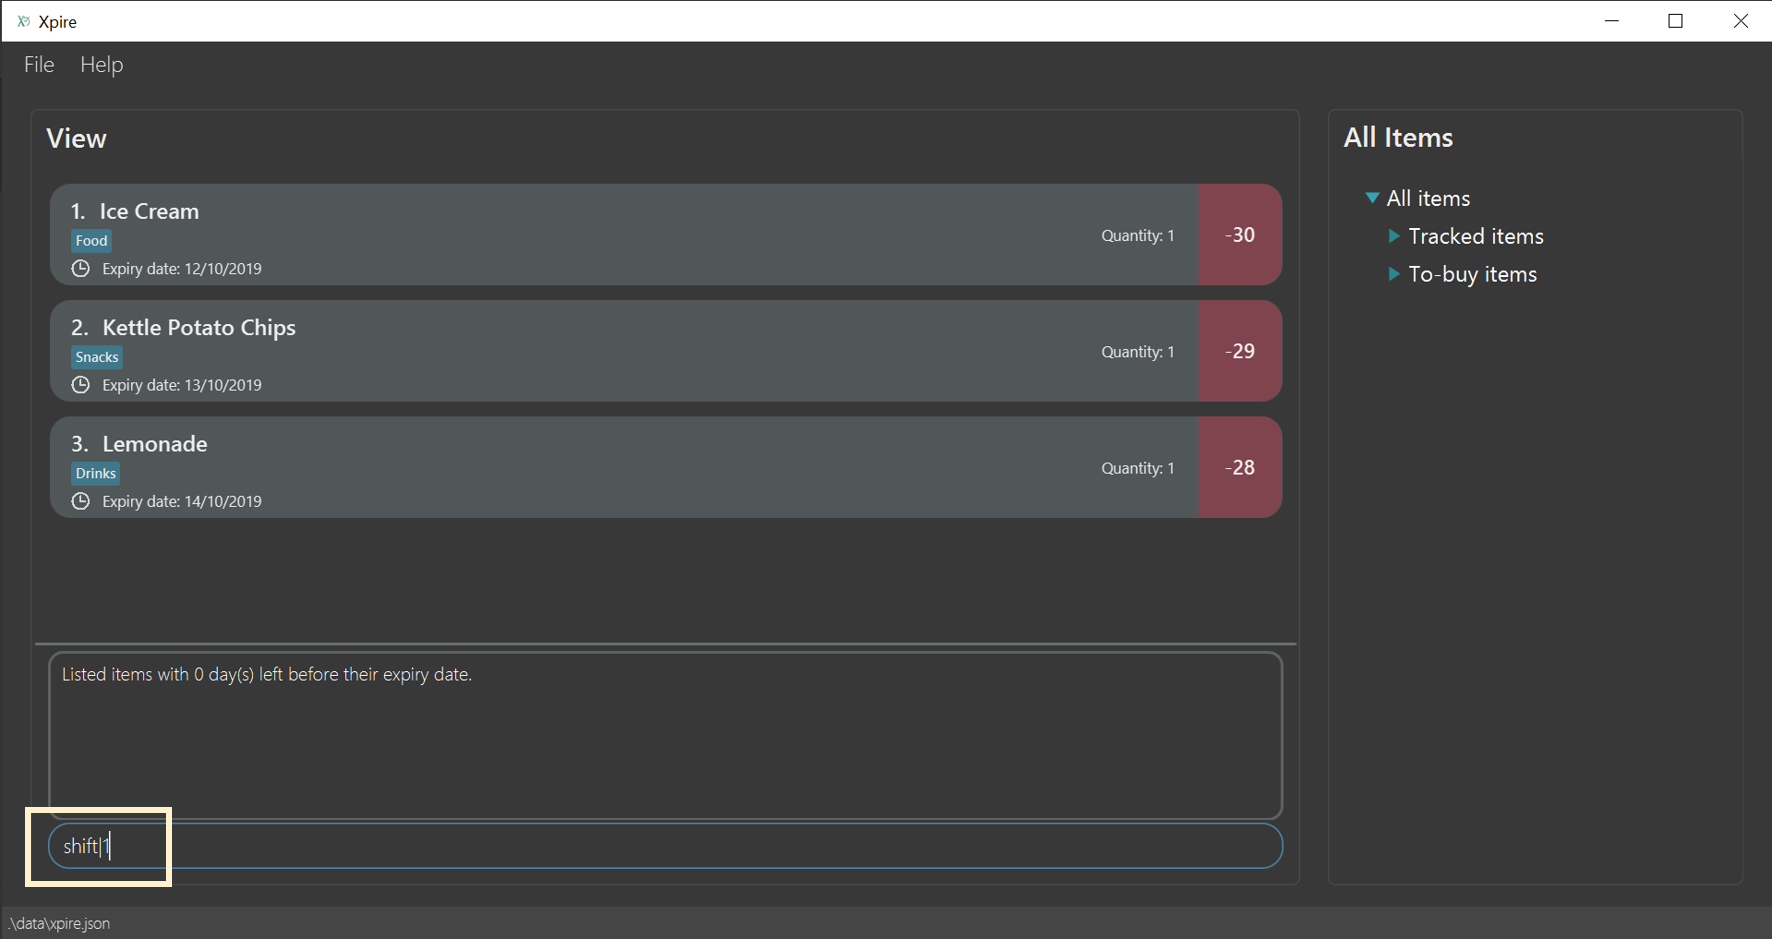
Let’s say you have this list of expired items and you want to remind yourself to replenish the first item in the list—the ice cream.
To do so, you can transfer the ice cream to the replenish list by typing shift|1, where 1 refers to item number displayed.
With this, your item will be shifted to the replenish list as seen from the figure below. When you go for grocery shopping in future, you can refer to this handy replenish list to stock up on your ice cream, or any items that have run out.
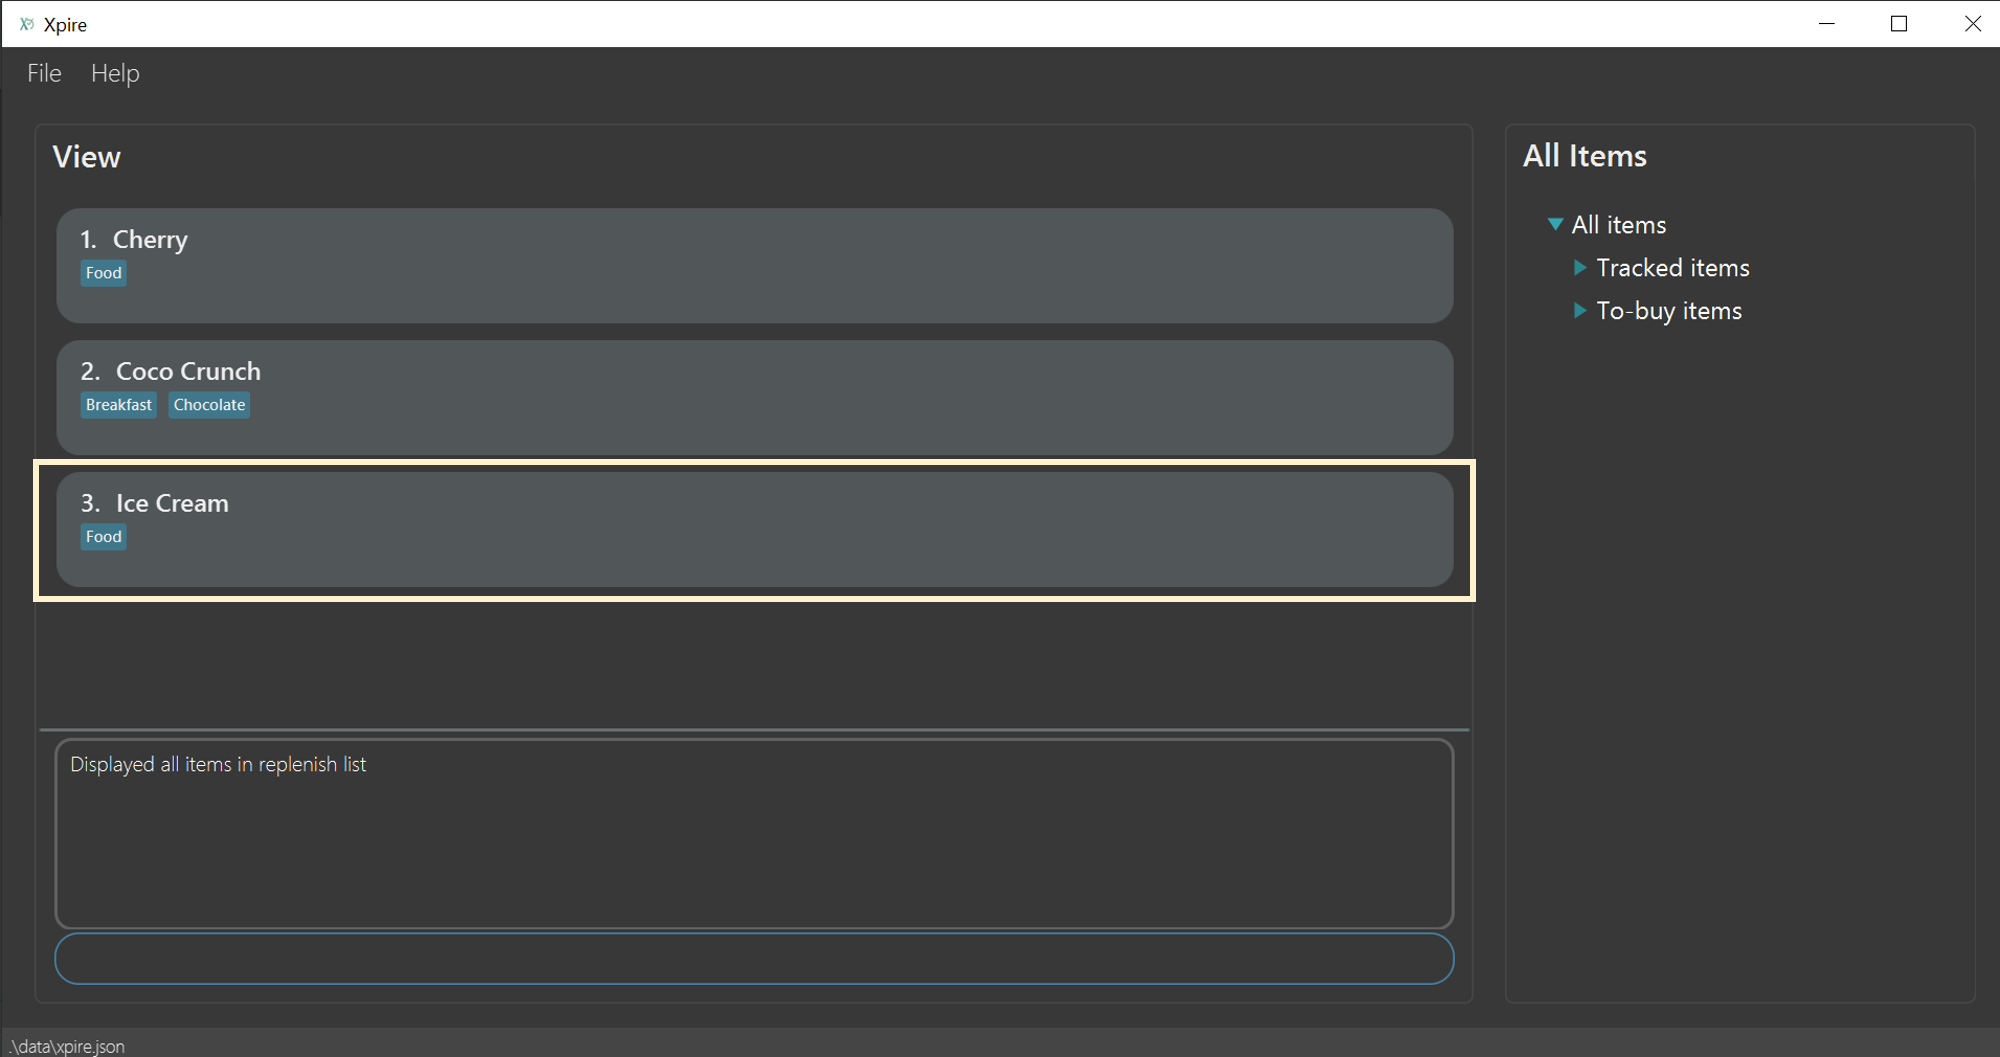
Shift command.Shifting an item from the replenish list to the main list
After some shopping, you may have stocked up on the items that were in the replenish list.
Now, you want to add these items back to your tracking list to keep track of their new expiry dates.
To do so, you can simply use the shift command again.
Format: shift|<index>|<expiry date>[|quantity]
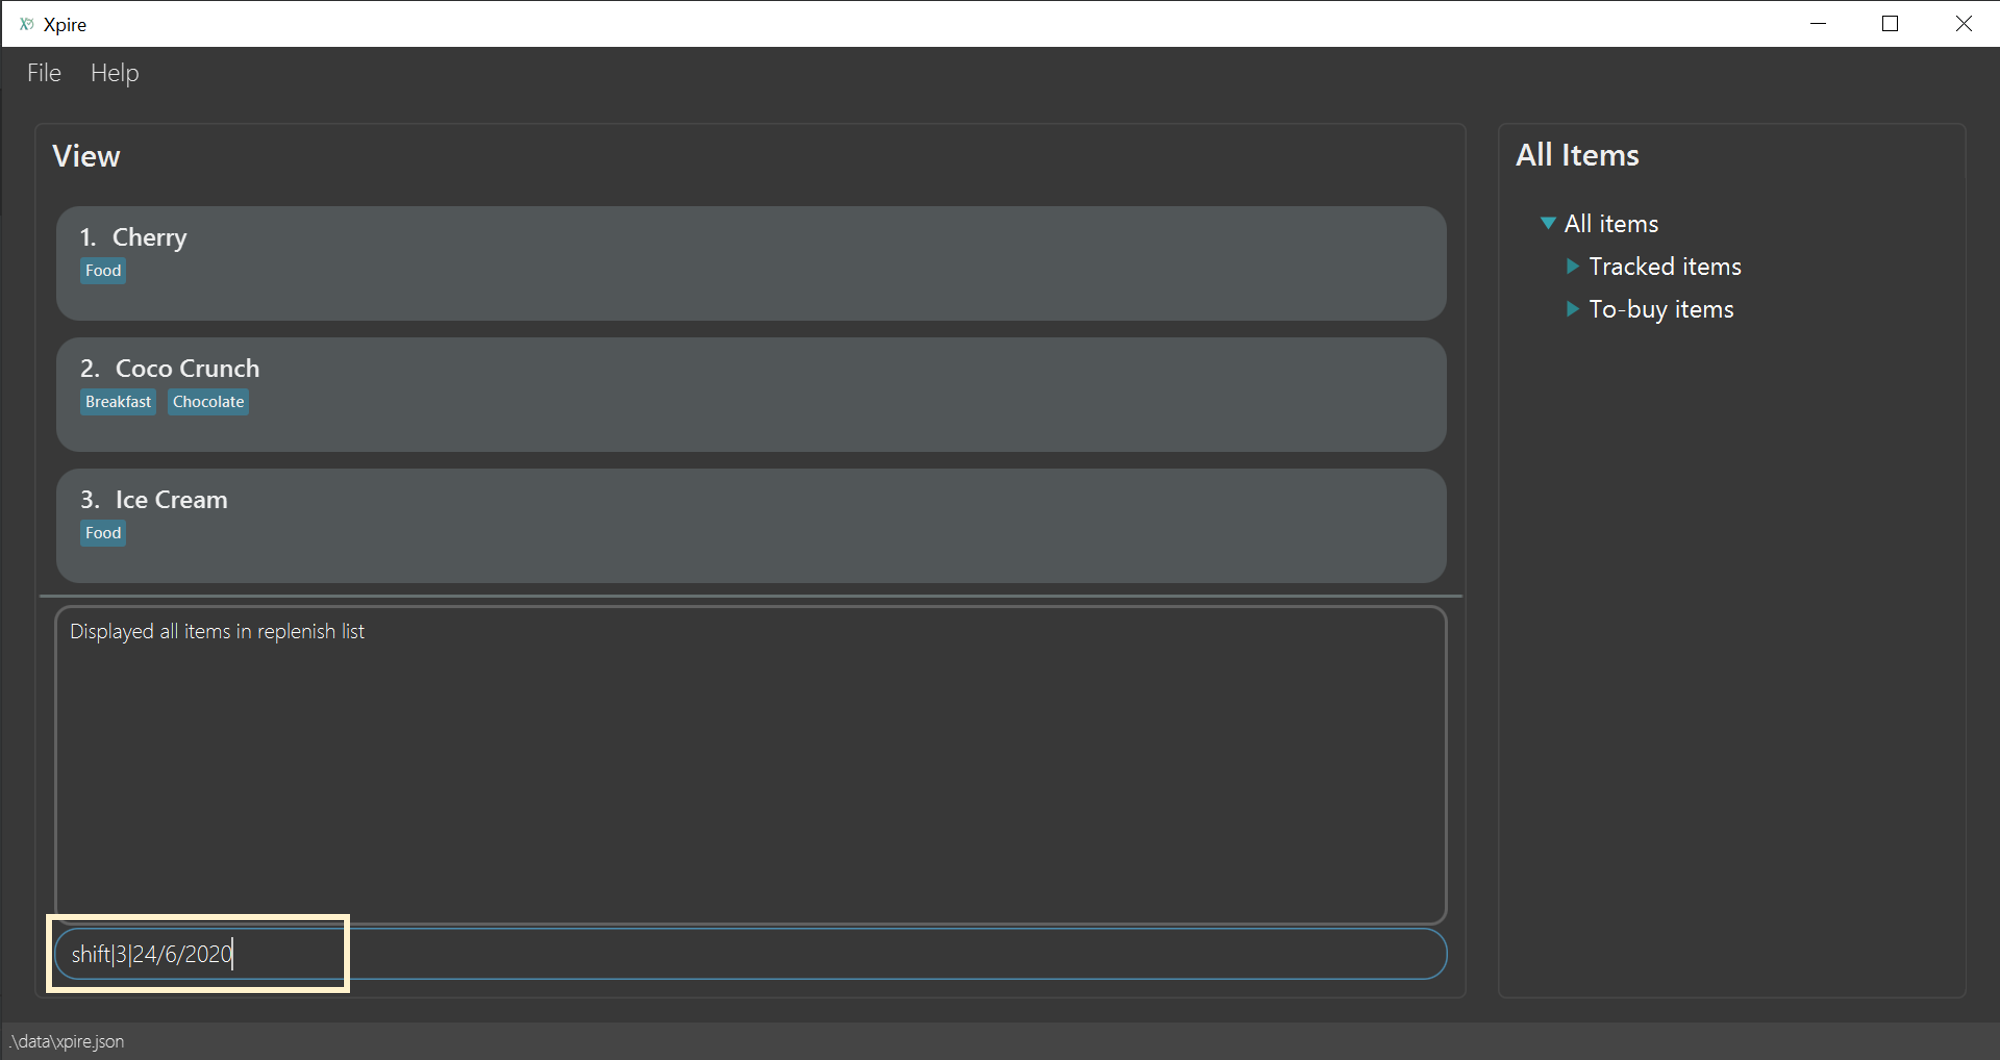
For example, you have just replenished the ice cream and you wish to keep track of its expiry date again.
To transfer the ice cream back to the tracking list, simply key in shift|3|<expiry date>[|<quantity>].
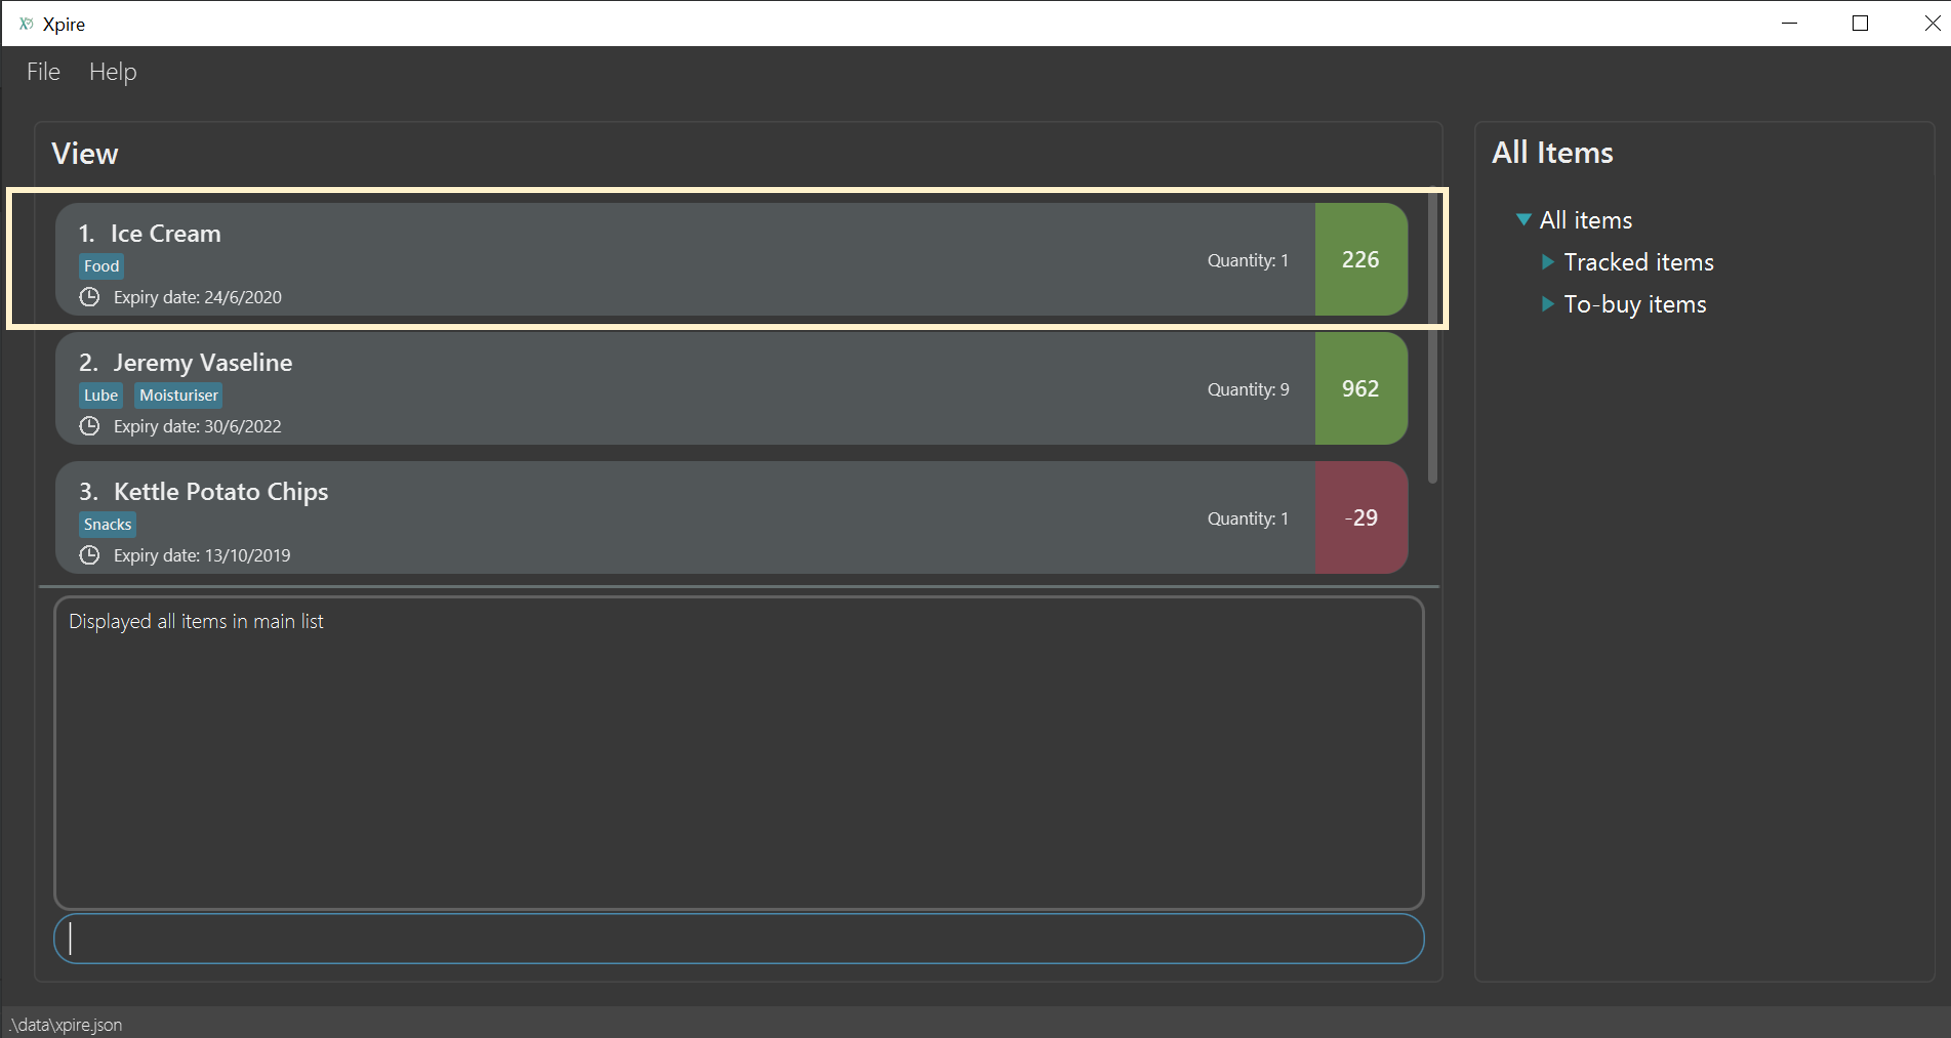
Now, the ice cream that you just bought is added back to the tracking list.
| If you only have one of a particular item, you only need to key in the item number and expiry date (without keying in the quantity)! We’ll do the rest for you. |
Reducing the quantity of an item
If you would have used up a certain amount of your item, you can use the delete command.
By specifying the item number and the quantity to be reduced, you can easily decrease your item’s quantity in the tracking list.
Format: delete|<index>|<quantity>
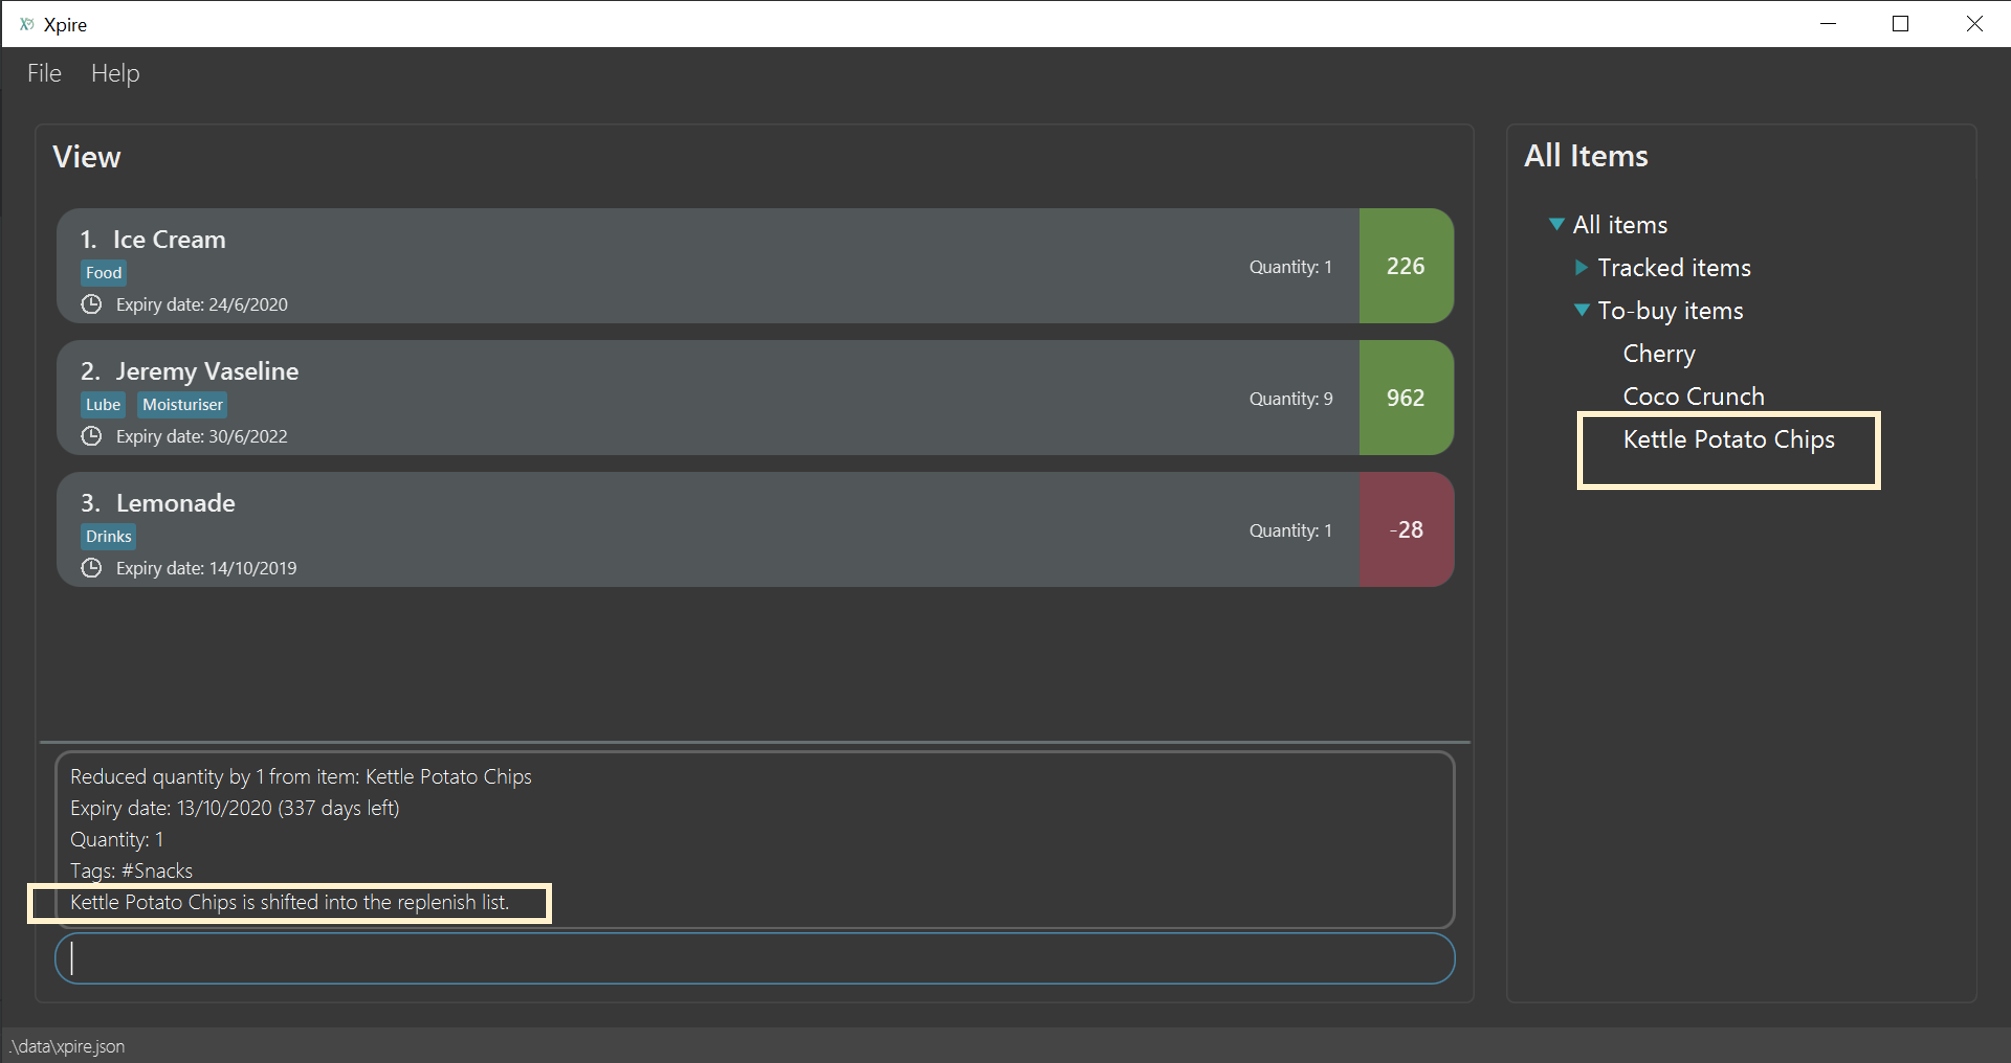
Let’s say you have just consumed the entire bag of Kettle potato chips as shown in the list below.
Now, you no longer have any more potato chips, so you would like to update the item quantity on the tracking list.
To update the potato chips with the new quantity, simply key in delete|3|1.
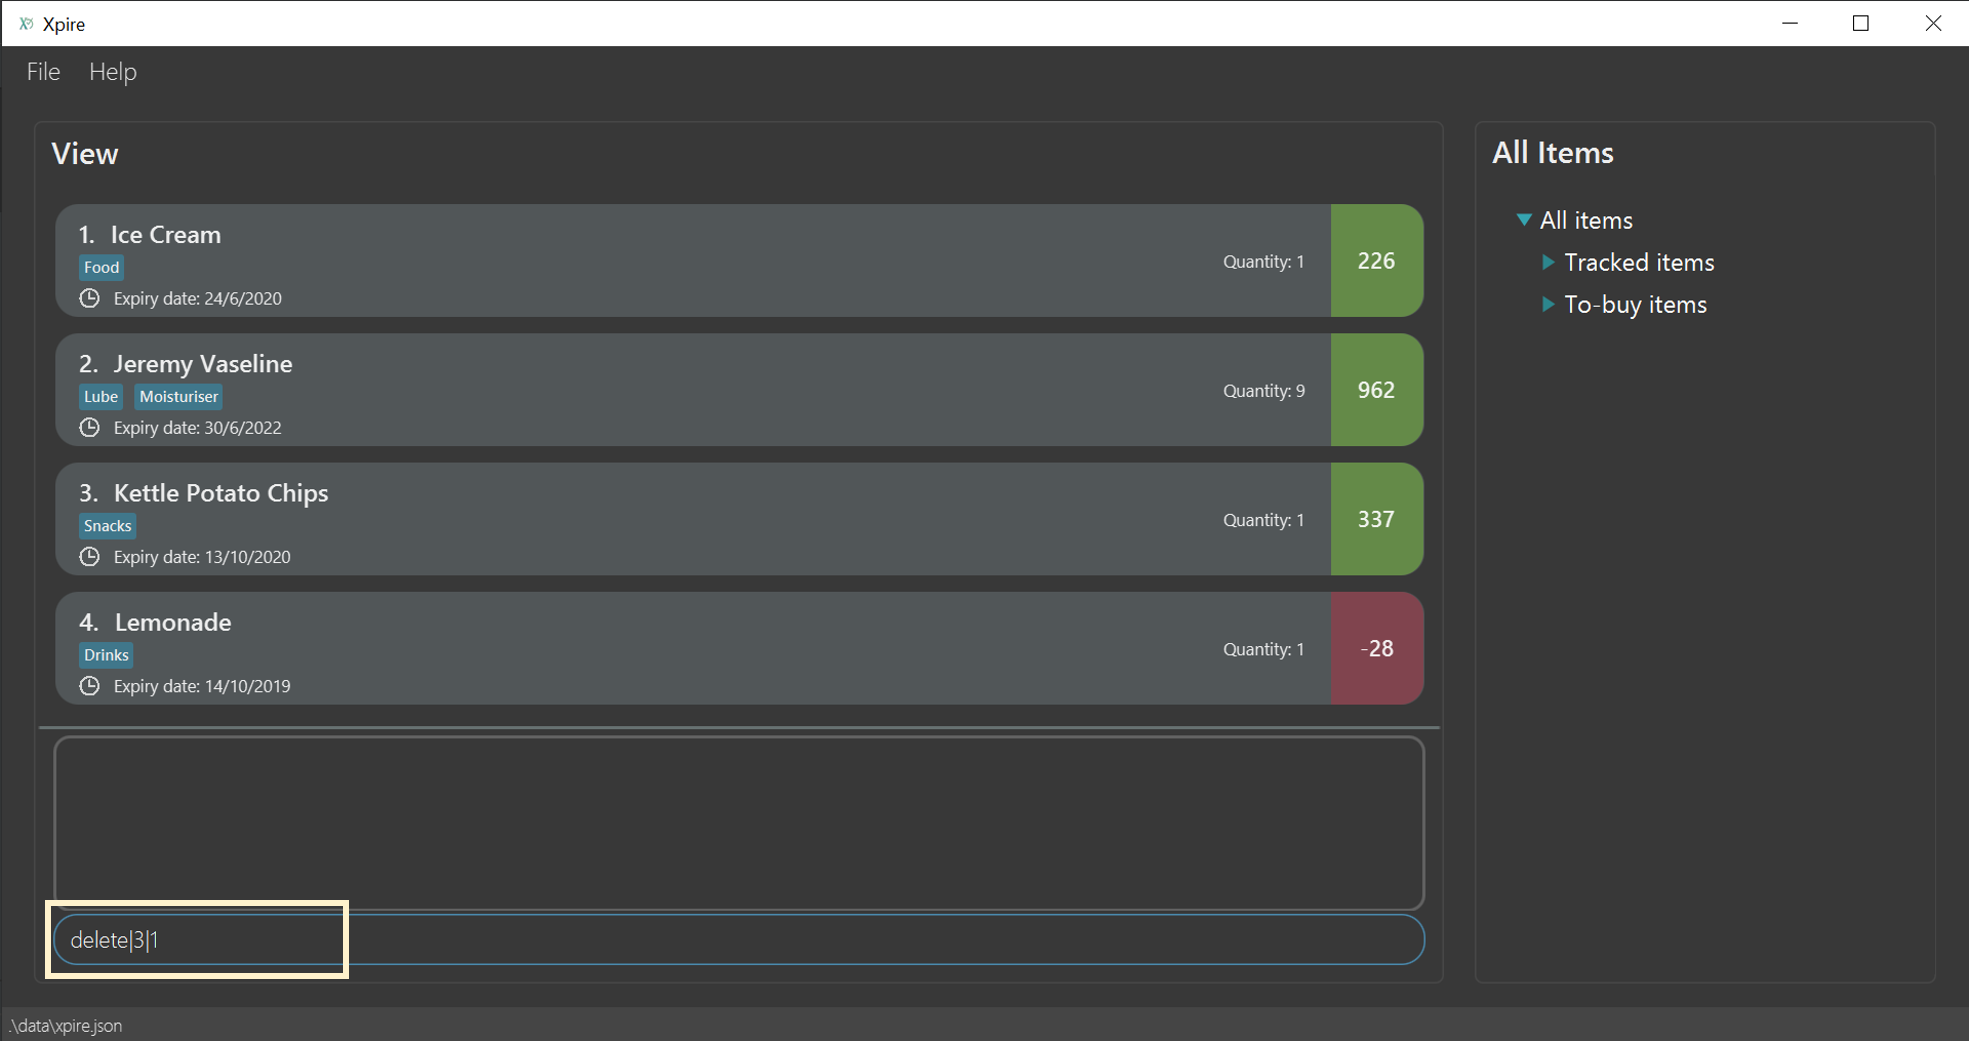
Since the item has run out, you would also like to add it to the replenish list so that you will be reminded to stock up on it. To save you the trouble of keying in the details again, our system has already automatically added the chips to the replenish list for you.
Contributions to the Developer Guide
Given below are sections I contributed to the Developer Guide. They showcase my ability to write technical documentation and the technical depth of my contributions to the project. |
Items in replenish list and main list
Items in the replenish list with only Name and Tag fields are represented by the Item class.
On the other hand, items in the main list with additional fields such as ExpiryDate,
Quantity and ReminderThreshold are represented by the XpireItem class.
To utilise the concept of inheritance and reduce duplicate data and methods, XpireItem is written to inherit from Item.
This relationship can be observed from the diagram below.
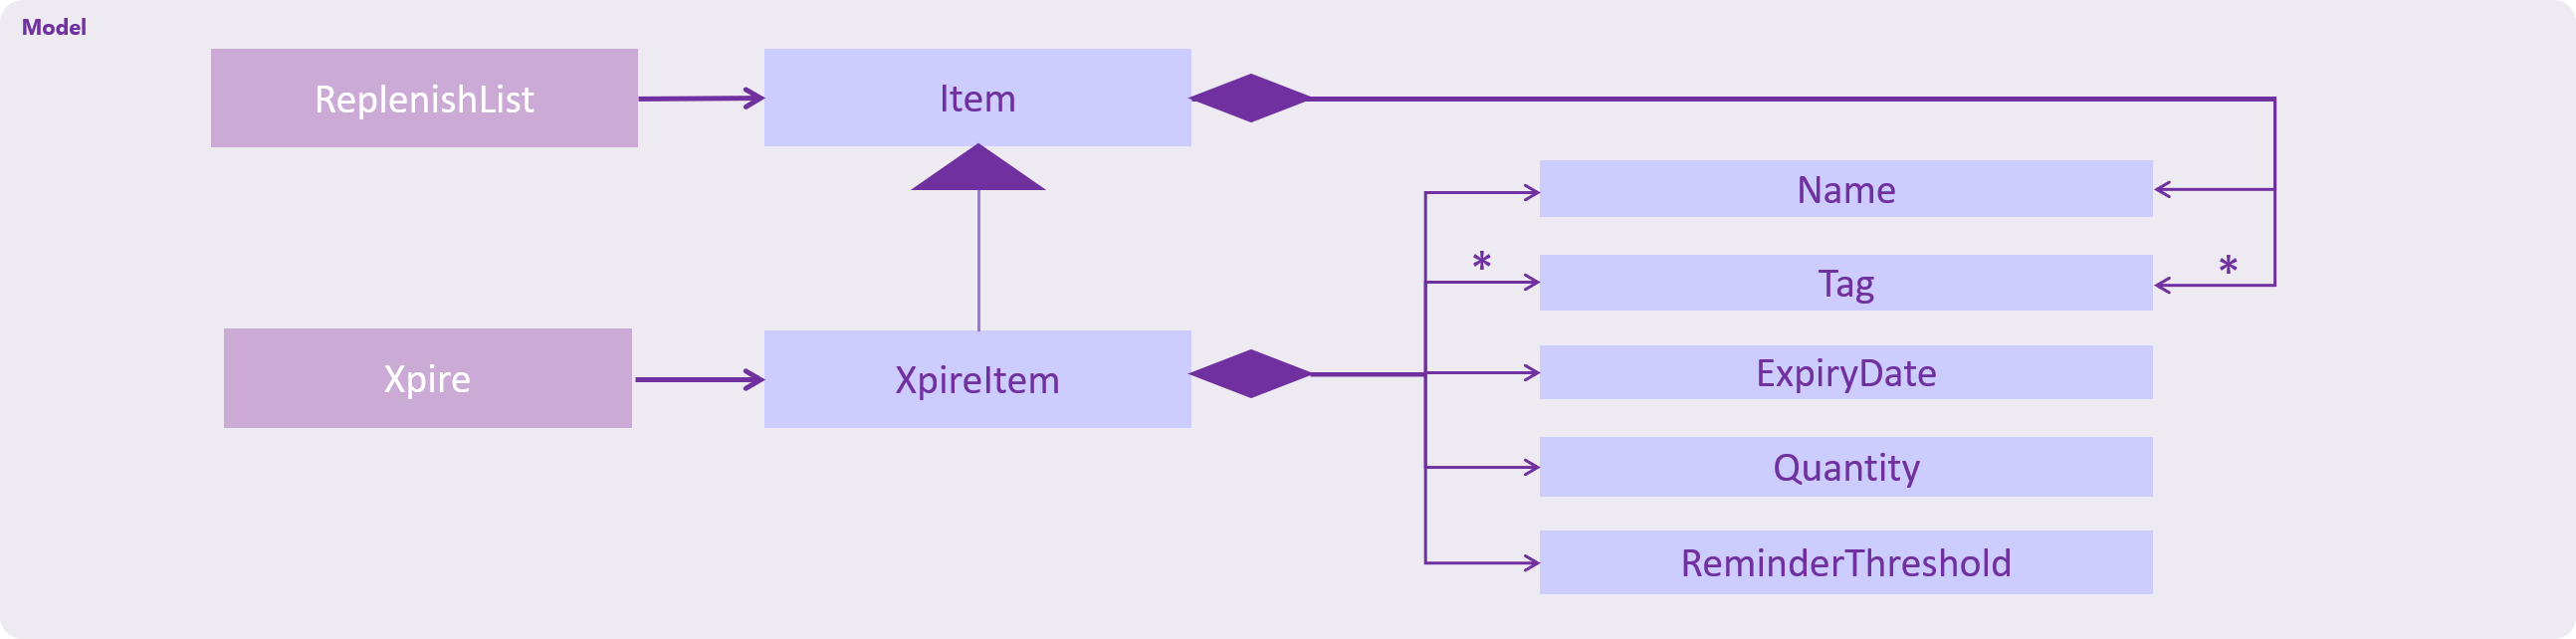
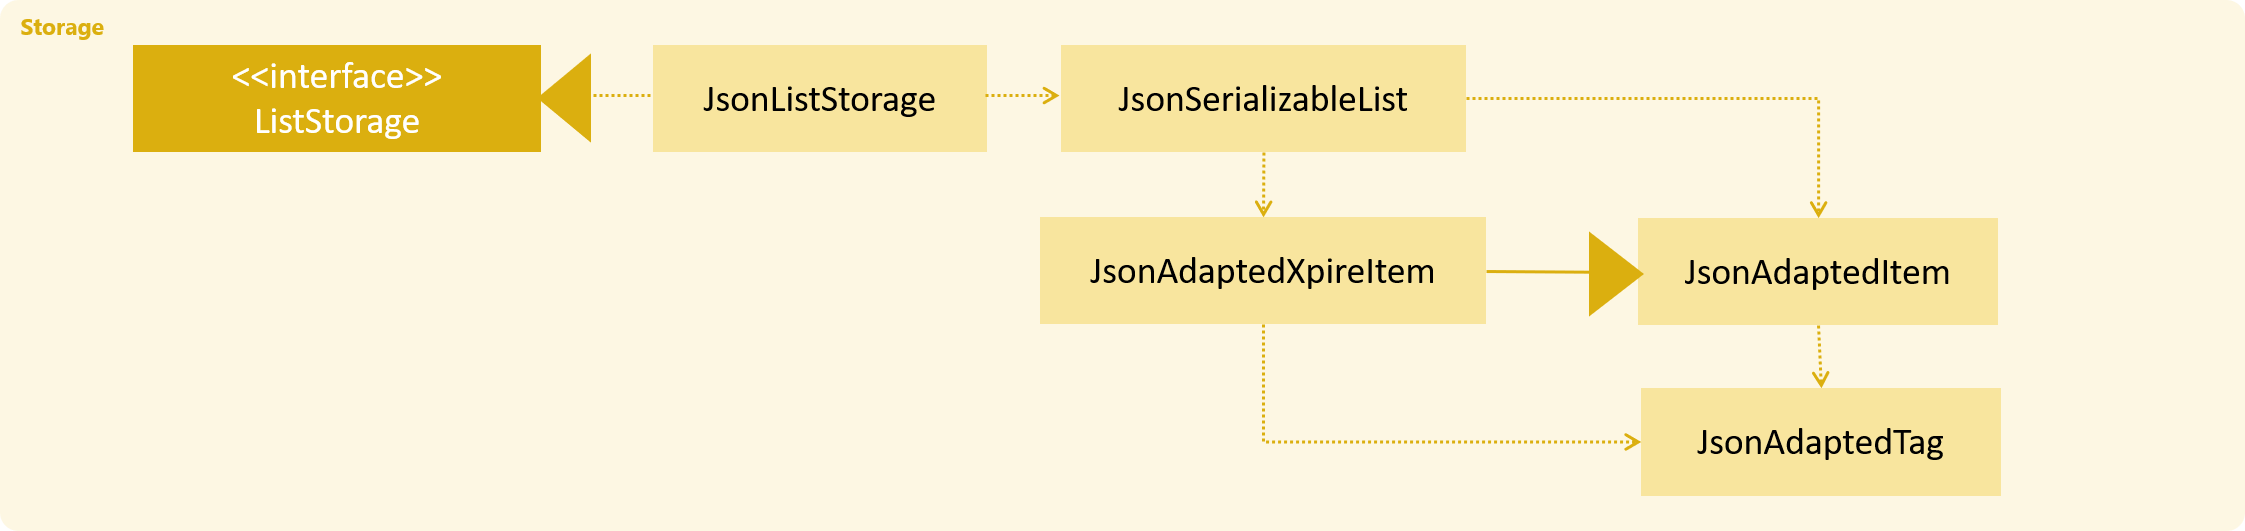
XpireItem from Item.Storage of items in the replenish list
An XpireItem is converted to a JsonAdaptedXpireItem whereas an Item is converted to a JsonAdaptedItem for storage.
To store both the replenish list and main list in a single JSON file, both lists are wrapped in the JsonSerializableList class
for serializing and deserializing using the Jackson Library.
Design Considerations
Aspect: Storage of replenish list and main list
-
Alternative 1 (current choice): Store both lists in the same JSON file
-
Pros: Updating the storage would be less cumbersome as only one file needs to be read and written into.
-
Cons: Challenging to find a suitable and efficient data structure that wraps both lists for storage into a single file.
-
-
Alternative 2: Store both lists as separate JSON files
-
Pros: Easier to implement as there is no need to find a data structure to wrap both lists for storage.
-
Cons: Makes updating the storage troublesome as both files need to be updated at the same time for any changes made to the lists.
-
Moving items in the main list into the replenish list
An XpireItem in the main list can be transferred to the replenish list using the ShiftToReplenishCommand.
Any XpireItem whose quantity is 0 will also be automatically added to the replenish list.
Implementation
When the user executes a ShiftToReplenishCommand, the target item in the main list will be adapted from a XpireItem into an Item.
The adapted item will be subsequently added to the replenish list, while the target item is removed from the main list.
The following sequence diagrams demonstrate how the command makes changes to both the main list and replenish list.
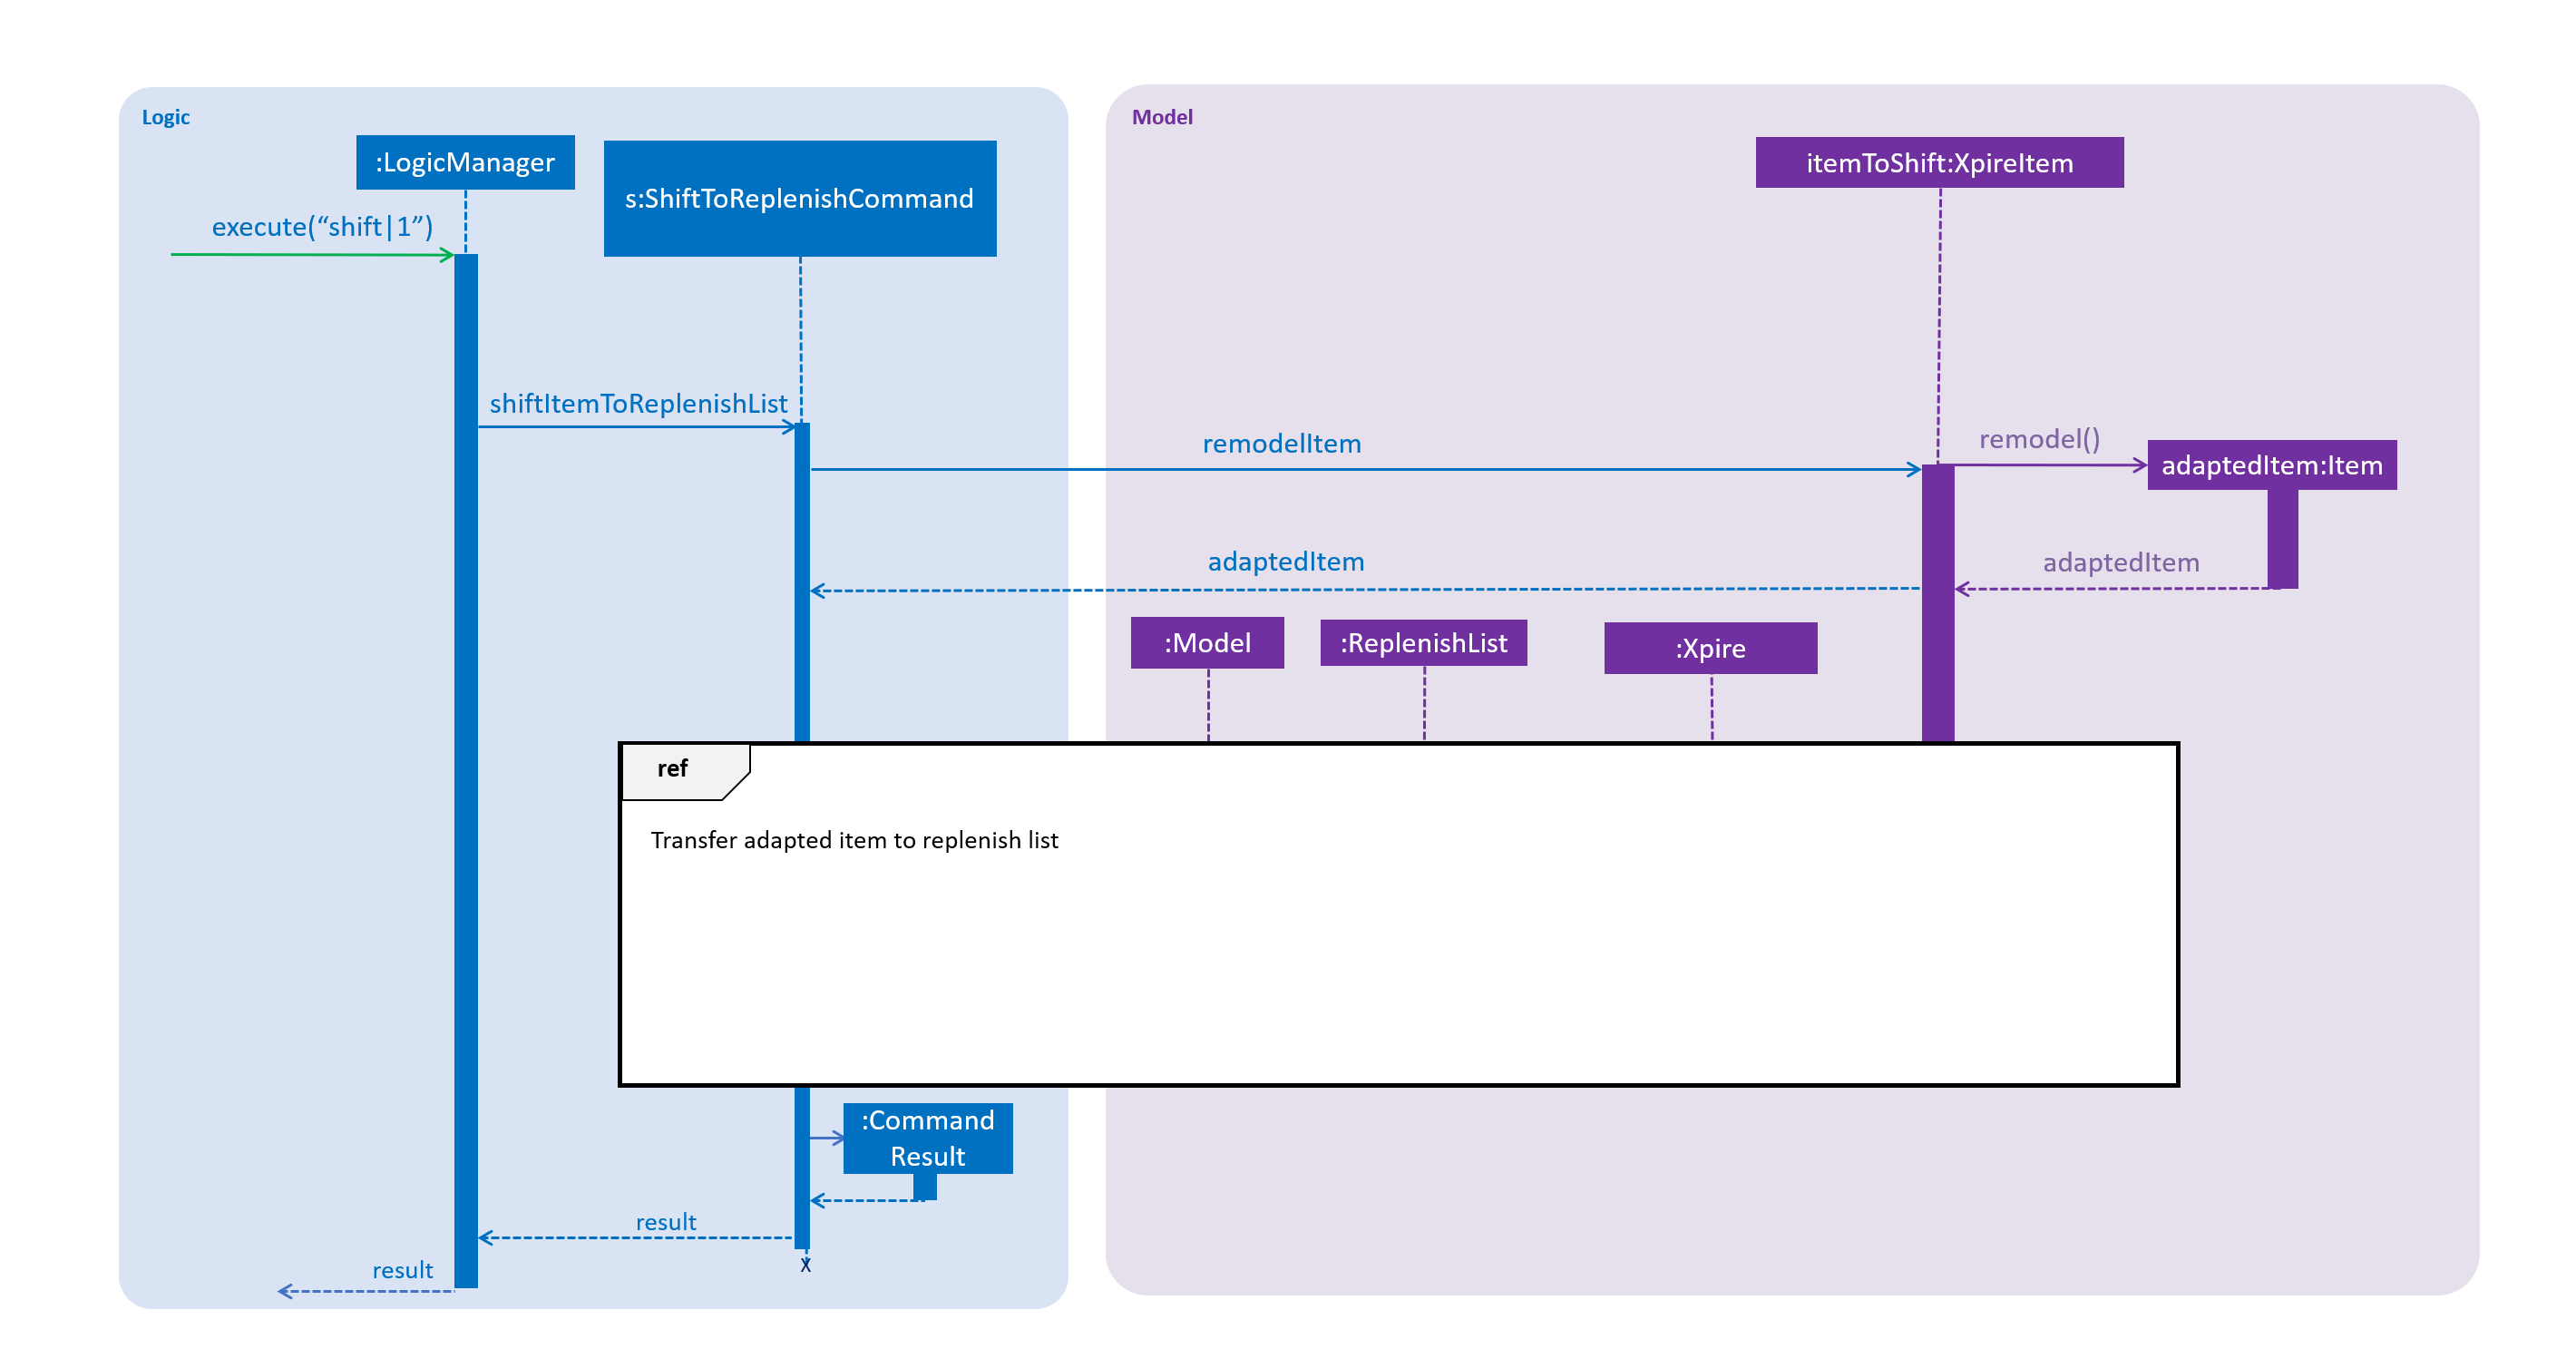
ShiftToReplenishCommand.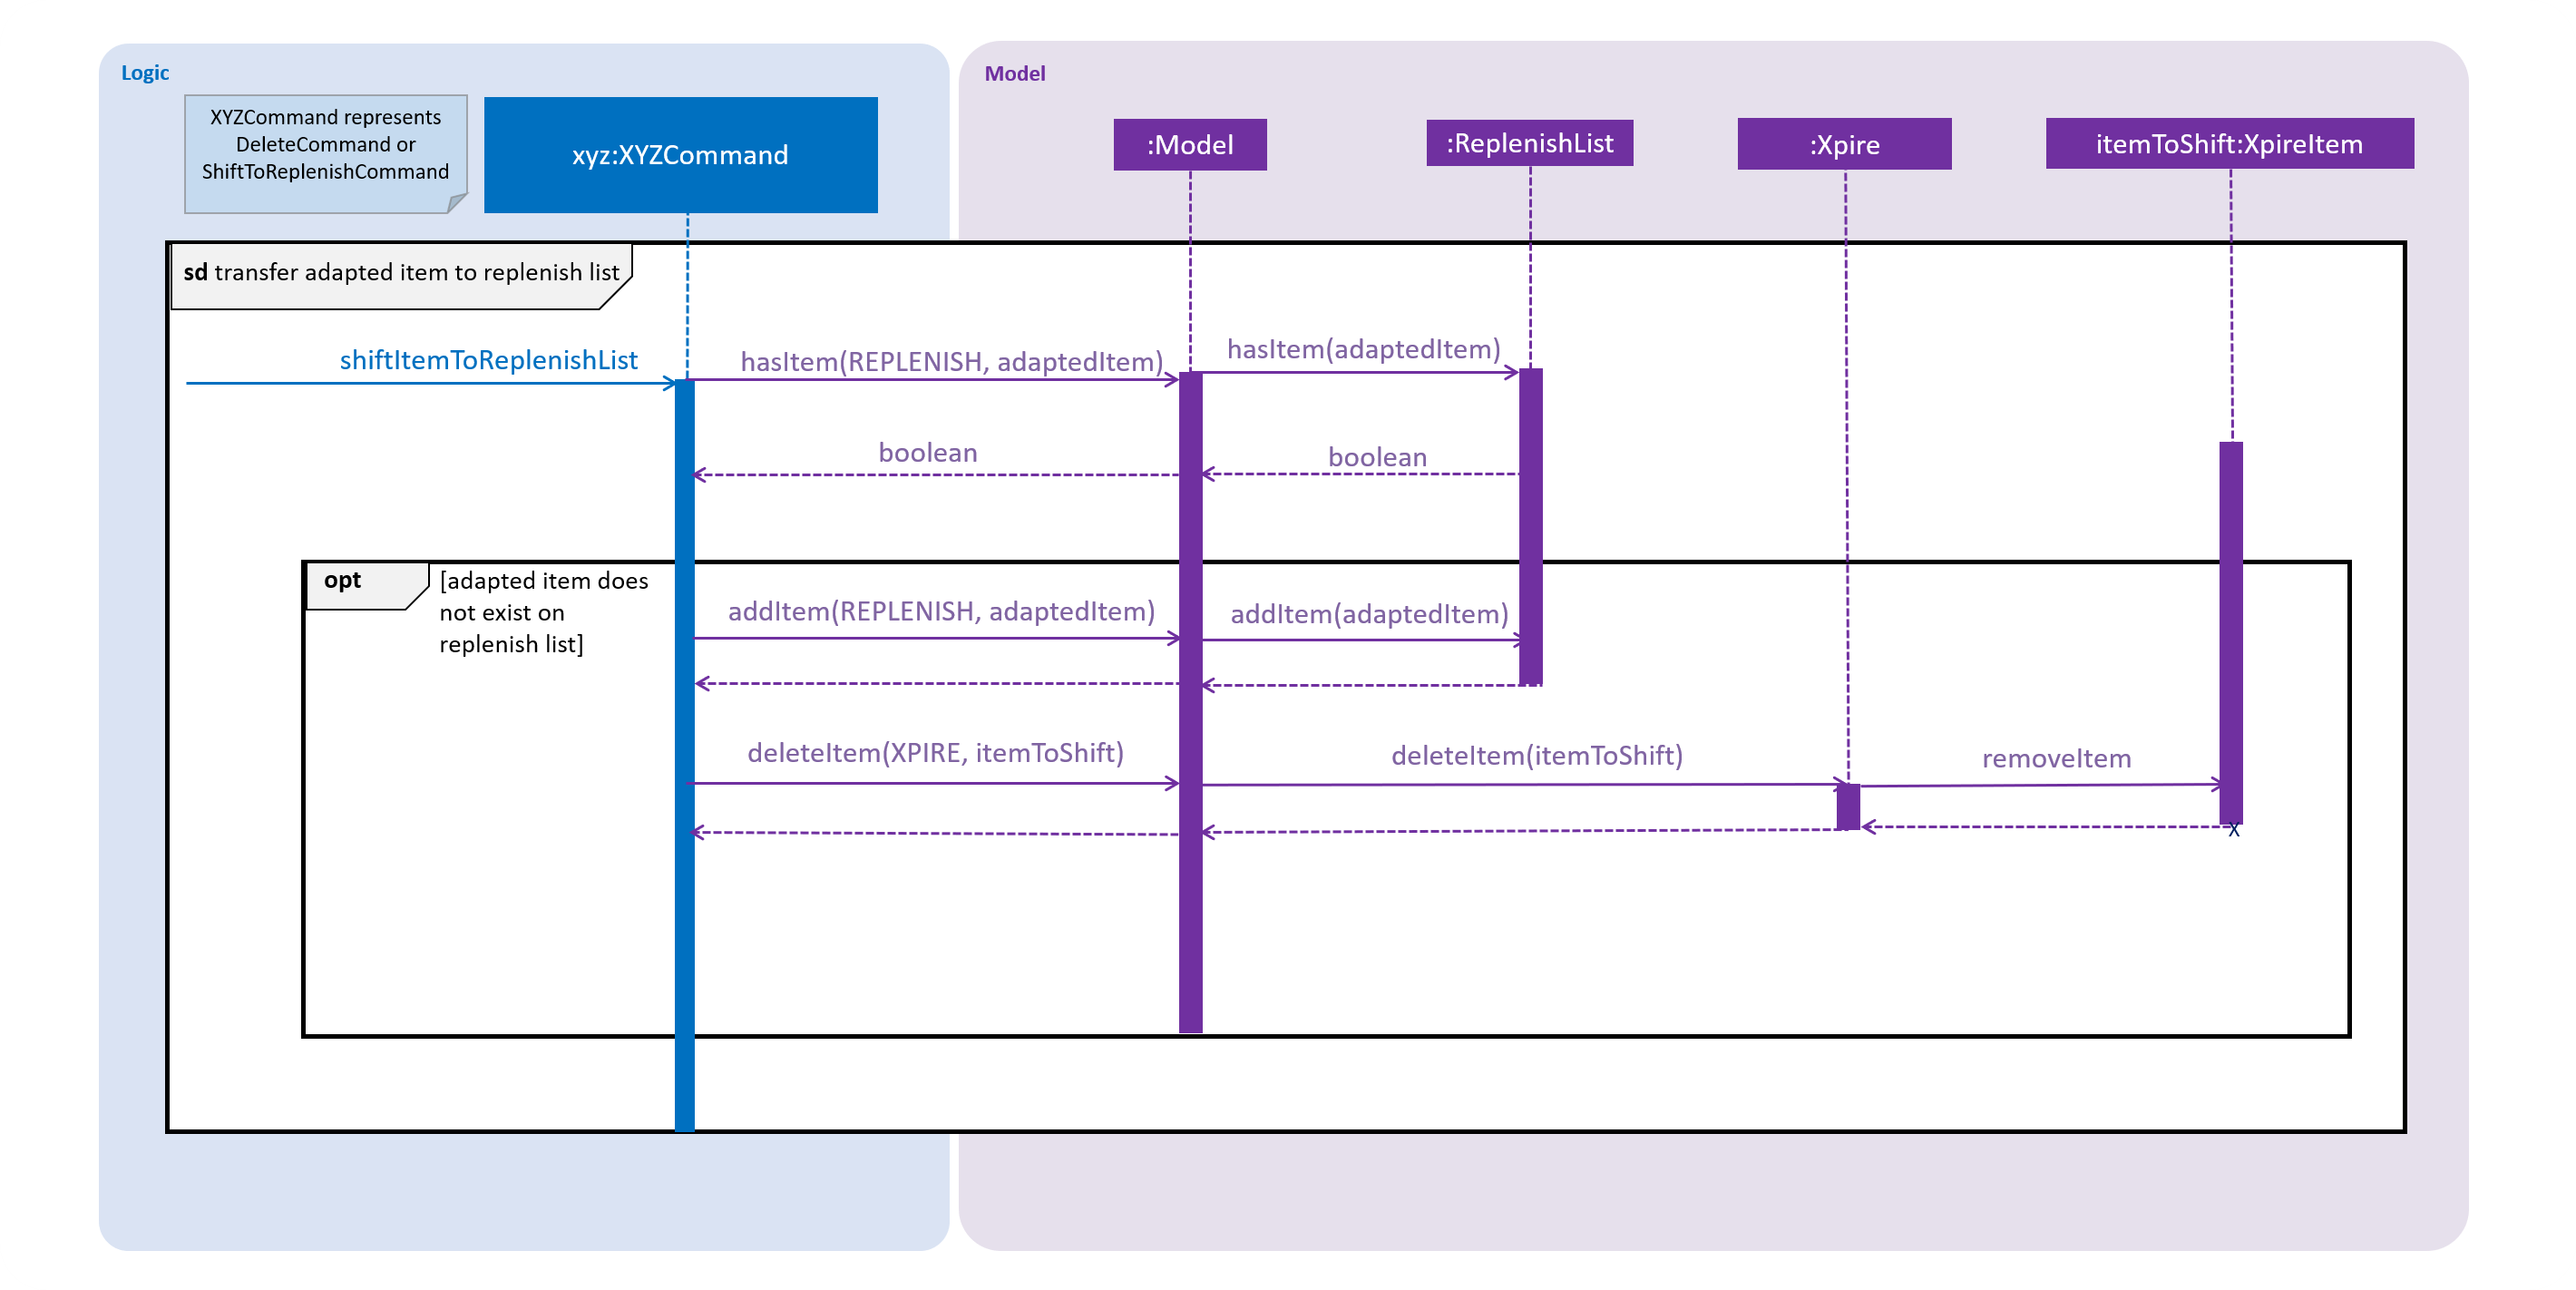
When the user executes a DeleteCommand to reduce the Quantity of an XpireItem to 0, the item is automatically
shifted to the replenish list. The item shift is demonstrated in the activity diagram below.
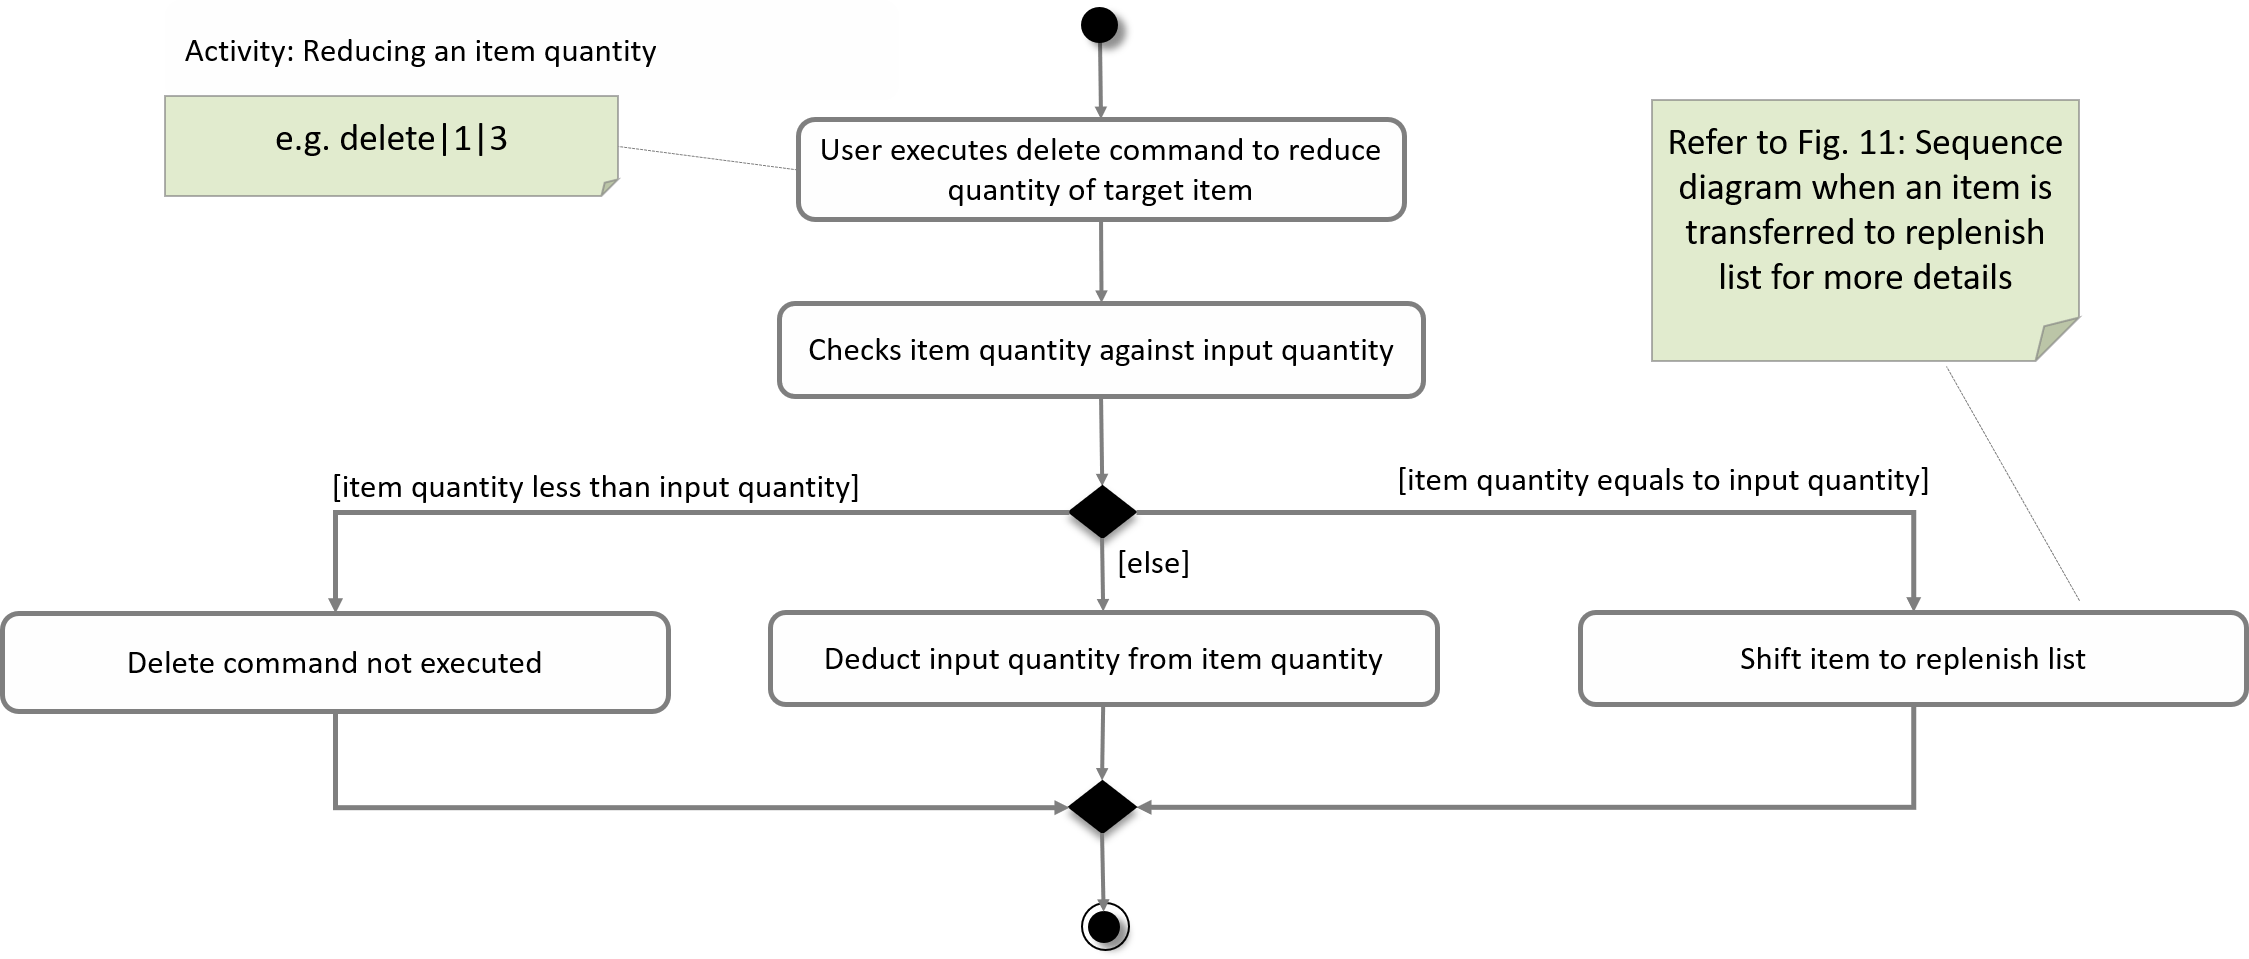
The shift would not be successful if an item with the same Name already exists on the replenish list.
The user would be prompted to delete the existing item in the replenish list in order to add the target item into the replenish list.
|
Moving items in the replenish list to the main list
On the other hand, items can be transferred into the main list using the ShiftToMainCommand.
The following activity diagram summarises how the command works:
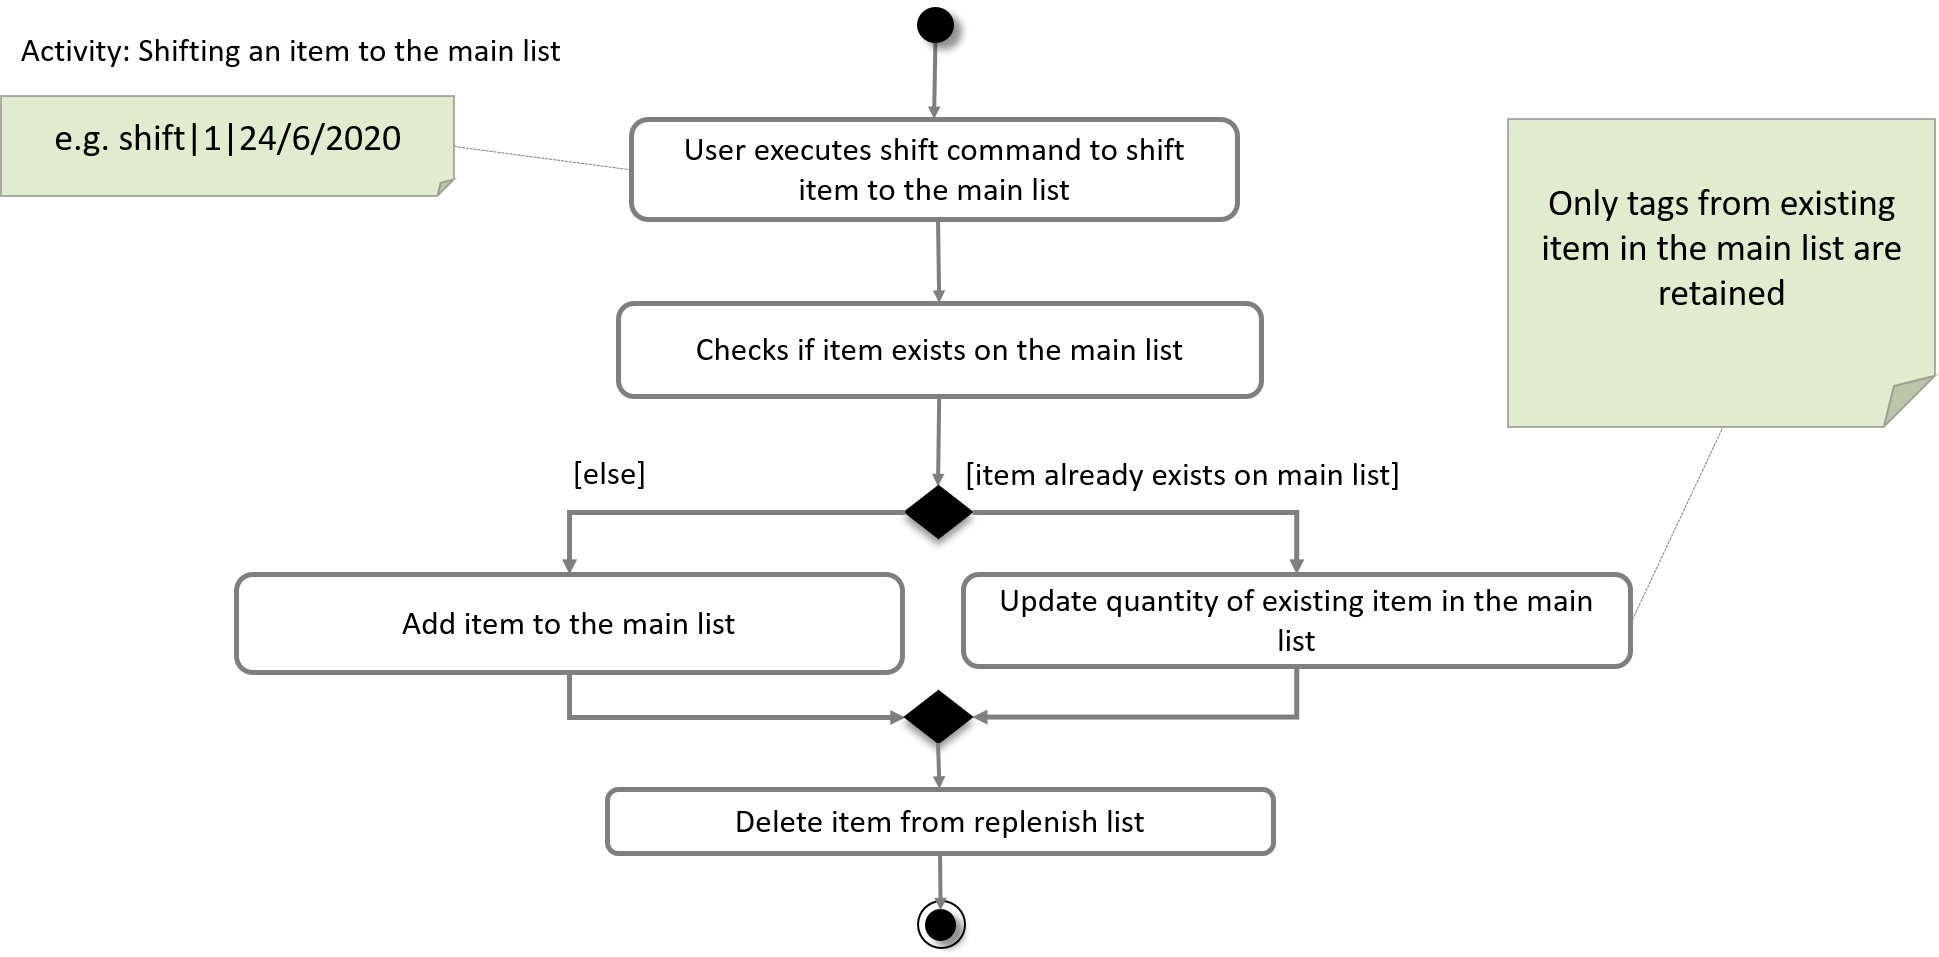
ShiftToMainCommand.When utilising the ShiftToMainCommand, the user would have to input the item’s ExpiryDate and Quantity (optional)
so that the Item can be adapted into an XpireItem.
If an item with the same Name and ExpiryDate already exists on the main list, the Quantity of the item would be updated.
However, only the tags of the item on the main list will be retained.
|
Design Considerations
Aspect: Handling of items that have run out
-
Alternative 1 (current choice): Automatically shift an item to the replenish list when the item’s quantity reaches 0
-
Pros: User does not need to input any command to perform the shifting, making the user experience more fuss-free.
-
Cons: User has to delete the item from the replenish list if the user does not want to stock up on the item in future.
-
-
Alternative 2: Delete item from the main list without any shift
-
Pros: Items that the user may not want to replenish will not be automatically added to the replenish list.
-
Cons: User has to go through the trouble to key in details of an item that was already in the main list.
-